Lemon Bars Recipe for Bright and Buttery Dessert Squares
Lemon bars have been a favorite at bake sales and family gatherings for generations, loved for how they balance sweet and tart in every bite.
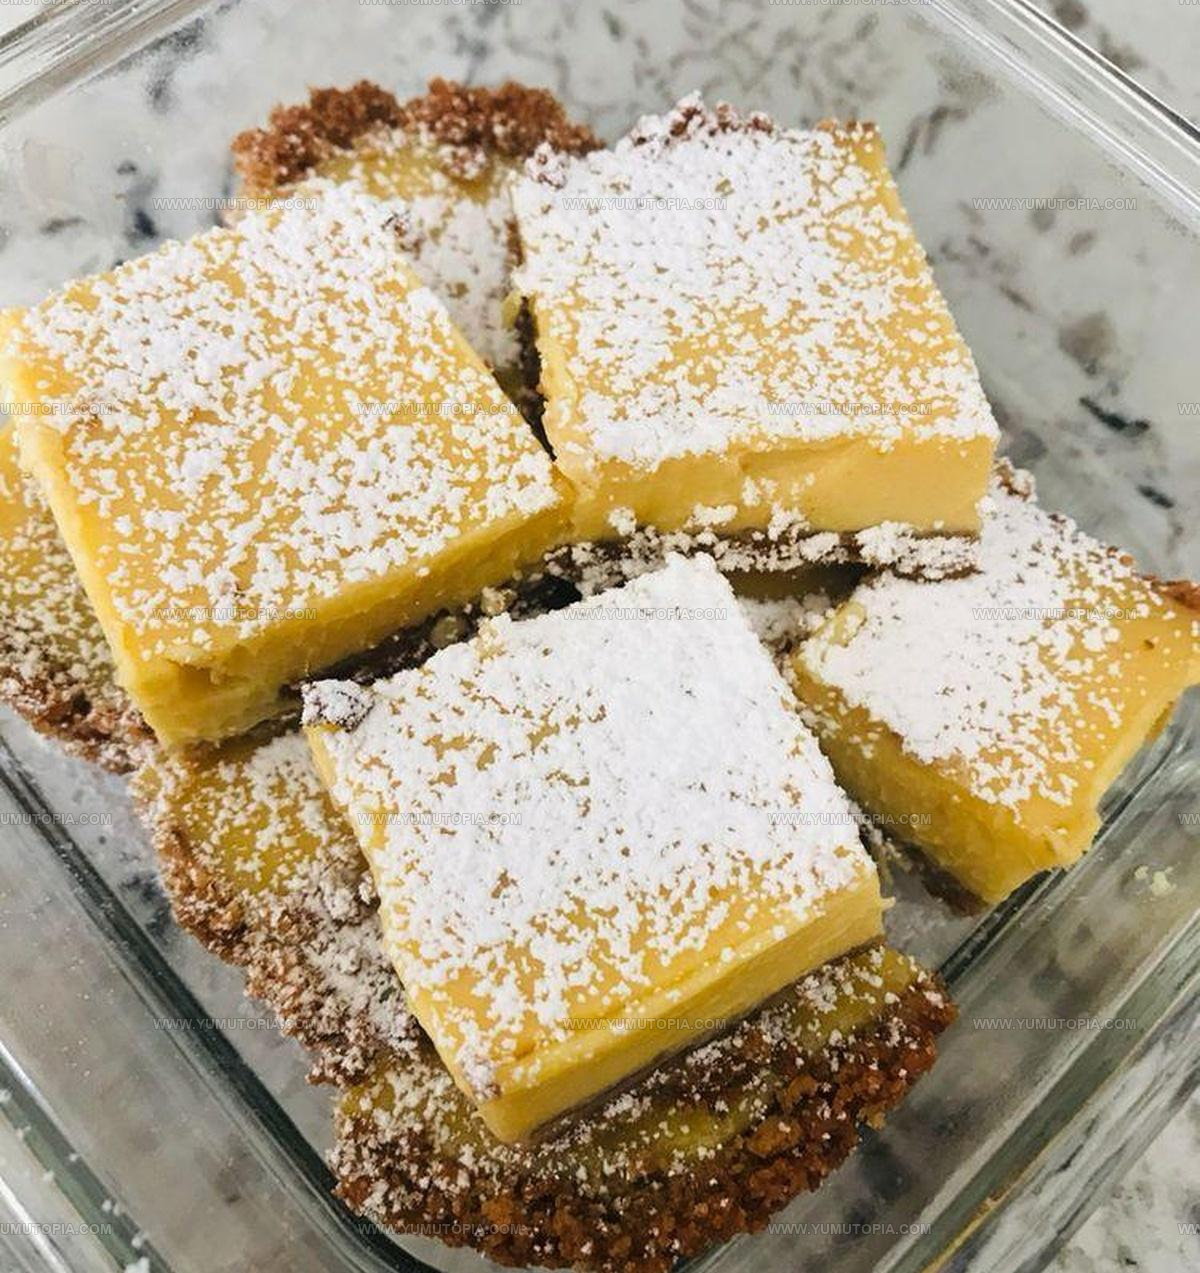
Something about that smooth filling paired with a buttery base makes them feel both simple and special at the same time.
They work beautifully for spring brunches, summer picnics, or anytime you want dessert that feels light yet satisfying.
You can count on them to brighten any occasion without being too heavy or overly complicated to prepare.
They’re also wonderful because they slice neatly, travel well, and look impressive on any serving platter.
Even when you need something crowd-pleasing but not fussy, they never disappoint.
The contrast between the crisp bottom and creamy topping creates a texture that keeps everyone coming back for seconds.
Scroll down to find the full details and start baking today.
Why Creamy Tart Lemon Bars Always Deliver
Creamy Lemon Bar Ingredient Essentials
Crust Ingredients:Filling Ingredients:Equipment For Creamy Tart Lemon Bars
Preparing Creamy Tart Lemon Bars Step by Step

Prepare Baking Pan
Grab a 9×13 inch pan and line it with parchment paper. Smear a tiny bit of butter on the pan first so the paper sticks nicely. Make sure the paper hangs over the sides – this will help you lift out those delicious bars later.
Create Crust Base
Toss 1 3/4 cups flour, 2/3 cup confectioners sugar, and 3/4 tsp salt into a food processor. Drop in 12 tbsp unsalted butter cut into 1-inch pieces. Pulse everything until it looks like coarse sand. Spread this crumbly mixture into your prepared pan, pressing firmly to create an even layer that climbs slightly up the sides.
Chill and Bake Crust
Slide the pan into the refrigerator for 30 minutes. Then heat your oven to 350°F. Bake the crust for 20-25 minutes until it turns a soft golden color.
Mix Lemon Filling
Whisk together the filling ingredients in a bowl:
Blend everything until smooth and well combined.
Bake Lemon Bars
Lower the oven temperature to 325°F. Pour the lemon mixture over the hot crust. Bake for 20 minutes, checking that the filling feels set when you tap it gently.
Cool and Slice
Let the bars cool on a rack for about 30 minutes. Use the parchment paper handles to lift the entire batch onto a cutting board. Slice into whatever size squares make you happy.
Cook Smarter With Creamy Tart Lemon Bars
Flavor Options for Creamy Tart Lemon Bars
How To Serve Creamy Lemon Bars
Proper Storage for Creamy Tart Lemon Bars
Creamy Tart Lemon Bars Helpful FAQs
Can I use bottled lemon juice instead of fresh?
Fresh lemon juice delivers the brightest flavor. Bottled works in a pinch, but your bars won’t taste as vibrant and zesty.
Do I really need to chill the crust?
Yes! Chilling helps prevent shrinking and creates a more tender, flaky base that holds together perfectly when you cut your bars.
What if my butter is too cold?
Let butter sit at room temperature for 10-15 minutes. Softened butter blends more smoothly into the crust and creates a better texture.
How thin should the crust layer be?
Press the crust evenly across the pan bottom and slightly up the sides, about 1/2 inch thick. A uniform layer ensures consistent baking and texture.
Can these bars be made ahead of time?
Absolutely! These lemon bars keep well in the refrigerator for 3-4 days when stored in an airtight container between layers of parchment paper.
Why does the recipe use both butter and milk?
Butter adds rich flavor, while milk contributes to the creamy, smooth filling that makes these bars so delectable.

Bakery-Classic Lemon Bars Recipe
- Total Time: 1 hour 20 minutes – 1 hour 25 minutes
- Yield: 8 1x
Description
Lemon bars bring sunshine to your dessert plate with a silky smooth filling and buttery crust that melts right into your taste buds. Zesty citrus and sweet shortbread create a perfect balance that makes these treats disappear faster than you can slice them.
Ingredients
Base:
- 1 ¾ cups all purpose flour
- ⅔ cup confectioners sugar
- 1 ½ sticks (12 tablespoons) unsalted butter
- ¾ teaspoon salt
Filling:
- 4 large eggs
- 1 ¼ cups granulated sugar
- ⅔ cup lemon juice
- 2 teaspoons lemon zest
Finishing:
- 3 tablespoons all purpose flour
- ⅛ teaspoon salt
- ¼ cup whole milk
- 2 tablespoons unsalted butter
Instructions
- Prepare a 9×13 inch baking pan by lining it with parchment paper. Apply a thin butter layer to help the paper stick securely.
- Combine 1 ¾ cups flour, ⅔ cup confectioners sugar, and ¾ tsp salt in a food processor. Pulse 12 tablespoons butter into the mixture until it resembles coarse meal.
- Press the crust mixture evenly across the pan bottom, creating a slight ½-inch upward edge. Refrigerate for 30 minutes.
- Preheat your oven to 350°F. Bake the crust for 22 minutes until it turns light golden brown.
- Whisk 4 large eggs, 1 ¼ cups granulated sugar, and 2 teaspoons lemon zest in a medium bowl. Incorporate 3 tablespoons flour and ⅛ teaspoon salt.
- Mix ⅔ cup lemon juice, ¼ cup whole milk, and 2 tablespoons melted butter into the egg mixture until thoroughly combined.
- Reduce oven temperature to 325°F. Pour the lemon filling over the hot crust.
- Bake for 20 minutes, checking that the filling feels firm when gently touched.
- Cool the pan on a rack for 30 minutes. Lift the bars out using parchment paper edges.
- Transfer to a cutting board and slice into desired serving sizes.
Notes
- Ensure the butter is cold when making the crust for the best flaky texture and easy blending in the food processor.
- Zesting lemons requires a gentle touch to avoid the bitter white pith, so use only the bright yellow outer layer of the skin.
- Chilling the crust helps prevent shrinkage and creates a more stable base for your tangy lemon bars.
- When cutting the bars, use a sharp knife wiped clean between cuts for neat, precise squares that showcase the creamy filling.
- Prep Time: 35 minutes
- Cook Time: 45-50 minutes
- Category: Dessert Bars
- Method: Baking
- Cuisine: American
Nutrition
- Serving Size: 8
- Calories: 235 kcal
- Sugar: 18 g
- Sodium: 130 mg
- Fat: 12 g
- Saturated Fat: 7 g
- Unsaturated Fat: 5 g
- Trans Fat: 0.2 g
- Carbohydrates: 28 g
- Fiber: 1 g
- Protein: 3 g
- Cholesterol: 70 mg
Logan Lemaster
Founder & Culinary Innovator
Expertise
Recipe Development and Innovation, Menu Design and Optimization, Fine Dining Techniques, Ingredient Pairing and Flavor Science
Education
Metropolitan Culinary Arts Institute
Logan’s culinary journey kicked off in his vibrant Chicago family kitchen, where fresh, seasonal ingredients and bold flavors were always front and center.
After graduating from the Metropolitan Culinary Arts Institute in Arlington, Virginia, and honing his skills in renowned restaurants, Logan mastered the art of blending classic techniques with exciting, modern twists.
His kitchen is a dynamic lab for flavor exploration. Through Yum Utopia, Logan aims to empower you to cook with both confidence and creativity, turning simple ingredients into spectacular meals.