
Creamy Oreo Cheesecake Recipe With Cookie Crust
Oreo cheesecake combines two beloved desserts into one show-stopping creation that never fails to impress at any gathering.
Rich, creamy, and beautifully contrasted with dark cookie crumbles, it’s become a go-to choice for celebrations and casual dinners alike.
The appeal spans generations, making it perfect when you need something that feels both familiar and special.
No complicated techniques stand between you and a dessert that looks like it came from a bakery.
Serving it means watching faces light up as forks cut through layers of pure satisfaction.
It holds up beautifully in the fridge, so making it ahead takes pressure off party day.
Every bite offers that perfect balance of smooth and crunchy textures that keeps everyone coming back for seconds.
Put together something truly memorable that will have friends asking for the recipe before they’ve even finished their slice.
What Makes Oreo Cheesecake So Satisfying
Ingredients Used in Oreo Cheesecake
Oreo Crust:Cheesecake Filling:Ganache Topping:Kitchen Tools Overview for Oreo Cheesecake
How to Prepare Oreo Cheesecake
Crush Oreo Cookies
Grab your food processor and toss in 30 Oreo cookies. Pulse those cookies until they turn into fine, sandy crumbs.
Create Crust
Melt 5 tablespoons of butter and mix it thoroughly with the cookie crumbs.
Press this mixture firmly into the bottom and partway up the sides of a 9-inch springform pan.
Slide the pan into the refrigerator to set while you prepare the next steps.
Prepare Cream Cheese Mixture
Take 3 packages of 8-ounce cream cheese (make sure they’re softened) and beat them in a large mixing bowl until they become smooth and fluffy.
Add 4 large eggs one at a time, mixing completely after each addition.
Add Sweet Touches
Stir in 1 cup of granulated sugar and 2 teaspoons of vanilla extract. Scrape down the sides of the bowl to ensure everything gets mixed evenly.
Incorporate Oreo Chunks
Gently fold 25 broken Oreo cookies into the cream cheese mixture. Break them into chunks so you get nice surprising bits throughout the cheesecake.
Bake the Cheesecake
Preheat your oven to 325°F. Pour the cheesecake mixture into the prepared Oreo crust. Bake for 60-70 minutes, watching for the edges to set while the center remains slightly soft.
Cool and Rest
Remove the cheesecake from the oven and let it cool completely at room temperature. This helps prevent cracking and ensures a smooth texture.
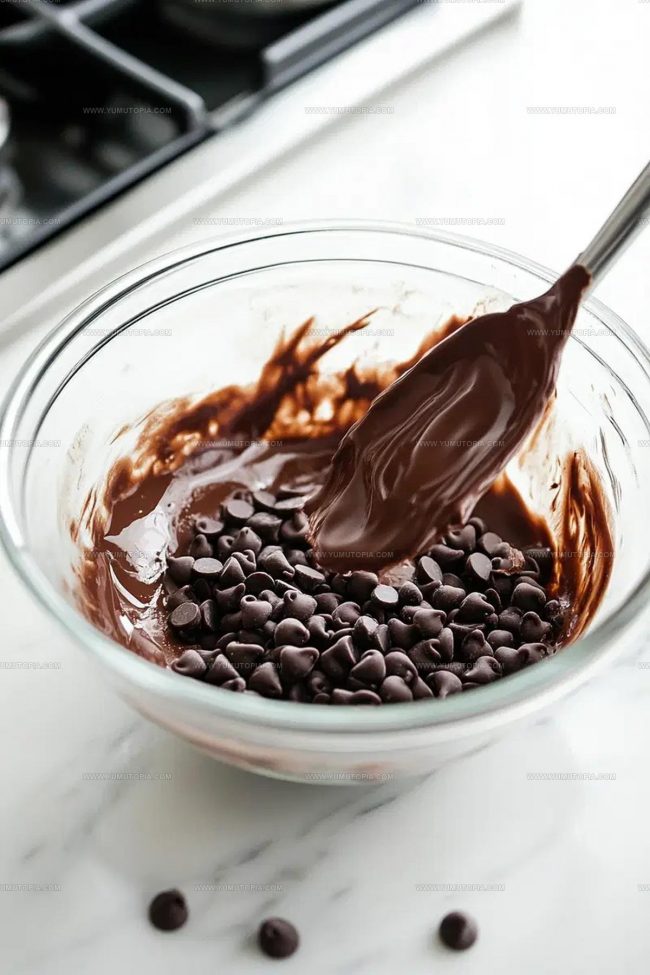
Create Chocolate Ganache
In a saucepan, prepare the ganache by heating the ingredients:
Heat until the mixture starts simmering. Pour over 1/2 cup semi-sweet chocolate chips in a bowl. Stir until smooth.
Finish Ganache
Stir in:
Mix until completely combined and glossy.
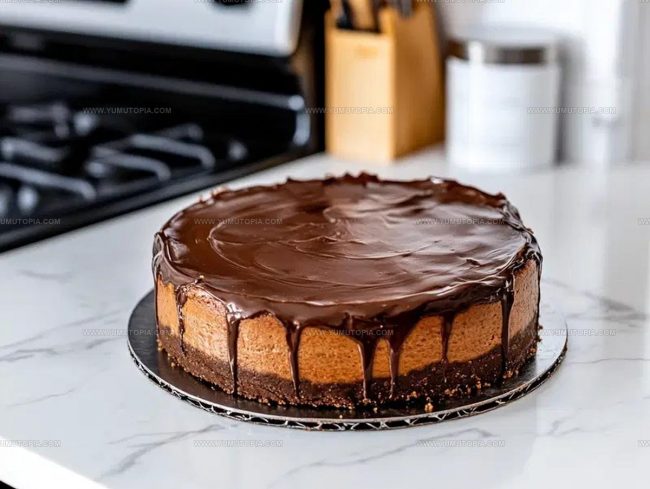
Final Touch
Spread the ganache evenly over the completely cooled cheesecake. Refrigerate for at least 1 hour before serving to let everything set perfectly.
Smart Notes for Oreo Cheesecake
Flavorful Options for Oreo Cheesecake
Classic Serving Ideas for Oreo Cheesecake
Proper Storage For Oreo Cheesecake
Oreo Cheesecake Q&A
Can I use reduced-fat Oreos for the crust?
Regular Oreos work best for maximum flavor and texture. Reduced-fat versions can make the crust less stable and might not provide the same rich taste.
How do I prevent my cheesecake from cracking?
Always beat cream cheese until smooth, add eggs one at a time, and avoid overmixing. A water bath can also help prevent cracks during baking.
What if my ganache looks lumpy?
Ensure chocolate is chopped finely and cream is hot when you pour it. Stir consistently until completely smooth and glossy.
Can this cheesecake be frozen?
Wrap tightly in plastic wrap and freeze for up to 3 weeks. Thaw overnight in the refrigerator before serving.
Do I need a food processor to make the crust?
No, you can place Oreos in a sealed plastic bag and crush with a rolling pin until fine crumbs form.
How do I know when the cheesecake is perfectly baked?
The edges should look set, but the center will still be slightly soft. It should not appear liquid or extremely jiggly when gently shaken.

Bakery-Style Oreo Cheesecake Recipe
- Total Time: 1 hour 25 minutes
- Yield: 10 to 12 1x
Description
Oreo Cheesecake brings creamy chocolate cookie magic straight to your dessert table with zero bakery skills required. Crumbly Oreo crust and silky smooth filling guarantee a knockout treat that disappears faster than you can slice it.
Ingredients
Main Ingredients:
- 3 8 oz packages cream cheese
- 4 large eggs
- 1 cup granulated sugar
- 30 Oreo cookies
- 25 Oreo cookies
Supporting Ingredients:
- 5 tablespoons butter
- 2 teaspoons vanilla extract
Finishing Ingredients:
- ½ cup semi-sweet chocolate chips
- 4 tablespoons butter
- ¼ cup heavy whipping cream
- ½ teaspoon vanilla extract
- 1 tablespoon powdered sugar
Instructions
- Crush 30 Oreo cookies into fine crumbs using a food processor. Mix thoroughly with 5 tablespoons melted butter until completely combined.
- Press the buttery cookie mixture firmly into the bottom and slightly up the sides of a 9-inch springform pan. Refrigerate the crust while preparing the filling.
- Heat your oven to 325°F. Ensure the rack is positioned in the center.
- Place 3 packages of softened cream cheese in a large mixing bowl. Beat with an electric mixer for 3 minutes until smooth and creamy.
- Add 4 large eggs one at a time, mixing thoroughly after each addition. Scrape down the bowl’s sides to ensure even incorporation.
- Pour 1 cup granulated sugar and 2 teaspoons vanilla extract into the mixture. Blend until completely integrated.
- Carefully fold 25 Oreo cookies (broken into chunky pieces) into the cream cheese batter. Distribute evenly without overmixing.
- Transfer the batter into the chilled Oreo crust, smoothing the top with a spatula.
- Bake at 325°F for 60-70 minutes. The edges should look set, with a slight wobble in the center when gently shaken.
- Remove from oven and let cool completely at room temperature for approximately 2 hours.
- Create ganache by melting 4 tablespoons butter and ¼ cup heavy whipping cream in a small saucepan over medium heat.
- Pour hot cream mixture over ½ cup semi-sweet chocolate chips. Whisk until silky and smooth.
- Stir ½ teaspoon vanilla extract and 1 tablespoon powdered sugar into the ganache.
- Pour ganache over the cooled cheesecake, spreading evenly with a clean spatula.
- Refrigerate for at least 4 hours or overnight before serving for optimal texture and flavor.
Notes
- Always use room temperature cream cheese to ensure a smooth, lump-free filling that blends perfectly.
- Crush Oreos into fine crumbs for the crust, pressing firmly to create a solid base that won’t crumble when slicing.
- Avoid overmixing the cheesecake batter, which can introduce air bubbles and cause cracking during baking.
- Cool the cheesecake gradually by turning off the oven and leaving the door slightly open to prevent sudden temperature changes that can cause surface cracks.
- Prep Time: 25 minutes
- Cook Time: 1 hour
- Category: Cheesecakes
- Method: Baking
- Cuisine: American
Nutrition
- Serving Size: 10 to 12
- Calories: 512 kcal
- Sugar: 38 g
- Sodium: 290 mg
- Fat: 36 g
- Saturated Fat: 21 g
- Unsaturated Fat: 13 g
- Trans Fat: 1 g
- Carbohydrates: 41 g
- Fiber: 1.5 g
- Protein: 7 g
- Cholesterol: 110 mg
Madison Wyman
Recipe Developer & Food Storyteller
Expertise
Recipe Research and Adaptation, Food Writing and Cultural Storytelling, Sustainable and Ethical Sourcing, Dietary Adaptations (e.g., gluten-free, plant-based)
Education
Oregon Health & Science University
Portland Community College
Madison’s passion for flavor and culture ignited amidst the rich Southern cooking traditions of her upbringing, where cherished family recipes told delicious tales.
Armed with a Master’s in Food Systems and Society from Oregon Health & Science University and a Culinary Arts Certificate from Portland Community College, Madison truly excels at transforming rich, intricate flavors into dishes that are both approachable and heartfelt.
For her, cooking is a vibrant blend of science, art, and heritage – a powerful way to connect us to our roots and each other. Her recipes invite you to delve deeper, uncovering the fascinating stories woven into every ingredient.