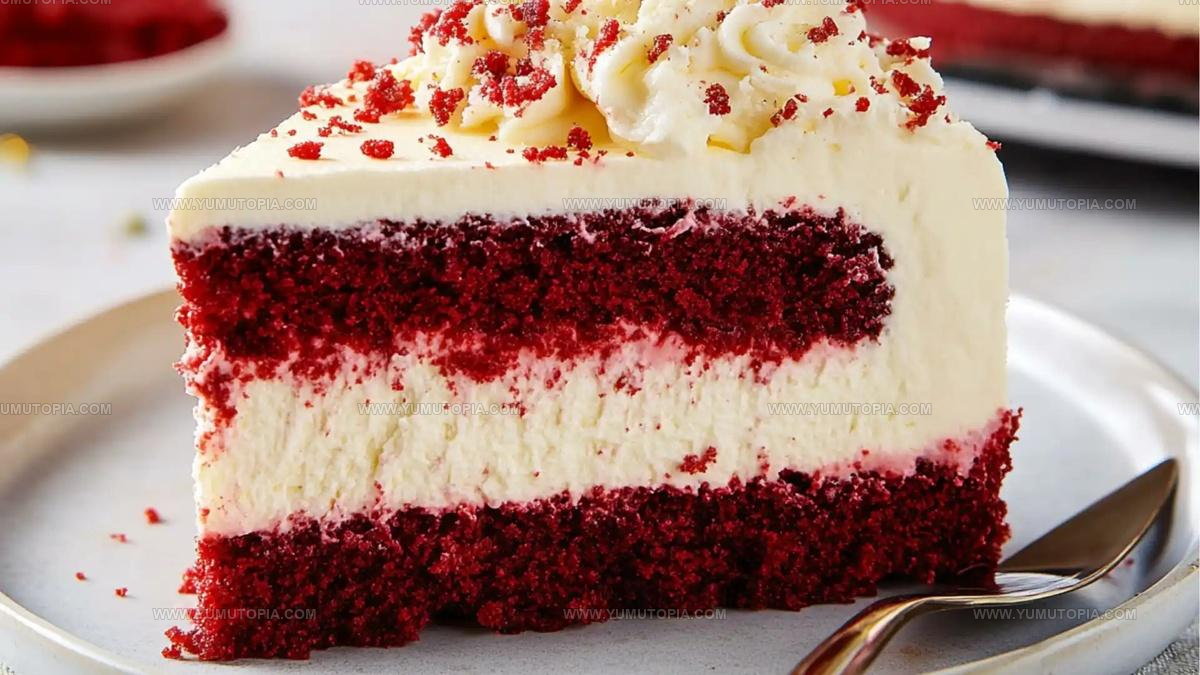
Red Velvet Cheesecake Recipe With Cream Cheese Frosting
Red velvet cheesecake recipe lovers know that some desserts simply feel special without trying too hard.
Rich cocoa meets cream cheese in a combination that looks as stunning as it tastes, making any occasion feel more memorable.
The deep red color catches everyone’s attention, while the smooth texture keeps them coming back for more.
Perfect for celebrations or when you want to impress someone without spending all day in the kitchen, it’s surprisingly approachable for home bakers.
You don’t need fancy equipment or professional training to pull off something that looks bakery-perfect.
If you love desserts that balance richness with elegance, it’s time to add something new to the rotation.
What Sets Red Velvet Cheesecake Apart
Red Velvet Cheesecake Core Ingredients
Crust Ingredients:Cheesecake Filling Ingredients:Frosting Ingredients:Tools Required for Red Velvet Cheesecake
Red Velvet Cheesecake Baking Guide
Prepare Cookie Base
Preheat your oven to 325°F. Grab a 9-inch springform pan and crush those chocolate cookies until they’re fine crumbs. Mix the crumbs with melted butter until everything sticks together nicely:
Press the mixture firmly into the bottom of the pan. Slide it into the oven and bake for exactly 10 minutes. Set aside to cool while getting ready for the next phase.
Create Cheesecake Mixture
Grab your electric mixer and beat the cream cheese until it’s super smooth. Add in your dry ingredients and mix thoroughly:
Crack the eggs in one at a time, mixing gently after each addition. Pour in your liquid ingredients and watch the color transform:
Set Up Water Bath
Transfer the vibrant red batter into your cooled cookie crust. Smooth the top with a spatula. Place the springform pan inside a larger baking dish and carefully pour hot water around the sides, creating a water bath that helps prevent cracks.
Bake and Rest
Bake at 325°F for 60-70 minutes. The center should look slightly jiggly but set. Turn off the oven, crack the door open, and let the cheesecake rest inside for one hour.
Cool and Chill
Remove the cheesecake and let it reach room temperature. Refrigerate for at least 4 hours or overnight for the best texture.
Finish with Frosting
Whip together the frosting ingredients until light and fluffy:
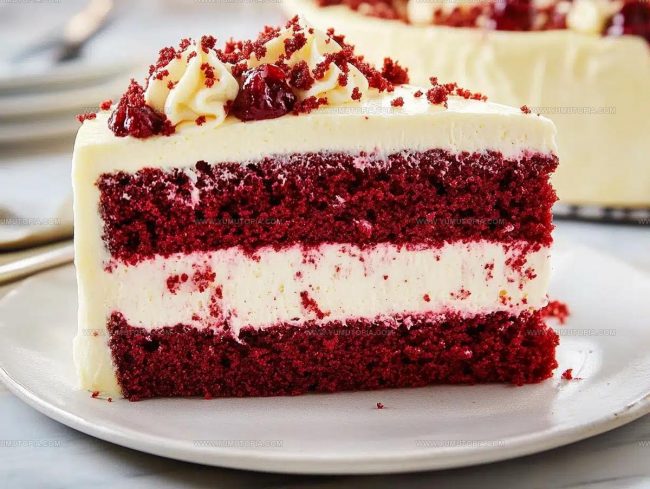
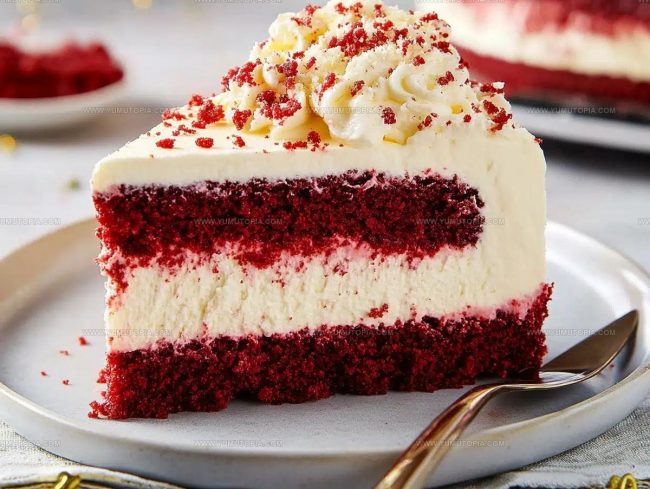
Spread or pipe the frosting over the chilled cheesecake. Slice and serve chilled.
Good to Know Before Baking Red Velvet Cheesecake
Flavor Options for Red Velvet Cheesecake
Best Serving Options for Red Velvet Cheesecake
Proper Storage For Red Velvet Cheesecake
Frequently Asked Questions About Red Velvet Cheesecake
What makes red velvet cheesecake different from regular cheesecake?
The cocoa powder and food coloring create a distinctive red color and subtle chocolate flavor that sets it apart from classic cheesecake.
Can I use natural cocoa powder instead of Dutch-processed cocoa?
Natural cocoa powder works, but Dutch-processed provides a smoother, less bitter chocolate taste that complements the cheesecake perfectly.
How do I prevent cracks in my cheesecake?
Using a water bath and allowing the cheesecake to cool gradually in the oven helps prevent unsightly surface cracks during baking.
Is it necessary to use food coloring?
Food coloring gives the signature red color, but you can skip it if you prefer a more natural appearance without changing the taste.
What type of cookies work best for the crust?
Chocolate sandwich cookies like Oreos create the ideal crust, providing a rich, dark base that complements the red velvet flavor.
Can I freeze this cheesecake?
Yes, wrap it tightly and freeze for up to 2 months, ensuring the best texture and flavor when thawed in the refrigerator overnight.

Bakery-Style Red Velvet Cheesecake Recipe
- Total Time: 6 hours 20 minutes
- Yield: 8 1x
Description
Red Velvet Cheesecake brings together creamy richness and classic Southern charm in a dessert that’ll make your taste buds dance with pure delight. Smooth cream cheese filling nestled in a tender red velvet cake base creates pure indulgence for your next special gathering.
Ingredients
Cake Base:
- 1.5 cups chocolate cookie crumbs
- ¼ cup unsalted butter, melted
Cheesecake Filling:
- 3 (8-ounce) packages cream cheese
- 4 large eggs
- 1 cup granulated sugar
- ¾ cup sour cream
- ⅓ cup buttermilk
- 1 tablespoon unsweetened cocoa powder
- 2 teaspoons vanilla extract
- 1 tablespoon red food coloring
- 1 teaspoon white vinegar
Frosting:
- 8 ounces cream cheese
- ¼ cup unsalted butter
- 2 cups powdered sugar
- 1 teaspoon vanilla extract
Instructions
- Mix 1½ cups chocolate cookie crumbs with ¼ cup melted butter until thoroughly combined. Press mixture firmly into bottom of 9-inch springform pan. Bake at 325°F for 10 minutes, then set aside to cool completely.
- Using electric mixer, blend 24 ounces cream cheese until completely smooth. Gradually incorporate 1 cup granulated sugar and 1 tablespoon cocoa powder, beating until fully integrated.
- Add 4 large eggs one at a time, mixing on low speed after each addition. Ensure each egg is fully incorporated before adding next.
- Gently fold in ¾ cup sour cream, ⅓ cup buttermilk, 2 teaspoons vanilla extract, 1 tablespoon red food coloring, and 1 teaspoon white vinegar. Mix until batter appears uniformly red.
- Transfer cheesecake batter into prepared crust-lined pan. Smooth surface with spatula to create even layer.
- Place springform pan inside larger baking dish. Fill outer dish with hot water about 1 inch deep to create water bath. This prevents surface cracking during baking.
- Bake at 325°F for 65-70 minutes. Center should look slightly jiggly but not liquid when pan is gently shaken.
- Turn off oven. Crack oven door and let cheesecake rest inside for 1 hour. This gradual cooling prevents sudden temperature changes.
- Remove from oven and cool completely at room temperature for approximately 2 hours.
- Refrigerate cheesecake for minimum 4 hours or ideally overnight before serving.
- For frosting, beat 8 ounces cream cheese, ¼ cup softened butter, 2 cups powdered sugar, and 1 teaspoon vanilla until light and fluffy.
- Spread frosting over chilled cheesecake or pipe decorative swirls using pastry bag.
Notes
- Always use room temperature cream cheese to ensure a smooth, lump-free cheesecake batter that blends perfectly.
- Create a water bath by wrapping the springform pan in aluminum foil to prevent water from seeping into the crust, which can make it soggy.
- For the most vibrant red color, use gel food coloring instead of liquid, as it provides more intense pigmentation without thinning the batter.
- If baking for someone with gluten sensitivities, swap regular chocolate cookie crumbs for gluten-free cookie crumbs and ensure all other ingredients are certified gluten-free.
- Prep Time: 20 minutes
- Cook Time: 1 hour 10 minutes
- Category: Cheesecakes
- Method: Baking
- Cuisine: American
Nutrition
- Serving Size: 8
- Calories: 557 kcal
- Sugar: 48 g
- Sodium: 255 mg
- Fat: 38 g
- Saturated Fat: 23 g
- Unsaturated Fat: 14 g
- Trans Fat: 0.5 g
- Carbohydrates: 44 g
- Fiber: 1 g
- Protein: 7 g
- Cholesterol: 105 mg
Logan Lemaster
Founder & Culinary Innovator
Expertise
Recipe Development and Innovation, Menu Design and Optimization, Fine Dining Techniques, Ingredient Pairing and Flavor Science
Education
Metropolitan Culinary Arts Institute
Logan’s culinary journey kicked off in his vibrant Chicago family kitchen, where fresh, seasonal ingredients and bold flavors were always front and center.
After graduating from the Metropolitan Culinary Arts Institute in Arlington, Virginia, and honing his skills in renowned restaurants, Logan mastered the art of blending classic techniques with exciting, modern twists.
His kitchen is a dynamic lab for flavor exploration. Through Yum Utopia, Logan aims to empower you to cook with both confidence and creativity, turning simple ingredients into spectacular meals.