
Creamy Biscoff Cheesecake Recipe Without Using Your Oven
Biscoff cheesecake promises pure dessert magic that melts hearts and delights senses.
Sweet lovers everywhere understand the extraordinary charm behind this iconic cookie-infused treat.
Creamy textures and rich caramelized notes create an unbelievably smooth experience for anyone seeking decadent comfort.
European-inspired desserts like this cheesecake represent pure indulgence without complicated techniques or extensive baking skills.
Minimal preparation ensures anyone can craft something spectacular with simple ingredients and straightforward assembly.
Sophisticated yet approachable, this no-bake wonder transforms ordinary moments into extraordinary celebrations of flavor and texture.
Dessert enthusiasts will absolutely adore how quickly this spectacular treat comes together with minimal effort.
Standout Reasons To Try Biscoff Cheesecake No Bake
Core Ingredients In Biscoff Cheesecake No Bake
Base Ingredients:Cheesecake Filling Ingredients:Topping Ingredients:Basic Kitchen Equipment for Biscoff Cheesecake No Bake
Directions for No Bake Biscoff Cheesecake
Crush Those Cookies
Grab 250 grams of Biscoff biscuits and turn them into fine crumbs. Smash them with a rolling pin inside a sealed bag or use a food processor to make quick work of it.
Butter Magic
Melt 75 grams of unsalted butter and mix it thoroughly with the cookie crumbs. Keep stirring until the mixture feels like damp sand that will hold together when pressed.
Create the Base
Grab an 8-inch springform pan and line it with parchment paper. Press the buttery crumb mixture firmly across the bottom, creating a solid, even foundation for your cheesecake.
Set the Base
Preheat the oven to 175°C (350°F). Bake the crumb base for 8-10 minutes to help it set, then let it cool completely before moving forward.
Cream Cheese Prep
Take 1000 grams of cream cheese and beat it with an electric mixer until super smooth. Make sure there are zero lumps hanging around.
Sweet Additions
Slowly blend in 150 grams of granulated sugar and 150 grams of brown sugar. Keep mixing until the mixture looks thick and silky.
Flavor Boost
Stir in these ingredients by hand:
Blend gently until everything is perfectly combined.
Egg Integration
Carefully add 3 large eggs and 2 egg yolks one at a time. Mix gently after each addition to keep the batter light and smooth.
Filling the Pan
Pour the cheesecake batter over the cooled crust, spreading it evenly across the surface.
Water Bath Technique
Wrap the springform pan tightly with foil. Place it in a larger baking dish and add hot water around the sides to create a gentle water bath.
Slow Baking
Reduce the oven temperature to 165°C (325°F). Bake for exactly 60 minutes.
Cooling Process
Turn off the oven and crack the door open. Let the cheesecake rest inside for one hour, then transfer to the counter to cool completely.
Refrigerate
Cover the cheesecake and refrigerate for at least 8 hours or overnight to set perfectly.
Topping Time
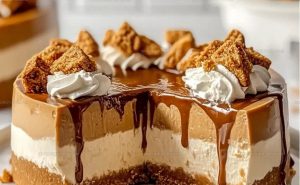
Warm 150 grams of Biscoff spread slightly and drizzle it over the top. Arrange 8 whole Biscoff biscuits as a decorative finish.
Serve and Enjoy
Slice with a sharp knife and serve chilled. A dollop of whipped cream makes an excellent final touch.
Helpful Notes For No Bake Biscoff Cheesecake
Different Takes on Biscoff Cheesecake No Bake
Presentation Notes for No Bake Biscoff Cheesecake
How To Store Biscoff Cheesecake No Bake
What People Ask About Biscoff Cheesecake No Bake
Can I make this cheesecake without a springform pan?
A springform pan helps release the cheesecake easily, but you could use a deep cake pan lined with parchment paper overhanging the sides for easier removal.
How do I prevent cracks in my cheesecake?
Avoid overmixing the batter, bake at a lower temperature, and use a water bath. Letting the cheesecake cool slowly helps prevent cracking.
Is it safe to eat raw eggs in this recipe?
The cheesecake gets baked, which cooks the eggs and makes them safe to consume. Gentle mixing and proper baking ensure food safety.
Can I freeze this Biscoff cheesecake?
Wrap the cheesecake tightly in plastic wrap and freeze for up to 2 months. Thaw overnight in the refrigerator before serving.
What if my cream cheese is lumpy?
Make sure the cream cheese is at room temperature and beat it thoroughly before adding other ingredients. A smooth start ensures a creamy final texture.
How can I tell when the cheesecake is done baking?
The edges should look set but the center will still have a slight jiggle. It will continue to set as it cools in the refrigerator.
Biscoff Cheesecake (No Bake) Recipe
- Total Time: 1 hour 40 minutes
- Yield: 10 1x
Description
No Bake Biscoff Cheesecake delivers pure dessert magic without turning on your oven. Crushed cookies and creamy filling make this treat simple and delectable for your next gathering.
Ingredients
Main Ingredients:
- 1000 grams cream cheese
- 250 grams Biscoff biscuits (for base)
- 200 grams Biscoff spread
- 150 grams Biscoff spread (for topping)
- 3 large eggs
- 2 egg yolks
Supporting Ingredients:
- 150 grams granulated sugar
- 150 grams brown sugar
- 150 grams sour cream
- 75 grams unsalted butter
- 2 tablespoons vanilla paste
- 8 pieces Biscoff biscuits (for topping)
Instructions
- Pulverize 250 grams of Biscoff biscuits into fine crumbs using a food processor or by crushing them in a sealed bag with a rolling pin.
- Melt 75 grams of unsalted butter and thoroughly mix with the cookie crumbs until the texture resembles wet sand.
- Line an 8-inch springform pan with parchment paper and firmly press the crumb mixture into an even base.
- Heat your oven to 175°C (350°F) and bake the base for 10 minutes, then allow it to cool completely.
- Beat 1000 grams of cream cheese with an electric mixer until completely smooth and lump-free.
- Gradually incorporate 150 grams of granulated sugar and 150 grams of brown sugar, mixing until the texture becomes thick and fluffy.
- Gently stir in 150 grams of sour cream, 2 tablespoons of vanilla paste, and 200 grams of Biscoff spread by hand.
- Carefully add 3 large eggs and 2 egg yolks one at a time, mixing gently after each addition to prevent overmixing.
- Pour the cheesecake batter over the cooled crust in the springform pan.
- Wrap the pan tightly with foil and place it in a larger baking dish filled with hot water to create a water bath.
- Reduce oven temperature to 165°C (325°F) and bake for 60 minutes.
- Turn off the oven, crack the door open, and let the cheesecake cool inside for one hour.
- Transfer the cheesecake to the counter and allow it to cool completely.
- Refrigerate the cheesecake for at least 8 hours or overnight.
- Warm 150 grams of Biscoff spread and drizzle over the chilled cheesecake.
- Decorate the top with 8 whole Biscoff biscuits.
- Slice with a sharp knife and serve chilled.
Notes
- Check cookie crumb consistency to ensure a compact, even base that holds together well.
- Beat cream cheese thoroughly to eliminate any lumps and create a silky smooth filling.
- Avoid overmixing eggs to prevent air bubbles that can cause cracks in your cheesecake.
- Cool the cheesecake gradually to prevent sudden temperature changes that might cause surface cracking.
- Prep Time: 30 minutes
- Cook Time: 1 hour 10 minutes
- Category: Cheesecakes
- Method: Baking
- Cuisine: American
Nutrition
- Serving Size: 10
- Calories: 577 kcal
- Sugar: 41 g
- Sodium: 195 mg
- Fat: 38 g
- Saturated Fat: 20 g
- Unsaturated Fat: 15 g
- Trans Fat: 0.5 g
- Carbohydrates: 45 g
- Fiber: 2 g
- Protein: 8 g
- Cholesterol: 115 mg
Logan Lemaster
Founder & Culinary Innovator
Expertise
Recipe Development and Innovation, Menu Design and Optimization, Fine Dining Techniques, Ingredient Pairing and Flavor Science
Education
Metropolitan Culinary Arts Institute
Logan’s culinary journey kicked off in his vibrant Chicago family kitchen, where fresh, seasonal ingredients and bold flavors were always front and center.
After graduating from the Metropolitan Culinary Arts Institute in Arlington, Virginia, and honing his skills in renowned restaurants, Logan mastered the art of blending classic techniques with exciting, modern twists.
His kitchen is a dynamic lab for flavor exploration. Through Yum Utopia, Logan aims to empower you to cook with both confidence and creativity, turning simple ingredients into spectacular meals.