Black Velvet Cake Recipe with Deep Rich Chocolate Taste
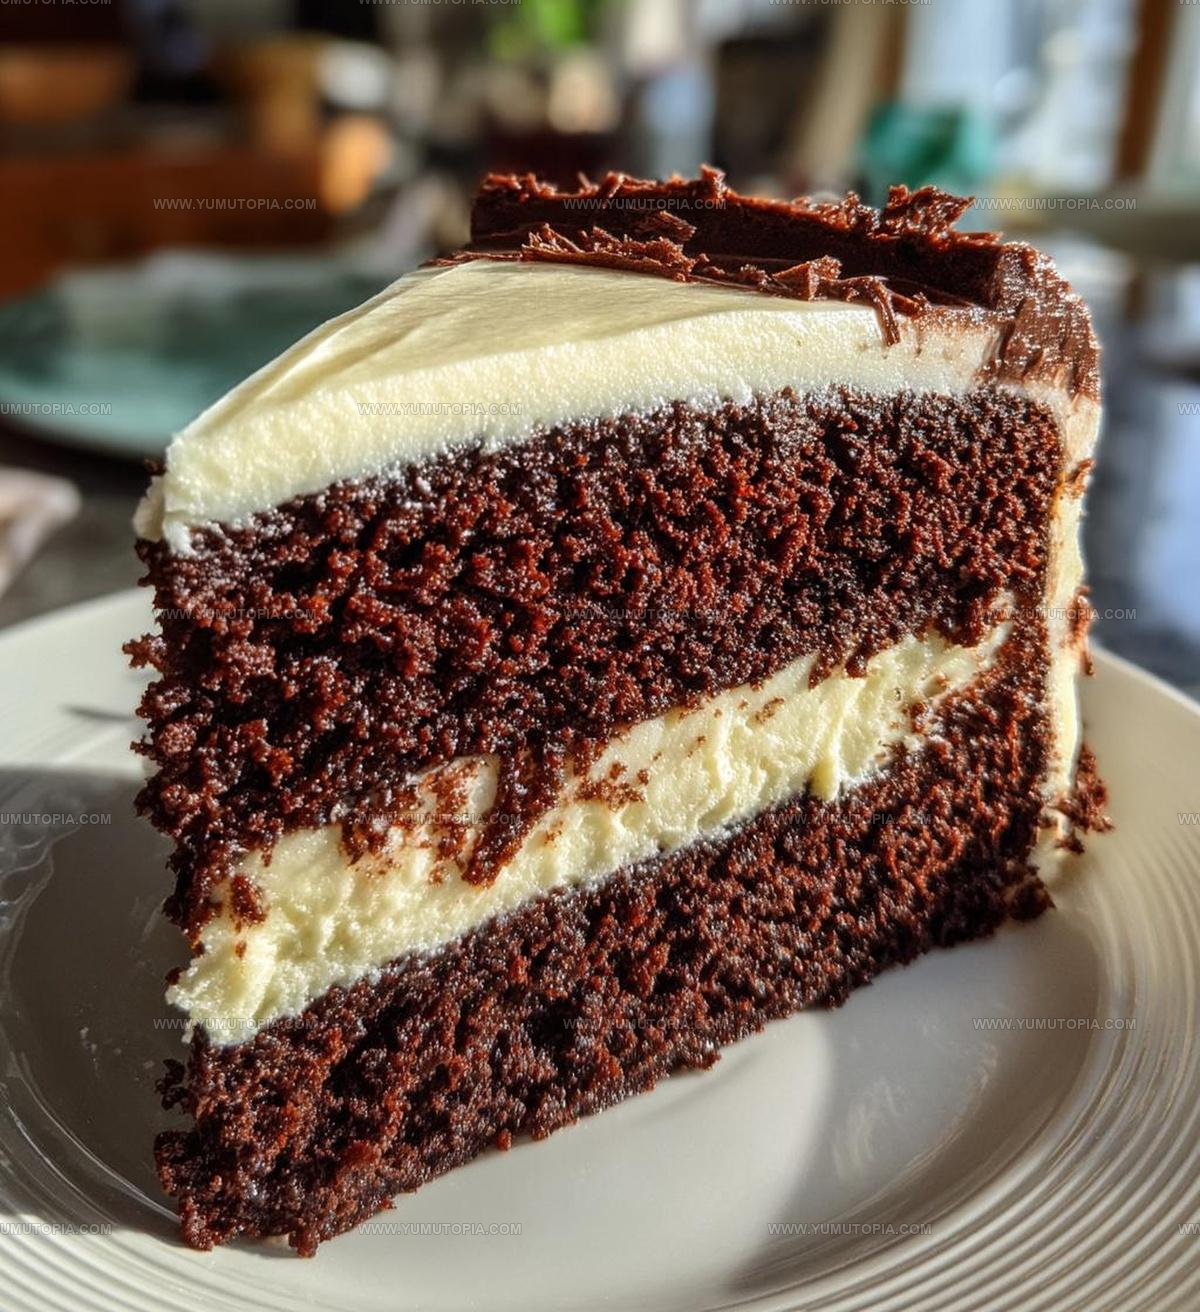
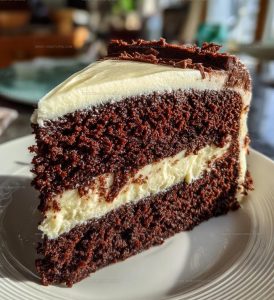
Black velvet cake captures drama and sophistication to any celebration with its striking dark appearance and luxurious flavor profile.
Rich cocoa creates depth while a hint of coffee enhances every bite without overpowering the chocolate notes.
The velvety crumb melts on the tongue, making each forkful feel like a special occasion.
Perfect for birthdays, anniversaries, or when life calls for something extraordinary, it never fails to impress.
Paired with cream cheese frosting, the contrast between dark cake and light topping creates visual appeal that matches the incredible taste.
Whether served at elegant dinner parties or casual gatherings, it always steals the spotlight.
Simple enough for home bakers yet impressive enough for any milestone event, it offers bakery-worthy results.
Once you make it, expect requests for seconds and the recipe itself.
Why You’ll Love Black Velvet Cake Deep Richness
Black Velvet Cake Ingredient Overview
Dry Ingredients:Wet Ingredients:Liquid Ingredient:Complete Baking Tools for Black Velvet Cake
Preparation Guide for a Rich Black Velvet Cake
Warm Up the Oven
Set your oven to exactly 350°F (175°C). This precise temperature will help create the perfect cake texture.
Prepare Cake Pans
Grab two 9-inch round cake pans. Grease them thoroughly with butter or cooking spray, then dust with a light layer of flour to prevent sticking.
Mix Dry Ingredients
Grab a large mixing bowl and combine the dry ingredients:
Whisk these together until they’re completely blended and look like a smooth, dark powder.
Add Wet Ingredients
Stir in the liquid ingredients until your batter looks smooth and consistent:
Mix everything until the ingredients are fully incorporated.
Add Boiling Water
Pour in 1 cup of boiling water and stir gently. The batter will become thin and glossy. Don’t worry – this is exactly how it should look!
Fill Cake Pans
Divide the batter evenly between the two prepared pans. Use a spatula to spread it out smoothly.
Bake the Cake
Slide the pans into the preheated oven. Bake for 30-35 minutes. Check doneness by inserting a toothpick into the center – it should come out clean.
Cool Down
Remove the pans from the oven. Let the cakes rest in the pans for 10 minutes. Then carefully transfer them to wire racks to cool completely.
Easy Notes for Deep Black Velvet Cake
Black Velvet Cake Flavor Changes
Black Velvet Cake Rich Dessert Serving
Black Velvet Cake Storage Notes
Black Velvet Cake Q&A
What makes black velvet cake different from red velvet cake?
The cocoa powder and dark food coloring create a deeper, richer black color instead of the traditional red hue.
Can natural cocoa powder be substituted for Dutch-processed cocoa?
Dutch-processed cocoa works best to achieve the signature dark black color and smooth texture.
Why is boiling water added to the batter?
Boiling water helps activate the cocoa powder and creates a more tender, moist cake texture.
How do I prevent the cake from sticking to the pan?
Thoroughly grease the pans and dust with flour, or use parchment paper for guaranteed easy cake removal.
What does buttermilk do in this recipe?
Buttermilk adds tanginess, helps tenderize the cake, and creates a softer crumb compared to regular milk.
Can this cake be made ahead of time?
Absolutely! Bake the layers in advance and wrap tightly in plastic wrap to keep fresh for 2-3 days before frosting.
Black Velvet Cake Recipe
- Total Time: 45-50 minutes
- Yield: 8 1x
Description
Black Velvet Cake brings a luxurious chocolate twist to classic desserts that will steal the show at your next gathering. Dripping with rich cocoa and topped with silky cream cheese frosting, this Southern-inspired treat delivers pure indulgence in each delectable slice.
Ingredients
Main Ingredients:
- 2 cups all-purpose flour
- 1 ½ cups granulated sugar
- 1 cup unsweetened cocoa powder
- 1 cup buttermilk
- 1 cup vegetable oil
- 1 cup boiling water
Leavening Agents:
- 1 ½ teaspoons baking soda
- 1 teaspoon baking powder
Flavor and Binding Ingredients:
- 2 large eggs
- 1 teaspoon vanilla extract
- 1 teaspoon salt
Instructions
- Prepare your oven by heating it to precisely 350°F (175°C) with the rack positioned in the center.
- Thoroughly coat two 9-inch round cake pans with cooking spray, then dust with flour, tapping out excess.
- Combine 2 cups flour, 1 ½ cups sugar, 1 cup cocoa powder, 1 ½ teaspoons baking soda, 1 teaspoon baking powder, and 1 teaspoon salt in a large mixing bowl.
- Whisk in 1 cup buttermilk, 1 cup vegetable oil, 2 large eggs, and 1 teaspoon vanilla extract until the mixture becomes smooth and well-integrated.
- Carefully pour 1 cup of boiling water into the batter, stirring gently until the liquid is completely incorporated and the texture becomes uniform.
- Distribute the batter equally between the prepared cake pans, using a spatula to spread it evenly to the edges.
- Slide the pans into the preheated oven and bake for exactly 32-35 minutes, checking doneness with a toothpick inserted in the center.
- Remove the cakes from the oven and let them rest in the pans for 10 minutes to stabilize.
- Gently transfer the cakes onto wire cooling racks, allowing them to cool completely before frosting or serving.
Notes
- Use room temperature ingredients to ensure smooth blending and consistent texture.
- Black cocoa powder creates the signature deep color, so don’t substitute regular cocoa.
- Buttermilk adds moisture and subtle tanginess that makes this cake incredibly soft.
- For gluten-free version, replace wheat flour with a 1:1 gluten-free baking blend.
- Prep Time: 15 minutes
- Cook Time: 30-35 minutes
- Category: Cakes
- Method: Baking
- Cuisine: American
Nutrition
- Serving Size: 8
- Calories: 311 kcal
- Sugar: 19 g
- Sodium: 250 mg
- Fat: 15 g
- Saturated Fat: 2 g
- Unsaturated Fat: 13 g
- Trans Fat: 0 g
- Carbohydrates: 40 g
- Fiber: 4 g
- Protein: 4 g
- Cholesterol: 37 mg
Logan Lemaster
Founder & Culinary Innovator
Expertise
Recipe Development and Innovation, Menu Design and Optimization, Fine Dining Techniques, Ingredient Pairing and Flavor Science
Education
Metropolitan Culinary Arts Institute
Logan’s culinary journey kicked off in his vibrant Chicago family kitchen, where fresh, seasonal ingredients and bold flavors were always front and center.
After graduating from the Metropolitan Culinary Arts Institute in Arlington, Virginia, and honing his skills in renowned restaurants, Logan mastered the art of blending classic techniques with exciting, modern twists.
His kitchen is a dynamic lab for flavor exploration. Through Yum Utopia, Logan aims to empower you to cook with both confidence and creativity, turning simple ingredients into spectacular meals.