
Boston Cream Pie Cheesecake Recipe That Combines Two Beloved Desserts
Boston cream pie cheesecake combines two beloved desserts into one showstopping creation that makes any occasion feel special.
Rich, creamy layers meet silky chocolate in a dessert that feels both familiar and exciting at the same time.
Serve it at birthday parties, holiday gatherings, or simply when you need something sweet to brighten an ordinary week.
The contrast of textures creates an eating experience that keeps everyone coming back for seconds.
No pastry chef credentials needed—just a love for desserts that taste as impressive as they look.
You won’t believe how something so elegant can come together in a home kitchen with results that rival any bakery.
Standout Features Of Boston Cream Pie Cheesecake

Essential Ingredients for Boston Cream Pie Cheesecake
Crust Ingredients:Cheesecake Base Ingredients:Topping Ingredients:What Tools Do You Need for Boston Cream Pie Cheesecake
Making Boston Cream Pie Cheesecake From Start to Finish
Prepare Crust
Grab a 9-inch springform pan and get ready to make a delicious base. Mix your graham cracker crumbs with melted butter and sugar until the mixture feels like damp sand. Press this crumbly goodness firmly into the bottom of the pan, creating a solid foundation for your cheesecake.
Create Cheesecake Batter
Grab your mixer and beat the cream cheese and sugar until it’s smooth as silk. Then add your eggs one at a time:
Make sure each egg is fully mixed before adding the next. Scrape down the sides of the bowl to keep everything evenly combined.
Add Creamy Touches
Stir in your sour cream and vanilla extract until the batter looks perfectly blended. The mixture should look super smooth and creamy.
Bake the Cheesecake
Pour the batter over your graham cracker crust. Slide the pan into a preheated oven at 325°F and bake for 55-60 minutes. You’re looking for a center that’s almost set but still has a slight jiggle.
Cool Slowly
Turn off the oven but leave the cheesecake inside with the door slightly open for 1 hour. This helps prevent cracking and ensures a smooth texture.
Chill and Set
Take the cheesecake out and let it cool completely at room temperature. Then refrigerate for 4 hours or overnight to firm up.
Layer the Pudding
Spread 2 cups of vanilla pudding evenly across the top of your chilled cheesecake.
Whip the Cream
Whip 1 cup of heavy cream until stiff peaks form. Carefully spread this fluffy layer over the pudding.
Make Chocolate Ganache
Heat 1/2 cup heavy cream until it’s just simmering. Pour the hot cream over 8 oz of chopped semisweet chocolate:
Let it sit for 2 minutes, then whisk until smooth. Stir in 2 tablespoons of butter until the mixture looks glossy.
Final Chocolate Drizzle
Pour the ganache over the whipped cream, letting some deliciously drip down the sides. Refrigerate for 30 minutes to set the chocolate layer.
Serve and Enjoy
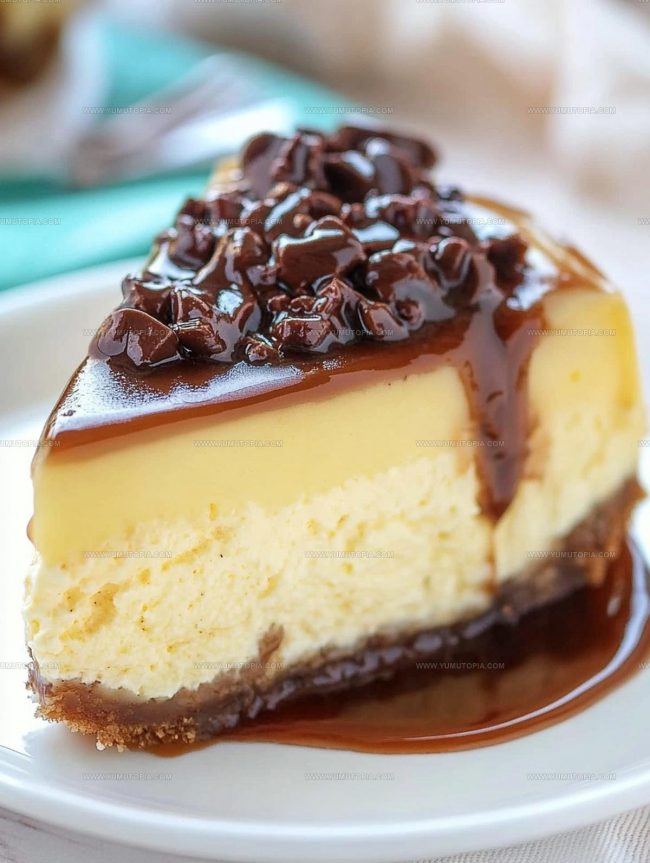
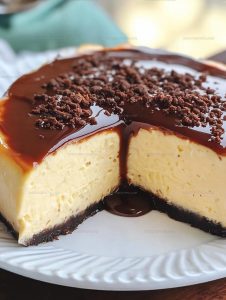
Carefully remove the springform pan sides and slice into this decadent Boston Cream Pie Cheesecake. Each bite is a perfect blend of creamy, chocolatey goodness!
Key Cooking Notes For Boston Cream Pie Cheesecake
Different Takes on Boston Cream Pie Cheesecake
Best Ways To Slice Boston Cream Pie Cheesecake
Storage Instructions For Boston Cream Pie Cheesecake
Boston Cream Pie Cheesecake Common Questions
Can I make this cheesecake ahead of time?
Absolutely! Prepare the entire cheesecake up to 2 days before serving and keep it refrigerated until ready to enjoy.
How do I prevent cracks in my cheesecake?
Use room temperature ingredients, mix gently, and avoid overmixing. The slow cooling process helps prevent surface cracks.
What if my ganache looks separated?
Whisk the ganache continuously and ensure your cream is hot but not boiling. A smooth, consistent temperature helps create a perfect glossy finish.
Does the pan type matter for this recipe?
A springform pan is crucial. It allows easy removal without damaging your beautiful cheesecake layers.
Can I freeze this cheesecake?
Yes! Wrap tightly in plastic wrap and freeze for up to 3 weeks. Thaw overnight in the refrigerator before serving.
How can I tell if my cheesecake is done baking?
The center should jiggle slightly when gently shaken – like a soft pudding. Overbaking leads to a dry, cracked surface.
Boston Cream Pie Cheesecake Recipe
- Total Time: 6 hours 50 minutes
- Yield: 8 1x
Description
Boston Cream Pie Cheesecake brings together two classic desserts in a creamy, dreamy slice of pure delight. Smooth vanilla custard and rich chocolate ganache make this crowd-pleasing treat your ultimate dessert indulgence.
Ingredients
Primary Ingredients:
- 3 (8 oz) packages cream cheese
- 2 cups vanilla pudding
- 3 large eggs
- 1 cup heavy cream
Supporting Ingredients:
- 2 cups graham cracker crumbs
- 1 cup granulated sugar
- ½ cup unsalted butter
- ½ cup sour cream
- 1 teaspoon vanilla extract
- ¼ cup granulated sugar
Finishing Ingredients:
- 8 ounces semisweet chocolate
- ½ cup heavy cream
- 2 tablespoons unsalted butter
Instructions
- Crush 2 cups graham cracker crumbs with ½ cup melted butter and ¼ cup sugar until thoroughly combined.
- Press crumb mixture into bottom of a 9-inch springform pan, creating a firm, compact base.
- Use an electric mixer to blend 3 packages cream cheese with 1 cup sugar until completely smooth.
- Incorporate 3 large eggs individually, mixing thoroughly after each addition and scraping mixer sides.
- Fold in ½ cup sour cream and 1 tsp vanilla extract until mixture is uniform.
- Transfer cheesecake batter gently over prepared graham cracker crust.
- Place pan in 325°F oven and bake for 55-60 minutes until center appears almost set with slight wobble.
- Switch oven off, leaving cheesecake inside with door slightly ajar for 1 hour.
- Remove from oven and allow cheesecake to reach room temperature naturally.
- Refrigerate cheesecake for minimum 4 hours or entire night until completely chilled.
- Distribute 2 cups vanilla pudding evenly across cheesecake surface.
- Whip 1 cup heavy cream until stiff peaks develop. Spread atop pudding layer.
- Heat ½ cup heavy cream until tiny bubbles appear around edges.
- Pour hot cream over 8 oz chopped semisweet chocolate. Rest for 2 minutes.
- Whisk chocolate mixture until completely smooth. Stir in 2 tbsp butter for glossy finish.
- Drizzle ganache over whipped cream, allowing attractive drips down cheesecake sides.
- Chill cheesecake for 30 minutes to set chocolate layer before serving.
Notes
- Use room temperature cream cheese to ensure a smooth, lump-free batter that blends perfectly.
- Wrap the springform pan’s exterior with aluminum foil to prevent water from seeping in during baking.
- To avoid cracks, do not overmix the cheesecake batter and bake in a water bath for even, gentle cooking.
- For a gluten-free version, swap graham cracker crumbs with almond flour or gluten-free cookie crumbs.
- Prep Time: 20 minutes
- Cook Time: 1 hour
- Category: Cheesecakes
- Method: Baking
- Cuisine: American
Nutrition
- Serving Size: 8
- Calories: 549 kcal
- Sugar: 37 g
- Sodium: 238 mg
- Fat: 39 g
- Saturated Fat: 23 g
- Unsaturated Fat: 14 g
- Trans Fat: 0.5 g
- Carbohydrates: 38 g
- Fiber: 2 g
- Protein: 9 g
- Cholesterol: 120 mg
Madison Wyman
Recipe Developer & Food Storyteller
Expertise
Recipe Research and Adaptation, Food Writing and Cultural Storytelling, Sustainable and Ethical Sourcing, Dietary Adaptations (e.g., gluten-free, plant-based)
Education
Oregon Health & Science University
Portland Community College
Madison’s passion for flavor and culture ignited amidst the rich Southern cooking traditions of her upbringing, where cherished family recipes told delicious tales.
Armed with a Master’s in Food Systems and Society from Oregon Health & Science University and a Culinary Arts Certificate from Portland Community College, Madison truly excels at transforming rich, intricate flavors into dishes that are both approachable and heartfelt.
For her, cooking is a vibrant blend of science, art, and heritage – a powerful way to connect us to our roots and each other. Her recipes invite you to delve deeper, uncovering the fascinating stories woven into every ingredient.