
Boston Cream Pie Cookies Recipe With Smooth Custard
Boston cream pie cookies deliver all the satisfaction of a classic dessert in a handheld form that fits perfectly into modern life.
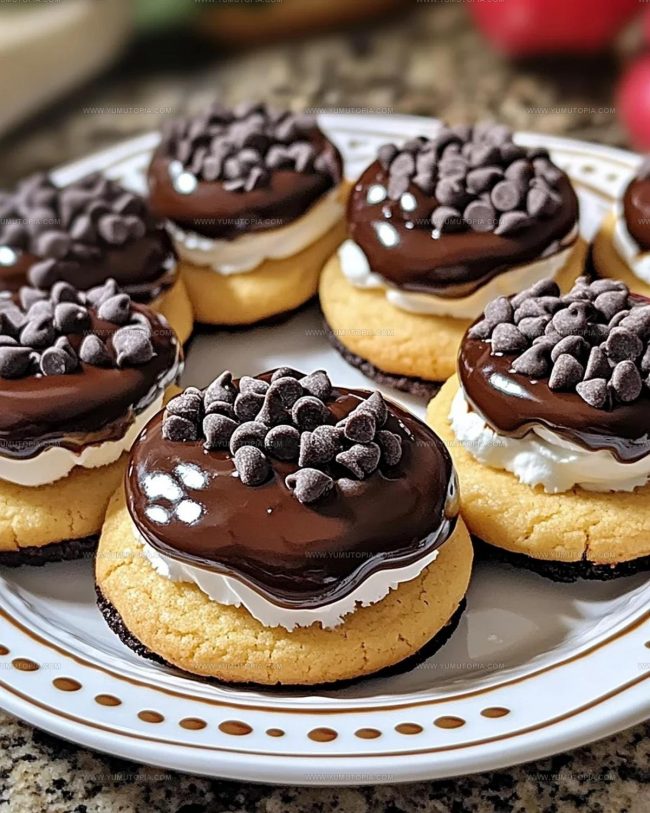
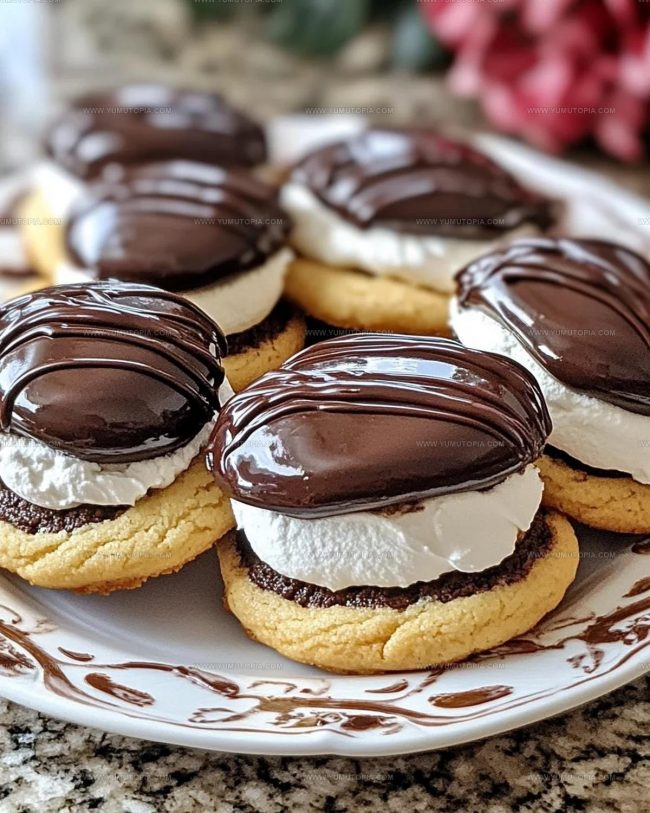
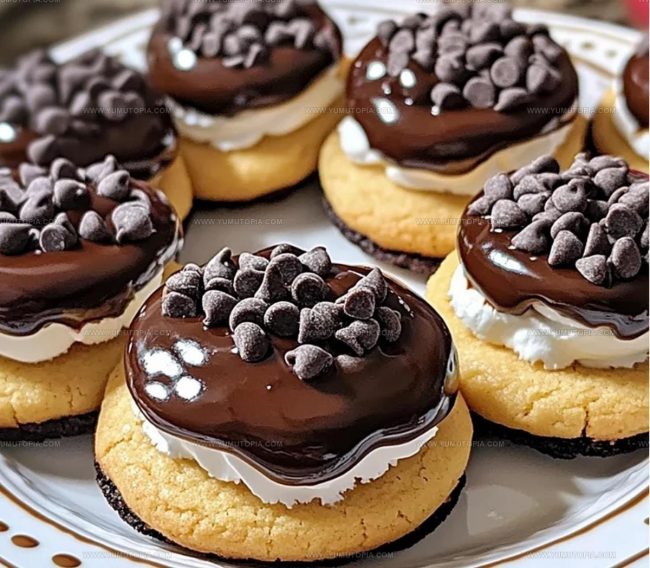
Soft vanilla cookies embrace silky custard filling, while a glossy chocolate coating adds richness to every bite.
The combination creates a treat that feels both familiar and exciting, ideal for afternoon gatherings or quiet moments with coffee.
Bakeries across New England have long celebrated this flavor profile, and home bakers continue finding new reasons to fall in love with it.
The contrast between textures makes each cookie memorable, balancing smoothness against tender crumb in ways that keep you coming back.
What began as a Massachusetts tradition has become a beloved favorite far beyond its origins.
Making something special for friends or simply treating yourself becomes effortlessly achievable with flavors this good.
Your next batch might just become the most requested treat in your home.
Best Reasons To Try Boston Cream Pie Cookies

Full Ingredient Breakdown for Boston Cream Pie Cookies
Dry Ingredients:Cookie Base Ingredients:Cream and Glaze Ingredients:Kitchen Tools for Boston Cream Pie Cookies
Step-by-Step Instructions For Boston Cream Pie Cookies
Prepare Oven
Crank your oven to 350°F and grab a baking sheet. Line it with parchment paper so nothing sticks.
Mix Dry Ingredients
Grab a medium bowl and whisk together 1 cup all-purpose flour, 1/2 teaspoon baking powder, 1/4 teaspoon baking soda, and 1/4 teaspoon salt. Set this mix aside for now.
Cream Butter and Sugar
In a large bowl, grab your electric mixer and beat 1/2 cup softened unsalted butter with 1/2 cup granulated sugar. Whip these together until they look light and fluffy, which takes about 3-4 minutes.
Add Wet Ingredients
Crack in 1 large egg and pour 1 teaspoon vanilla extract. Mix until everything looks smooth and combined.
Combine Wet and Dry
Slowly add your dry ingredient mixture to the wet ingredients. Pour in 1/4 cup milk between flour additions. Mix just until everything comes together.
Add Chocolate Chips
Sprinkle 1/3 cup chocolate chips into the dough. Fold them in gently so they’re evenly distributed.
Scoop Cookies
Drop spoonfuls of dough onto your prepared baking sheet. Space them about 2 inches apart to give them room to spread.
Bake Cookies
Slide the baking sheet into the 350°F oven. Bake for 10-12 minutes until the edges look golden brown. Pull them out and let them cool completely on a wire rack.
Prepare Cream Filling
Grab your electric mixer and whip 1/2 cup heavy cream until soft peaks form. Then add:
Keep whipping until the cream forms stiff peaks.
Assemble Cookie Sandwiches
Once cookies are cool, spread cream filling between two cookies to make little sandwiches.
Make Chocolate Glaze
In a small saucepan over low heat, melt together:
Stir until the mixture looks completely smooth.
Finish Cookies
Drizzle the warm chocolate glaze over each cookie sandwich. Let the chocolate set for a few minutes before serving.
Smart Tips For Boston Cream Pie Cookies
What Are the Best Variations for Boston Cream Cookies
Serving Inspiration for Boston Cream Pie Cookies
Boston Cream Pie Cookies Storage Notes
Boston Cream Pie Cookies FAQs
Can I make these cookies ahead of time?
Definitely! Bake the cookies and store them separately from the cream filling. Assemble just before serving to keep everything fresh and crisp.
How do I know when the cookies are perfectly baked?
Watch for lightly golden edges and a soft center. They should look slightly underbaked since they’ll continue cooking on the baking sheet after removal from the oven.
What if my whipped cream doesn’t form stiff peaks?
Make sure your heavy cream is very cold and your bowl is completely clean. Cold cream whips better and creates more stable peaks.
Can I substitute ingredients in this recipe?
Chocolate chips can swap with white or dark chocolate. Whole milk works instead of regular milk. Avoid changing core ingredients like butter or flour.
Why did my cookies spread too much?
Ensure butter isn’t too soft and you’re measuring flour correctly. Chilling the dough for 30 minutes before baking helps prevent excessive spreading.
Are these cookies good for shipping or gifting?
These are best enjoyed fresh within 1-2 days. If shipping, pack cream-filled cookies carefully and use quick delivery to maintain quality.

Boston Cream Pie Cookies Recipe
- Total Time: 25-27 minutes
- Yield: 12 1x
Description
Whip up these delightful Boston Cream Pie Cookies for a playful twist on the classic dessert that brings together creamy vanilla filling and rich chocolate glaze. Guaranteed to satisfy your sweet tooth, these cookies deliver all the nostalgic flavor of the beloved cake in one perfect, bite-sized treat.
Ingredients
Main Ingredients:
- 1 cup all-purpose flour
- ½ cup unsalted butter
- ½ cup granulated sugar
- 1 large egg
Supporting Ingredients:
- ½ teaspoon baking powder
- ¼ teaspoon baking soda
- ¼ teaspoon salt
- 1 teaspoon vanilla extract
- ¼ cup milk
- ⅓ cup chocolate chips
Cream Filling and Glaze:
- ½ cup heavy cream
- ¼ cup powdered sugar
- ½ teaspoon vanilla extract
- ½ cup semi-sweet chocolate chips
- 2 tablespoons unsalted butter
Instructions
- Preheat the oven to 350°F. Line a baking sheet with parchment paper to prevent sticking.
- Combine 1 cup flour, ½ teaspoon baking powder, ¼ teaspoon baking soda, and ¼ teaspoon salt in a medium bowl. Whisk thoroughly to distribute ingredients evenly.
- Beat ½ cup softened butter with ½ cup granulated sugar using an electric mixer for 3-4 minutes until the mixture becomes light and fluffy.
- Add 1 large egg and 1 teaspoon vanilla extract to the butter mixture. Mix until completely incorporated.
- Gradually add the dry ingredients to the wet ingredients, alternating with ¼ cup milk. Mix until just combined to keep the dough tender.
- Gently fold in ⅓ cup chocolate chips, distributing them evenly throughout the dough.
- Drop cookie dough by spoonfuls onto the prepared baking sheet, spacing each cookie 2 inches apart to allow room for spreading.
- Bake for 10-12 minutes until the cookie edges turn a light golden brown. Remove from the oven and cool completely on a wire rack.
- Whip ½ cup heavy cream with an electric mixer until soft peaks form. Slowly add ¼ cup powdered sugar and ½ teaspoon vanilla extract, continuing to whip until stiff peaks develop.
- Create cookie sandwiches by spreading the whipped cream filling between two cooled cookies.
- Melt ½ cup semi-sweet chocolate chips with 2 tablespoons butter in a small saucepan over low heat, stirring until smooth and glossy.
- Drizzle the chocolate glaze over each cookie sandwich. Let the chocolate set for 5-10 minutes before serving.
Notes
- Softening butter completely at room temperature ensures a smooth, fluffy cookie base that blends ingredients evenly.
- Chilling the dough for 30 minutes before baking helps prevent spreading and creates a more compact, structured cookie.
- When whipping cream, use cold equipment and cream for faster and more stable peaks that hold their shape in the filling.
- For gluten-free options, swap regular flour with a 1:1 gluten-free baking blend to maintain the cookie’s tender texture.
- Prep Time: 15 minutes
- Cook Time: 10-12 minutes
- Category: Cookies
- Method: Baking
- Cuisine: American
Nutrition
- Serving Size: 12
- Calories: 172 kcal
- Sugar: 13 g
- Sodium: 54 mg
- Fat: 11 g
- Saturated Fat: 6 g
- Unsaturated Fat: 4 g
- Trans Fat: 0.1 g
- Carbohydrates: 17 g
- Fiber: 1 g
- Protein: 2 g
- Cholesterol: 34 mg
Logan Lemaster
Founder & Culinary Innovator
Expertise
Recipe Development and Innovation, Menu Design and Optimization, Fine Dining Techniques, Ingredient Pairing and Flavor Science
Education
Metropolitan Culinary Arts Institute
Logan’s culinary journey kicked off in his vibrant Chicago family kitchen, where fresh, seasonal ingredients and bold flavors were always front and center.
After graduating from the Metropolitan Culinary Arts Institute in Arlington, Virginia, and honing his skills in renowned restaurants, Logan mastered the art of blending classic techniques with exciting, modern twists.
His kitchen is a dynamic lab for flavor exploration. Through Yum Utopia, Logan aims to empower you to cook with both confidence and creativity, turning simple ingredients into spectacular meals.