
S’mores Cookie Bars Recipe That Combines Campfire Favorites
S’mores cookie bars combine everything beloved about campfire treats with the convenience of a dessert you can bake at home.
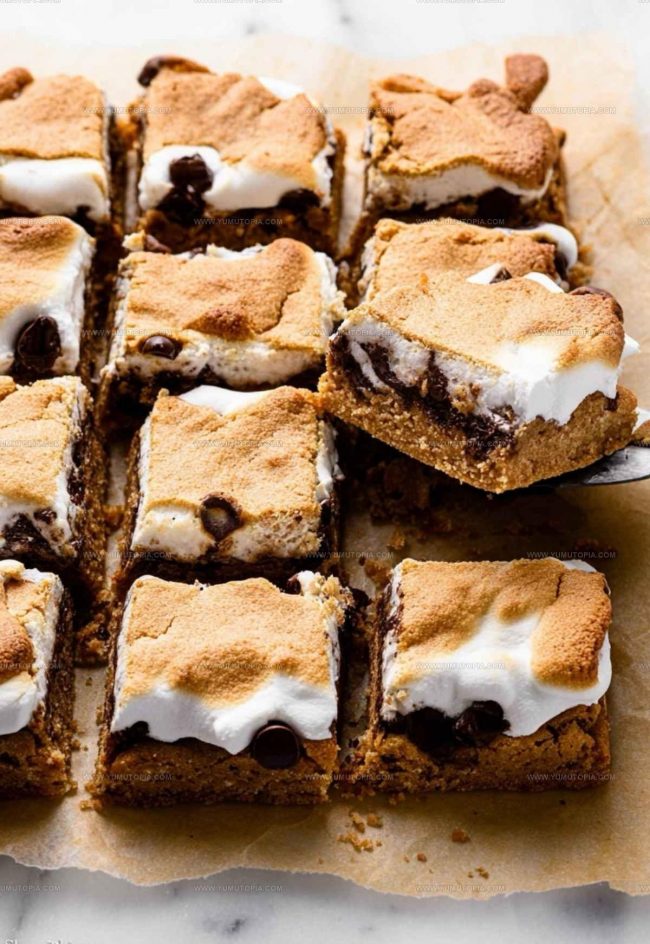
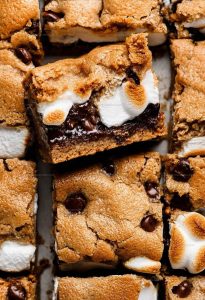
Rich chocolate, gooey marshmallow, and crispy graham cracker flavors meld into one decadent square that feeds a crowd with ease.
No bonfire is required, yet all that toasty sweetness remains intact in every bite.
Perfect for potlucks, parties, or weeknights when something sweet sounds appealing, bars like such offer shareable portions without fuss.
You can count on rave reviews from kids and adults alike when serving something so comforting and fun.
The nostalgia of summer nights meets modern baking simplicity in one pan.
Head to the recipe below and see how simple homemade magic can be.
Reasons Smores Cookie Bars Are Great for Sharing
Ingredient Lineup for Smores Cookie Bars
Butter and Sugar Base:Binding Ingredients:Dry Ingredients:Topping and Filling:Key Tools for Gooey Smores Cookie Bars
Smores Cookie Bars Baking Instructions
Prepare the Baking Pan
Grab your 8-inch square pan and line it with parchment paper, letting the edges hang over the sides. This trick helps you pull out the bars super easily later. Set your oven to exactly 350°F.
Mix the Wet Ingredients
Grab a large mixing bowl and blend 1/2 cup softened butter with 3/4 cup brown sugar until they’re smooth and creamy. Crack in 1 large egg and pour 1 teaspoon vanilla extract, then mix until everything looks well combined.
Create the Cookie Dough Base
Time to add your dry ingredients. Gently mix in:
Fold in 1 cup semi-sweet chocolate chips until they’re evenly distributed through the dough.
Layer the Cookie Base
Spread half the cookie dough across the bottom of your prepared pan. Make sure it’s an even layer that covers the whole surface.
Add the Marshmallow Layer
Carefully spread 1 heaping cup of marshmallow creme over the first cookie dough layer. This is where things get fun and gooey!
Top with Remaining Dough
Drop spoonfuls of the remaining cookie dough on top of the marshmallow creme. Don’t worry about covering everything perfectly – some marshmallow peeking through looks great.
Bake to Perfection
Slide the pan into the 350°F oven and bake for 25-30 minutes. You’re looking for a light golden brown color across the top.
Cool and Slice
Let the bars cool completely in the pan. Once cooled, use those parchment paper edges to lift the entire batch out, then slice into squares and enjoy!
What Tips Keep Smores Cookie Bars Gooey
Which Smores Cookie Bars Variations to Try
Serving Ideas for Gooey Smores Cookie Bars
What Are the Ideal Ways to Store Gooey Smores Cookie Bars
Gooey Smores Cookie Bars Common Q&A
Can I use homemade marshmallow creme?
Absolutely! Homemade marshmallow creme works great and adds a personal touch to your bars. Just ensure it’s smooth and spreadable.
What if my marshmallow creme is too thick to spread?
Warm the marshmallow creme slightly in the microwave for 10-15 seconds. This softens it and makes spreading much easier across your cookie base.
Are graham cracker crumbs essential?
Graham cracker crumbs are key to getting that classic s’mores flavor. If you’re out, crush graham crackers in a food processor or place them in a sealed bag and crush with a rolling pin.
Can these bars be made ahead of time?
Definitely! Prepare the bars a day before and store them covered at room temperature. They’ll stay fresh and taste just as delicious.
How do I get clean, neat bar cuts?
Let the bars cool completely, then use a sharp knife wiped with hot water between each cut. This helps create smooth, even edges.
Campfire-Inspired Gooey Smores Cookie Bars Recipe
- Total Time: 40-45 minutes
- Yield: 8 to 12 1x
Description
Campfire memories come alive with s’mores cookie bars that blend graham cracker, chocolate, and marshmallow into one delightful treat your whole family will devour. Grab a plate and savor the classic dessert reimagined as a shareable, nostalgic sweet that brings summer camp joy right to your kitchen table.
Ingredients
Primary Ingredients:
- 1 cup all-purpose flour
- 1 cup graham cracker crumbs
- 1 cup semi-sweet chocolate chips
- 1 heaping cup marshmallow creme
Base Ingredients:
- ½ cup unsalted butter
- ¾ cup packed light or dark brown sugar
- 1 large egg
Seasoning Ingredients:
- 1 teaspoon pure vanilla extract
- ½ teaspoon baking powder
- ¼ teaspoon salt
Instructions
- Coat an 8-inch square pan with nonstick spray. Line the pan with parchment paper, ensuring two sides hang over the edges for easy removal.
- Cream ½ cup softened butter and ¾ cup brown sugar in a large mixing bowl until the mixture becomes light and fluffy.
- Incorporate 1 room temperature egg and 1 teaspoon vanilla extract into the butter mixture, stirring until completely combined.
- Gradually fold in 1 cup all-purpose flour, 1 cup graham cracker crumbs, ½ teaspoon baking powder, and ¼ teaspoon salt until a consistent dough forms.
- Gently mix 1 cup semi-sweet chocolate chips into the dough, distributing them evenly throughout.
- Transfer half the cookie dough into the prepared pan, pressing it down to create an even bottom layer.
- Carefully spread 1 heaping cup of marshmallow creme across the dough, ensuring complete coverage.
- Drop remaining cookie dough in small spoonfuls over the marshmallow layer, creating a rustic, uneven top.
- Bake at 350°F for 25-30 minutes, watching for golden brown edges and a set center.
- Remove from oven and let the bars cool completely in the pan before slicing into squares using the parchment paper edges to lift.
Notes
- Chill the dough for 30 minutes before spreading to make it easier to handle and create a more even layer.
- Use a clean, warm knife to cut through the marshmallow creme smoothly when layering the dough.
- For a gluten-free version, swap graham cracker crumbs with gluten-free graham cracker alternative or ground almond flour.
- To prevent sticking, spray your spatula with cooking spray when spreading marshmallow creme and dough layers.
- Prep Time: 15 minutes
- Cook Time: 25-30 minutes
- Category: Dessert Bars
- Method: Baking
- Cuisine: American
Nutrition
- Serving Size: 8 to 12
- Calories: 244 kcal
- Sugar: 19 g
- Sodium: 93 mg
- Fat: 12 g
- Saturated Fat: 7 g
- Unsaturated Fat: 5 g
- Trans Fat: 0.1 g
- Carbohydrates: 32 g
- Fiber: 1 g
- Protein: 2 g
- Cholesterol: 27 mg
Madison Wyman
Recipe Developer & Food Storyteller
Expertise
Recipe Research and Adaptation, Food Writing and Cultural Storytelling, Sustainable and Ethical Sourcing, Dietary Adaptations (e.g., gluten-free, plant-based)
Education
Oregon Health & Science University
Portland Community College
Madison’s passion for flavor and culture ignited amidst the rich Southern cooking traditions of her upbringing, where cherished family recipes told delicious tales.
Armed with a Master’s in Food Systems and Society from Oregon Health & Science University and a Culinary Arts Certificate from Portland Community College, Madison truly excels at transforming rich, intricate flavors into dishes that are both approachable and heartfelt.
For her, cooking is a vibrant blend of science, art, and heritage – a powerful way to connect us to our roots and each other. Her recipes invite you to delve deeper, uncovering the fascinating stories woven into every ingredient.