
Cherry Cheesecake Bars Recipe for Sweet Summer Gatherings
Sweet, creamy cherry cheesecake bars promise pure dessert satisfaction for anyone craving a delightful treat.
Dessert enthusiasts will fall in love with this classic combination of smooth cream cheese and bright fruit flavors.
Perfectly balanced between rich and refreshing, these bars offer a delectable experience that feels like a special occasion.
Soft, decadent textures create a memorable moment of pure enjoyment for every bite.
Weekend bakers and dessert lovers appreciate how simple yet impressive these bars can be for gatherings or personal indulgence.
Elegant enough for celebrations but easy enough for casual enjoyment, cherry cheesecake bars represent comfort and joy in every slice.
What Makes Cherry Cheesecake Bars Special
Cherry Cheesecake Bars Ingredient Set
Main Ingredients:Handy Kitchen Tools for Cherry Cheesecake Bars
Directions for Cherry Cheesecake Bars

Prepare the Baking Pan
Grab your 9×13-inch baking pan and line it with parchment paper. Make sure the paper hangs over the sides – this trick helps you lift out the bars later with zero fuss. Set your oven to preheat at 350°F.
Create the Crunchy Crust
Grab a mixing bowl and combine these ingredients for the graham cracker base:
Mix everything until it looks like slightly damp sand. Press this mixture firmly into the pan bottom, using the back of a measuring cup to create a super compact layer.
Mix the Cheesecake Filling
Grab your electric mixer and blend these creamy ingredients until super smooth:
Beat for about 2-3 minutes until the mixture looks silky and light.
Add Filling Extras
Toss in these remaining filling ingredients and blend until completely combined:
Mix until everything looks perfectly incorporated and creamy.
Bake the Base Layer
Pour the cheesecake mixture over your graham cracker crust. Smooth the top with a spatula to make it even. Slide the pan into the 350°F oven and bake for 25-30 minutes. The center should look almost set but still have a tiny jiggle.
Cool and Rest
Pull the pan from the oven and let it cool completely at room temperature. This takes about 1 hour – perfect time to clean up the kitchen or relax.
Add Cherry Topping
Spread the entire 21 oz can of cherry pie filling across the cooled cheesecake layer. Make sure it’s distributed evenly.
Chill and Set
Slide the pan into the refrigerator and let it rest for at least 2 hours. This helps everything set perfectly.
Slice and Serve
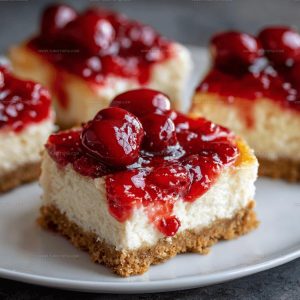
Use the parchment paper edges to lift the entire dessert from the pan. Slice into 24 neat squares. If you want extra fancy, sprinkle some fresh cherries on top before serving.
Helpful Cooking Notes For Cherry Cheesecake Bars
What Flavor Twists Refresh Cherry Cheesecake Bars
Best Ways To Slice Cherry Cheesecake Bars
Recommended Storage Method For Cherry Cheesecake Bars
Cherry Cheesecake Bars Common Questions
What makes the crust crisp and hold together?
Pressing the graham cracker mixture firmly with the back of a measuring cup creates a compact, sturdy base that won’t crumble when you bite into the bars.
Can cream cheese be substituted?
Standard cream cheese works best. Reduced-fat versions might change the texture and richness of your cheesecake bars.
How do I know when the cheesecake is perfectly baked?
Watch for the center to be almost set but still slightly jiggly – this ensures a creamy, smooth texture without overbaking.
Why does the recipe use sour cream?
Sour cream adds moisture and a subtle tangy flavor that enhances the richness of the cheesecake filling, creating a more complex taste.
Is it necessary to refrigerate the bars?
Absolutely refrigerate for at least 2 hours. Chilling helps the bars set completely and allows the flavors to meld together perfectly.
Can fresh cherries replace pie filling?
Pie filling provides consistent sweetness and texture. Fresh cherries might release too much liquid and affect the bar’s structure.
Cherry Cheesecake Bars Recipe
- Total Time: 55 minutes
- Yield: 9 1x
Description
Whip up these delightful cherry cheesecake bars for a sweet treat that’ll make your dessert dreams come true. Creamy cheesecake meets tangy cherries in a perfectly balanced bar that’s sure to impress your friends and family.
Ingredients
Main Ingredients:
- 16 oz cream cheese
- 1 can cherry pie filling
- 1 ½ cups graham cracker crumbs
- 2 large eggs
Dairy and Binding Ingredients:
- ½ cup unsalted butter
- ½ cup granulated sugar
- ¼ cup sour cream
Flavor and Seasoning Ingredients:
- ¼ cup granulated sugar
- 1 teaspoon vanilla extract
- Optional: Fresh cherries for garnish
Instructions
- Preheat your oven to 350°F and line a 9×13-inch baking pan with parchment paper, allowing excess to hang over the sides for easy removal.
- Mix 1 ½ cups graham cracker crumbs, ¼ cup sugar, and ½ cup melted butter in a bowl until the mixture resembles wet sand.
- Press the crumb mixture firmly into the bottom of the prepared pan, creating an even, compact layer using the back of a measuring cup.
- Beat 16 oz softened cream cheese and ½ cup sugar in a large mixing bowl until smooth and creamy, about 2-3 minutes.
- Add 1 teaspoon vanilla extract, 2 large eggs, and ¼ cup sour cream to the cream cheese mixture, blending until completely incorporated.
- Pour the cheesecake filling evenly over the graham cracker crust, smoothing the top with a spatula.
- Bake at 350°F for 25-30 minutes, until the center is almost set but still slightly jiggly.
- Remove from the oven and let the cheesecake cool completely at room temperature for about 1 hour.
- Spread the entire 21 oz can of cherry pie filling evenly across the cooled cheesecake layer.
- Refrigerate the bars for at least 2 hours to allow them to set completely.
- Using the parchment paper overhang, lift the bars out of the pan and slice into 24 square pieces.
- Garnish with fresh cherries if desired and serve chilled.
Notes
- Chill the cream cheese to room temperature for smoother, lump-free mixing.
- Press the graham cracker crust firmly and evenly to create a solid base that won’t crumble when cutting.
- If fresh cherries aren’t available, use high-quality cherry preserves or canned pie filling for consistent flavor.
- For a gluten-free version, swap graham crackers with almond flour or gluten-free cookie crumbs to maintain the classic texture.
- Prep Time: 20 minutes
- Cook Time: 35 minutes
- Category: Dessert Bars
- Method: Baking
- Cuisine: American
Nutrition
- Serving Size: 9
- Calories: 285 kcal
- Sugar: 24 g
- Sodium: 135 mg
- Fat: 20 g
- Saturated Fat: 12 g
- Unsaturated Fat: 7 g
- Trans Fat: 0.5 g
- Carbohydrates: 22 g
- Fiber: 1 g
- Protein: 4 g
- Cholesterol: 70 mg
Madison Wyman
Recipe Developer & Food Storyteller
Expertise
Recipe Research and Adaptation, Food Writing and Cultural Storytelling, Sustainable and Ethical Sourcing, Dietary Adaptations (e.g., gluten-free, plant-based)
Education
Oregon Health & Science University
Portland Community College
Madison’s passion for flavor and culture ignited amidst the rich Southern cooking traditions of her upbringing, where cherished family recipes told delicious tales.
Armed with a Master’s in Food Systems and Society from Oregon Health & Science University and a Culinary Arts Certificate from Portland Community College, Madison truly excels at transforming rich, intricate flavors into dishes that are both approachable and heartfelt.
For her, cooking is a vibrant blend of science, art, and heritage – a powerful way to connect us to our roots and each other. Her recipes invite you to delve deeper, uncovering the fascinating stories woven into every ingredient.