
Cherry Cheesecake Brownies Recipe That Swirl Fudge
Cherry Cheesecake Brownies Recipe combines two beloved desserts into one show-stopping treat that works for any celebration or casual gathering.
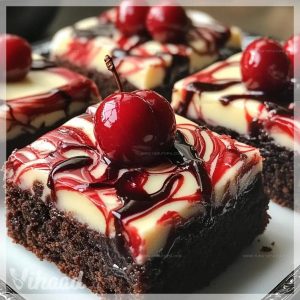
Rich chocolate meets creamy sweetness with a fruity finish that balances every bite perfectly.
Whether for birthday parties, potlucks, or weekend baking sessions, it brings out crowd-pleasing results without requiring advanced skills.
The contrast between layers creates visual appeal that makes presentation effortless and impressive.
Families love how quickly it disappears from the pan, while hosts appreciate how well it travels to events.
Making something special feels achievable when the process stays manageable and the outcome looks bakery-worthy.
Once you see how simple it is to create bakery-style results at home, there’s no going back to ordinary brownies.
Why Cherry Cheesecake Brownies Combine Two Favorites
What Ingredients Are Needed for Cherry Cheesecake Brownies
Brownie Base:Cheesecake Layer:Fruit Topping:Equipment Used in Cherry Cheesecake Brownies
Cherry Cheesecake Brownies Recipe Baking Guide
Prepare Brownie Base
Grab your 18 oz brownie mix and get ready to create some magic. Follow the package instructions by mixing in 1/4 cup water, 1/3 cup vegetable oil, and 1 large egg. Stir until everything blends smoothly. Grease your 9×13 inch baking pan and spread the brownie batter evenly across the bottom.
Make Cheesecake Layer
Grab a mixing bowl and your softened 8 oz cream cheese. Beat the cream cheese until it’s silky smooth. Add these ingredients:
Whip everything together until the mixture looks creamy and consistent.
Create Cherry Swirl
Pour the cheesecake mixture over your brownie base, making sure it covers the entire surface. Gently distribute 1 cup of halved pitted cherries across the top, pressing them slightly into the cheesecake layer.
Bake to Perfection
Slide your pan into a preheated oven at 350°F. Bake for 28 minutes, checking that the cheesecake layer sets and turns a soft golden color.
Cool and Chill
Remove the pan from the oven and let it rest at room temperature for 45 minutes. Transfer to the refrigerator and chill for 3 hours before cutting into delectable squares.
Which Tips Work Best for Cherry Cheesecake Brownies Recipe
Which Variations Are Best for Cherry Cheesecake Brownies
Serving Ideas for Cherry Cheesecake Brownies
How to Store Cherry Cheesecake Brownies
Cherry Cheesecake Brownies Frequently Asked Questions
Can I use frozen cherries instead of fresh ones?
Absolutely! Just thaw and drain them well before adding to prevent excess moisture in your cheesecake layer.
How do I know when the brownies are perfectly baked?
Look for a slightly golden cheesecake top and a set (not jiggly) center when you gently shake the pan.
What if my cream cheese isn’t fully softened?
Microwave it in 10-second intervals, stirring between each, to reach a smooth consistency without melting.
Can I make these brownies ahead of time?
These brownies are perfect for preparing a day in advance and storing in the refrigerator until serving.
Do I need a mixer to make the cheesecake layer?
A hand whisk works great if you don’t have an electric mixer – just beat until the mixture is smooth and creamy.
How can I prevent the cherries from sinking?
Lightly coat the halved cherries in flour before folding into the cheesecake mixture to help them stay suspended.
Cherry Cheesecake Brownies Recipe
- Total Time: 45 minutes
- Yield: 9 to 12 1x
Description
Rich fudgy brownies meet tangy cherry cheesecake in this impressive dessert that looks as incredible as it tastes. The sweet-tart cherry topping perfectly balances the creamy cheesecake layer and chocolate base for a bakery-worthy treat.
Ingredients
Main Ingredients:
- 1 box brownie mix
- 8 oz cream cheese
- 1 cup cherries
Wet Ingredients:
- 1 large egg (for brownie mix)
- 1 large egg (for cheesecake)
- Water (as per package instructions)
- 1 tablespoon vegetable oil
Sweeteners and Flavorings:
- ½ cup granulated sugar
- 1 teaspoon vanilla extract
Instructions
- Mix the 18 oz brownie mix with ¼ cup water, ⅓ cup oil, and 1 large egg according to package directions. Spread the batter smoothly across a greased 9×13 inch pan.
- Grab your stand mixer and whip the 8 oz softened cream cheese until completely smooth and silky.
- Incorporate ½ cup granulated sugar, 1 teaspoon vanilla extract, and 1 large egg into the cream cheese mixture. Beat until the texture becomes creamy and uniform.
- Carefully drizzle the cheesecake mixture over the brownie base, ensuring an even layer covers the entire surface.
- Sprinkle 1 cup of halved pitted cherries across the cheesecake layer, gently pressing them slightly into the mixture.
- Slide the pan into a preheated oven at 350°F and bake for exactly 28 minutes. The cheesecake should look set with a light golden color around the edges.
- Remove the pan and let your brownies rest at room temperature for 45 minutes to stabilize their structure.
- Transfer the pan to the refrigerator and chill for 3 hours to help the layers set completely before slicing into square servings.
Notes
- Ensure cream cheese is at room temperature for smooth, lump-free mixing that creates a silky cheesecake layer.
- Drain cherries well before adding to prevent excess liquid from making the brownies soggy and compromising the texture.
- For a gluten-free version, swap the standard brownie mix with a gluten-free alternative that matches the same measurements.
- Refrigerating allows the layers to set completely, giving clean-cut squares with distinct brownie and cheesecake sections.
- Prep Time: 15 minutes
- Cook Time: 25-30 minutes
- Category: Brownies
- Method: Baking
- Cuisine: American
Nutrition
- Serving Size: 9 to 12
- Calories: 260 kcal
- Sugar: 18 g
- Sodium: 150 mg
- Fat: 14 g
- Saturated Fat: 5 g
- Unsaturated Fat: 8 g
- Trans Fat: 0.1 g
- Carbohydrates: 30 g
- Fiber: 1 g
- Protein: 4 g
- Cholesterol: 50 mg
Madison Wyman
Recipe Developer & Food Storyteller
Expertise
Recipe Research and Adaptation, Food Writing and Cultural Storytelling, Sustainable and Ethical Sourcing, Dietary Adaptations (e.g., gluten-free, plant-based)
Education
Oregon Health & Science University
Portland Community College
Madison’s passion for flavor and culture ignited amidst the rich Southern cooking traditions of her upbringing, where cherished family recipes told delicious tales.
Armed with a Master’s in Food Systems and Society from Oregon Health & Science University and a Culinary Arts Certificate from Portland Community College, Madison truly excels at transforming rich, intricate flavors into dishes that are both approachable and heartfelt.
For her, cooking is a vibrant blend of science, art, and heritage – a powerful way to connect us to our roots and each other. Her recipes invite you to delve deeper, uncovering the fascinating stories woven into every ingredient.