Cherry Cheesecake Lush Recipe That Layers Creamy Goodness
Cherry cheesecake lush has become a go-to dessert for anyone who loves layers of creamy sweetness without spending hours in the kitchen.
Potlucks and family gatherings feel incomplete without a dessert that looks impressive but comes together with ease.
Cool, smooth, and satisfying in every bite, it brings smiles to faces before anyone even picks up a spoon.
No baking means less stress and more time to enjoy company while still serving something special.
You can count on it to disappear fast from any dessert table, leaving everyone asking for the recipe.
Light enough for warm weather but indulgent enough for celebrations, it fits any occasion beautifully.
The combination of textures keeps things interesting from top to bottom, making every spoonful worth savoring.
Make it once and it becomes a regular request at every gathering you host.
What Makes Cherry Cheesecake Lush So Enjoyable
Key Ingredients in Cherry Cheesecake Lush
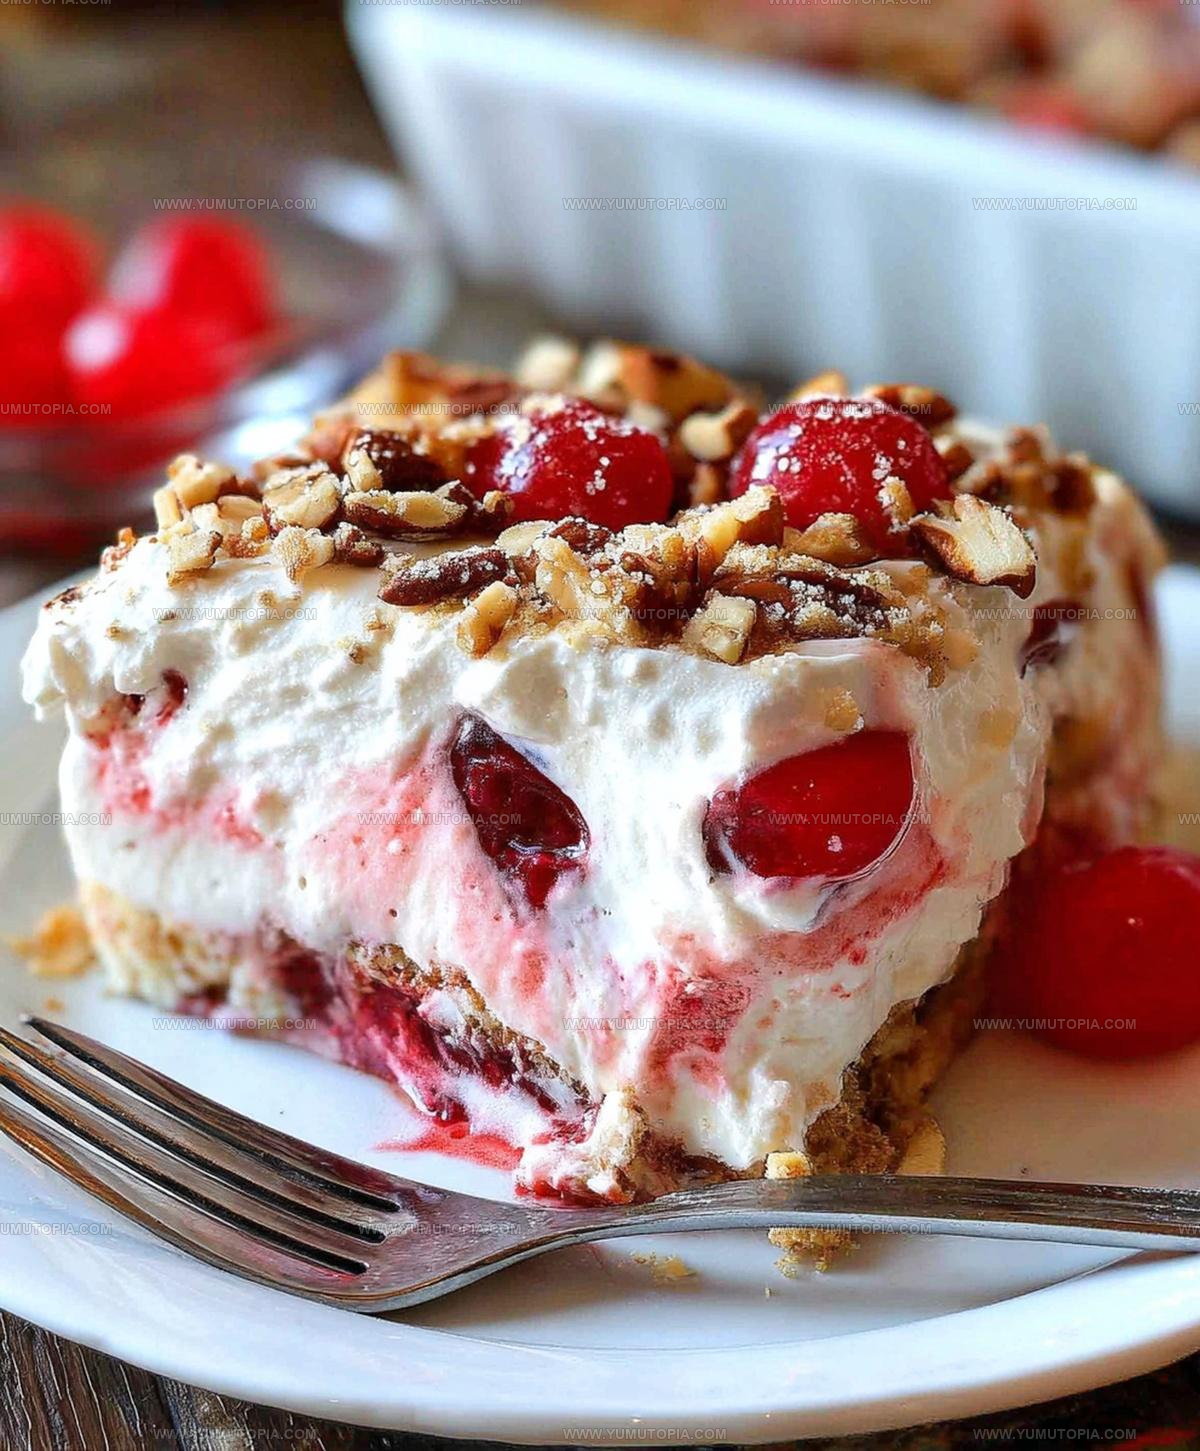
Crust:Cream Cheese Layer:Pudding and Topping Layer:Refrigerate for at least 4 hours or overnight at 40°F.
Standard Cooking Tools for Cherry Cheesecake Lush
Making Cherry Cheesecake Lush From Start to Finish
Prepare Crust
Preheat the oven to 350°F. Grab a medium bowl and mix these ingredients:
Press the crumbly mixture into a 9×13 inch baking pan, making sure it’s packed down evenly.
Bake Crust
Slide the pan into the preheated oven and bake for 15 minutes. Pull it out and let the crust cool completely.
Create Cream Cheese Layer
In a clean bowl, whip together:
Blend until smooth and creamy. Spread this mixture carefully over your cooled crust.
Mix Pudding Layer
Whisk these ingredients until they’re perfectly smooth:
Pour this pudding mixture over the cream cheese layer.
Add Cherry Topping
Open your can of Lucky Leaf Cherry Pie Filling and spread it evenly across the pudding layer.
Final Decoration
Top the entire dessert with the remaining whipped topping. Sprinkle:
Chill and Set
Tuck the dessert into the refrigerator for at least 4 hours. Overnight chilling works best to let all the flavors blend together perfectly.
Making It Better With Cherry Cheesecake Lush
Layered Variations for Cherry Cheesecake Lush
How To Serve Cherry Cheesecake Lush
Proper Storage For Cherry Cheesecake Lush
Cherry Cheesecake Lush Helpful FAQs
Can I use a different type of pie filling?
Absolutely swap cherry for blueberry, strawberry, or any pie filling that sounds delicious to you. Just make sure the can size matches the recipe.
Do I need to use name-brand ingredients?
No need! Store-brand vanilla wafers, pudding mix, and whipped topping work perfectly fine and can save you money.
What if I cannot find pecans?
Almonds or walnuts are great substitutes. If you have nut allergies, simply skip the nuts or replace with graham cracker crumbs.
How long does this dessert stay fresh?
When stored covered in the refrigerator, your Cherry Cheesecake Lush stays delicious for 3-4 days. Just keep it chilled and away from warm temperatures.
Can this dessert be frozen?
Yes! Wrap the pan tightly in plastic wrap and aluminum foil. The dessert freezes well for up to one month. Thaw overnight in the refrigerator before serving.
Is this recipe good for potlucks?
Definitely! This dessert travels well, serves a crowd, and looks impressive without requiring complex preparation.
Cherry Cheesecake Lush Recipe
- Total Time: 4 hours 35 minutes
- Yield: 8 1x
Description
This cherry cheesecake lush delivers creamy comfort straight from Grandma’s kitchen, melting together layers of graham cracker crust, silky cream cheese, and sweet cherry goodness that make your taste buds dance with pure delight.
Ingredients
Crust:
- 1 cup vanilla wafer crumbs
- 1 cup pecans (finely chopped)
- 1 stick butter (½ cup, melted)
Filling:
- 8 ounces cream cheese (softened)
- 1 cup powdered sugar
- 16 ounces whipped topping (divided)
- 2 boxes cheesecake flavored pudding (small)
- 3 cups milk
Topping:
- 1 can Lucky Leaf cherry pie filling
- ½ cup pecans (chopped)
Instructions
- Preheat your oven to 350°F. Combine 1 cup vanilla wafer crumbs, 1 cup finely chopped pecans, and ½ cup melted butter in a mixing bowl until thoroughly blended.
- Press the crumb mixture evenly into a 9×13 inch baking pan. Bake for exactly 15 minutes at 350°F, then remove and let cool completely at room temperature.
- Beat 8 oz softened cream cheese with 1 cup powdered sugar. Fold in 1 ½ cups whipped topping until the mixture becomes silky and uniform.
- Spread the cream cheese layer carefully across the cooled crust, ensuring an even distribution.
- Whisk 2 small boxes of cheesecake pudding mix with 3 cups milk for 2 minutes. Gently fold in 1 cup whipped topping until smooth.
- Pour the pudding mixture over the cream cheese layer, creating a consistent surface.
- Spread 1 entire can of Lucky Leaf Cherry Pie Filling across the pudding layer, covering it completely.
- Top the cherry layer with remaining whipped topping, using a spatula to create a smooth finish.
- Sprinkle ½ cup chopped pecans over the top for added crunch and decoration.
- Refrigerate the dessert for 4-6 hours or overnight to allow layers to set and flavors to meld together.
Notes
- Crust gets extra crunch if pecans are toasted lightly before mixing into the vanilla wafer crumbs.
- Cream cheese needs to be completely softened at room temperature to ensure a smooth, lump-free filling.
- Chilling overnight allows layers to set perfectly and flavors to develop more deeply.
- For a gluten-free version, swap vanilla wafer crumbs with gluten-free graham cracker crumbs or almond flour.
- Prep Time: 20 minutes
- Cook Time: 15 minutes
- Category: Cheesecakes
- Method: Baking
- Cuisine: American
Nutrition
- Serving Size: 8
- Calories: 365 kcal
- Sugar: 26 g
- Sodium: 180 mg
- Fat: 27 g
- Saturated Fat: 8 g
- Unsaturated Fat: 17 g
- Trans Fat: 0.5 g
- Carbohydrates: 25 g
- Fiber: 2 g
- Protein: 6 g
- Cholesterol: 45 mg
Madison Wyman
Recipe Developer & Food Storyteller
Expertise
Recipe Research and Adaptation, Food Writing and Cultural Storytelling, Sustainable and Ethical Sourcing, Dietary Adaptations (e.g., gluten-free, plant-based)
Education
Oregon Health & Science University
Portland Community College
Madison’s passion for flavor and culture ignited amidst the rich Southern cooking traditions of her upbringing, where cherished family recipes told delicious tales.
Armed with a Master’s in Food Systems and Society from Oregon Health & Science University and a Culinary Arts Certificate from Portland Community College, Madison truly excels at transforming rich, intricate flavors into dishes that are both approachable and heartfelt.
For her, cooking is a vibrant blend of science, art, and heritage – a powerful way to connect us to our roots and each other. Her recipes invite you to delve deeper, uncovering the fascinating stories woven into every ingredient.