Cherry Chocolate Brownie Cozy Cheesecake Bars Recipe
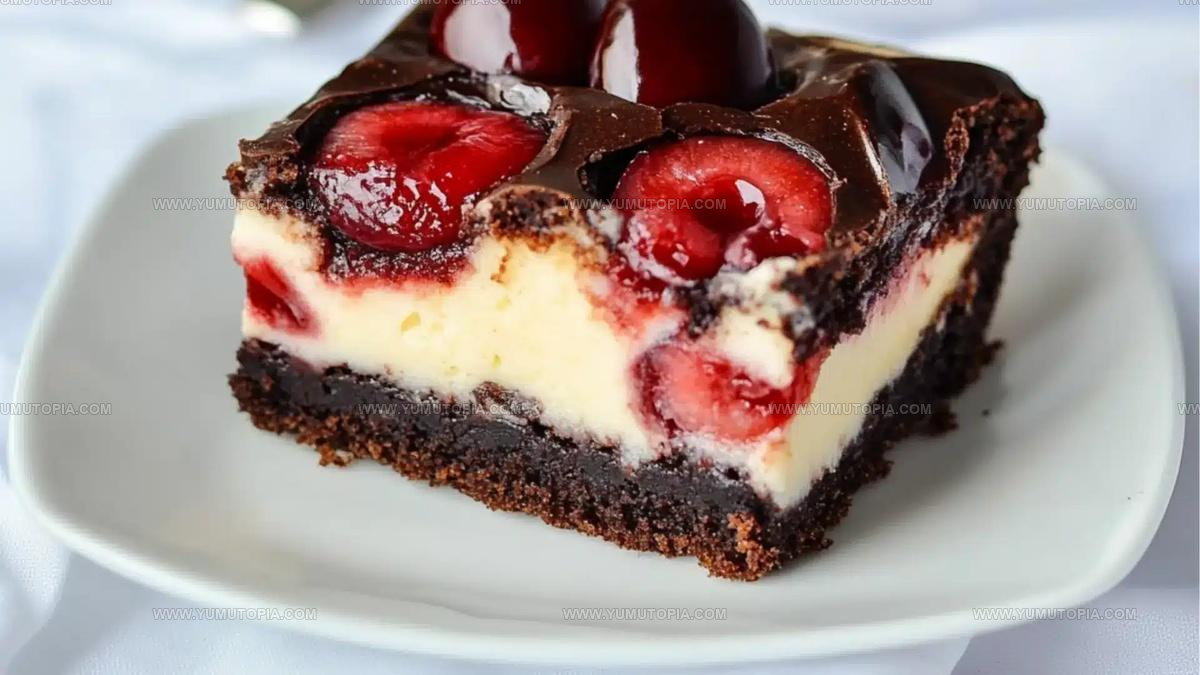
Cherry Chocolate Brownie Cheesecake Bars Recipe unites three beloved desserts into one show-stopping treat that satisfies every sweet tooth at the table.
Rich, fudgy layers meet creamy smoothness and bright fruit flavor in perfect harmony.
Potlucks, holiday gatherings, and special celebrations all call for something memorable, and nothing fits the bill quite like bars that look as impressive as they taste.
The contrast of textures keeps every bite interesting while the flavor profile balances richness with a hint of tartness.
You won’t need fancy equipment or professional skills to pull off something that looks bakery-worthy.
Simple enough for casual weekends yet impressive enough for entertaining, bars like these prove that homemade desserts really do make any occasion feel more special.
What Makes Cherry Chocolate Cheesecake Bars Stand Out
Cherry Chocolate Brownie Cheesecake Bars Ingredients
Brownie Layer:Cheesecake Layer:Cherry Layer:Optional Toppings:Tools Required for Cherry Brownie Cheesecake Bars
Cherry Chocolate Brownie Cheesecake Bars Cooking Guide
Prepare the Baking Setup
Grab an 8×8-inch pan and line it with parchment paper, making sure some hangs over the edges so you can easily lift out your bars later. Preheat your oven to exactly 350°F. This temperature will help everything bake perfectly.
Create the Brownie Base
Mix your chocolatey foundation by combining ingredients for the brownie layer:
Whisk everything until smooth. Then fold in your dry ingredients:
Spread this rich chocolate mixture evenly across your prepared pan.
Craft the Creamy Cheesecake Layer
Grab another bowl and blend your cheesecake components until silky:
Carefully pour this creamy mixture over your brownie base.
Prepare the Cherry Topping
In a small saucepan, combine your fruity ingredients:
Cook for 5-7 minutes until the mixture thickens. Stir in 1/4 teaspoon almond extract if you’re feeling fancy. Let it cool slightly.
Swirl and Decorate
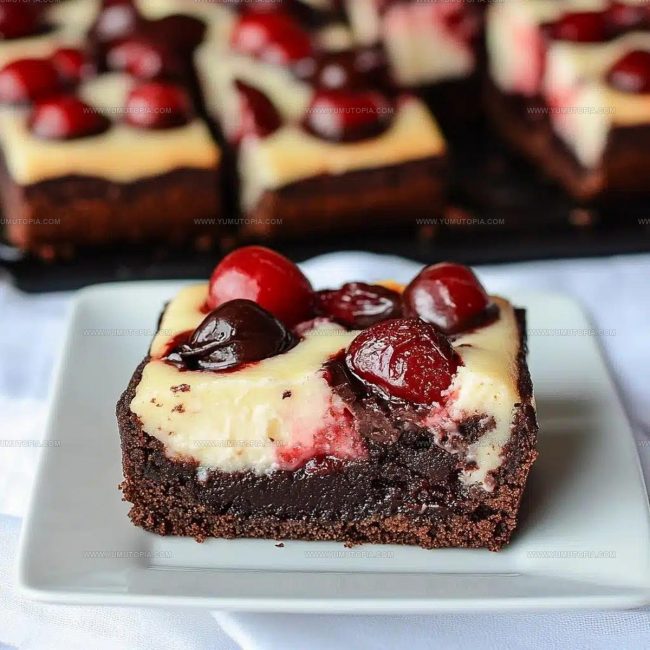
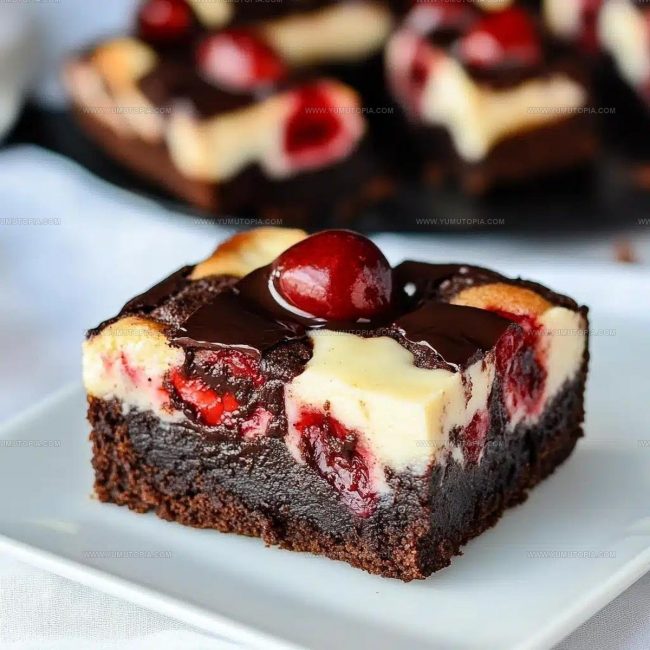
Spoon those beautiful cherry bits across your cheesecake layer. Use a knife to create elegant swirls that blend the red and white together.
Bake to Perfection
Slide your pan into the 350°F oven. Bake for 35-40 minutes. You’re looking for a center that’s just set and a toothpick that comes out with a few moist crumbs.
Cool and Set
Let the bars cool completely at room temperature. Then refrigerate for at least 2 hours – overnight is even better. This helps everything set and makes cutting super clean.
Serve and Enjoy
Use those parchment paper edges to lift out your bars. Slice into squares and serve chilled. Sprinkle with chocolate chips or chopped nuts if you want some extra crunch.
Helpful Cooking Notes for Cheesecake Brownie Bars
Different Takes on Cherry Chocolate Brownie Cheesecake Bars
What Pairs Well With Cherry Chocolate Brownie Cheesecake Bars
Best Storage Practices For Cherry Chocolate Brownie Cheesecake Bars
Helpful Recipe Answers for Cherry Brownie Cheesecake Bars
Can I use frozen cherries instead of fresh?
Frozen cherries work perfectly! Just thaw and drain them before cooking to prevent extra liquid in the cherry layer.
How do I know when the cheesecake layer is set?
Gently shake the pan – the center should have a slight wobble but not be liquid. The edges will look firmer and slightly puffed.
What if my cheesecake layer cracks?
No worries! Small cracks are normal and won’t affect taste. The cherry swirl will help disguise any surface imperfections.
Can I make these bars gluten-free?
Substitute the all-purpose flour with a gluten-free flour blend to create a delicious gluten-free version of these bars.
How should I store the cherry chocolate brownie bars?
Keep them covered in the refrigerator for up to 5 days. The flavor actually improves as they sit, so don’t be afraid to make them ahead.
Cherry Chocolate Brownie Cheesecake Bars Recipe
- Total Time: 2 hours 60 minutes (3 hours)
- Yield: 9 1x
Description
Cherry Chocolate Brownie Cheesecake Bars are my weekend baking adventure that never fails to make friends smile. Creamy cheesecake swirled into rich chocolate brownies create the perfect dessert your taste buds will absolutely adore.
Ingredients
Brownie Layer:
- ½ cup unsalted butter
- 1 cup granulated sugar
- 2 large eggs
- ⅓ cup unsweetened cocoa powder
- ½ cup all-purpose flour
- 1 teaspoon vanilla extract
- ¼ teaspoon salt
- ¼ teaspoon baking powder
Cheesecake Layer:
- 8 oz cream cheese
- ¼ cup granulated sugar
- 1 large egg
- ½ teaspoon vanilla extract
Cherry Layer:
- 1 ¼ cups frozen cherries
- 2 tablespoons granulated sugar
- 1 tablespoon cornstarch
- 1 tablespoon lemon juice
- ¼ teaspoon almond extract
Optional Toppings:
- Chocolate chips
- Shaved dark chocolate
- Chopped almonds or walnuts
Instructions
- Preheat your oven to 350°F. Line an 8×8-inch pan with parchment paper, creating overhanging sides for easy removal.
- Melt ½ cup butter and whisk with 1 cup sugar in a large bowl. Incorporate 2 eggs and 1 teaspoon vanilla until smooth.
- Blend ⅓ cup cocoa powder, ½ cup flour, ¼ teaspoon salt, and ¼ teaspoon baking powder into the butter mixture until just combined.
- Spread the brownie batter evenly across the prepared pan.
- Beat 8 oz softened cream cheese with ¼ cup sugar until creamy. Add 1 egg and ½ teaspoon vanilla, mixing thoroughly.
- Carefully pour the cheesecake mixture over the brownie layer and smooth gently.
- Combine 1 ¼ cups thawed chopped cherries, 2 tablespoons sugar, 1 tablespoon cornstarch, and 1 tablespoon lemon juice in a saucepan.
- Cook the cherry mixture over medium heat for 5-7 minutes until thickened, stirring constantly. Stir in ¼ teaspoon almond extract if desired.
- Allow cherry mixture to cool slightly, then spoon over the cheesecake layer. Create swirls using a butter knife.
- Bake for 35-40 minutes until the center sets and a toothpick shows minimal moist crumbs.
- Remove from oven and cool completely at room temperature.
- Refrigerate for at least 2 hours to ensure clean, precise slicing.
- Lift bars from pan using parchment paper. Slice into squares and serve chilled.
Notes
- Use room-temperature ingredients to ensure smooth, well-blended layers that combine perfectly.
- Check your brownie base for doneness by looking for a few moist crumbs on the toothpick, which prevents dry, tough brownies.
- When swirling cherry mixture into cheesecake, use light, gentle strokes to create beautiful marbled patterns without overmixing.
- For gluten-free version, substitute regular flour with almond or gluten-free flour blend, maintaining the same measurement.
- Prep Time: 20 minutes
- Cook Time: 40 minutes
- Category: Dessert Bars
- Method: Baking
- Cuisine: American
Nutrition
- Serving Size: 9
- Calories: 210 kcal
- Sugar: 18 g
- Sodium: 90 mg
- Fat: 13 g
- Saturated Fat: 6 g
- Unsaturated Fat: 6 g
- Trans Fat: 0 g
- Carbohydrates: 22 g
- Fiber: 2 g
- Protein: 3 g
- Cholesterol: 45 mg
Logan Lemaster
Founder & Culinary Innovator
Expertise
Recipe Development and Innovation, Menu Design and Optimization, Fine Dining Techniques, Ingredient Pairing and Flavor Science
Education
Metropolitan Culinary Arts Institute
Logan’s culinary journey kicked off in his vibrant Chicago family kitchen, where fresh, seasonal ingredients and bold flavors were always front and center.
After graduating from the Metropolitan Culinary Arts Institute in Arlington, Virginia, and honing his skills in renowned restaurants, Logan mastered the art of blending classic techniques with exciting, modern twists.
His kitchen is a dynamic lab for flavor exploration. Through Yum Utopia, Logan aims to empower you to cook with both confidence and creativity, turning simple ingredients into spectacular meals.