
Cherry Hand Pie Recipe for Sweet On-the-Go Treats
Sweet, handheld cherry hand pies promise pure deliciousness for anyone craving a portable dessert adventure.
Compact pastry pockets bursting with fruity goodness have serious charm that goes beyond ordinary bakery treats.
Summer picnics, afternoon snacks, or spontaneous gatherings become extra special with these adorable personal-sized delights.
Perfectly portable and wonderfully nostalgic, these mini pies capture the essence of homemade comfort without complicated preparation.
Crispy golden crusts and luscious fruit filling create an irresistible combination that satisfies serious sweet tooth cravings.
Bakers of intermediate skill levels can confidently craft these delightful handheld desserts with minimal fuss and maximum flavor.
What Makes Easy Cherry Hand Pie So Charming
Cherry Hand Pies Ingredient List
Main Ingredients
Pie Crust:Fruit Filling:Supporting Ingredients
Wash and Finishing:Optional Flavor Enhancers:Handy Kitchen Tools for Cherry Hand Pie
How to Make Cherry Hand Pies
Warm Up the Oven
Crank your oven to 400°F and grab a baking sheet. Line it with parchment paper so nothing sticks.
Roll Out the Dough
Grab your pie crust and roll it out super thin – about 1/8 inch thick. You want a rectangle roughly 15×20 inches. Trim those edges to make a neat shape.
Cut Perfect Rectangles
Slice the dough into 8 equal rectangles. Make sure they’re neat and tidy – these will be your hand pie bases.
Prepare the Filling
Scoop out the cherry filling and get ready to create some deliciousness:
Spread the filling carefully, leaving a small border around the edges.
Create the Egg Wash
Whisk together these ingredients for a golden finish:
Brush the edges of each rectangle lightly with this magical mixture.
Seal the Pies
Top each filled rectangle with another dough piece. Press the edges together with a fork to create a tight seal. Cut a few small slits on top to let steam escape.
Sprinkle and Bake
Optionally sprinkle some coarse sugar on top. Pop the baking sheet into the 400°F oven for 20-25 minutes until the pies turn a beautiful golden brown.
Cool and Decorate
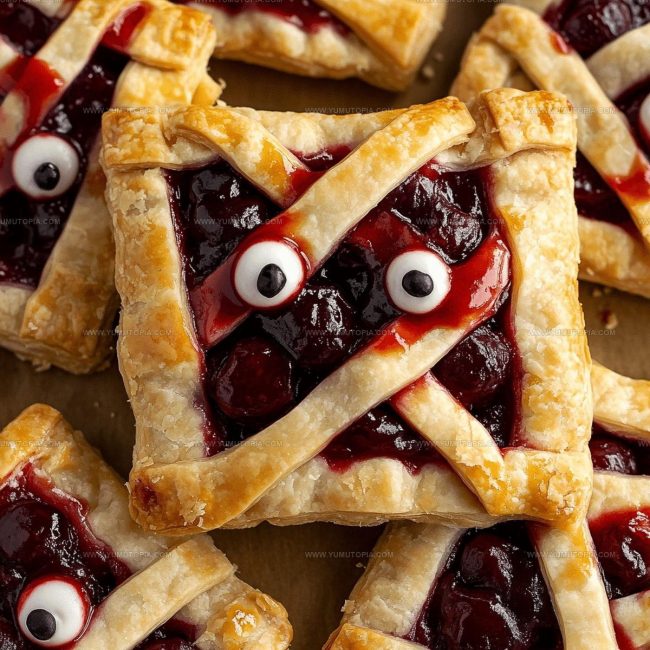
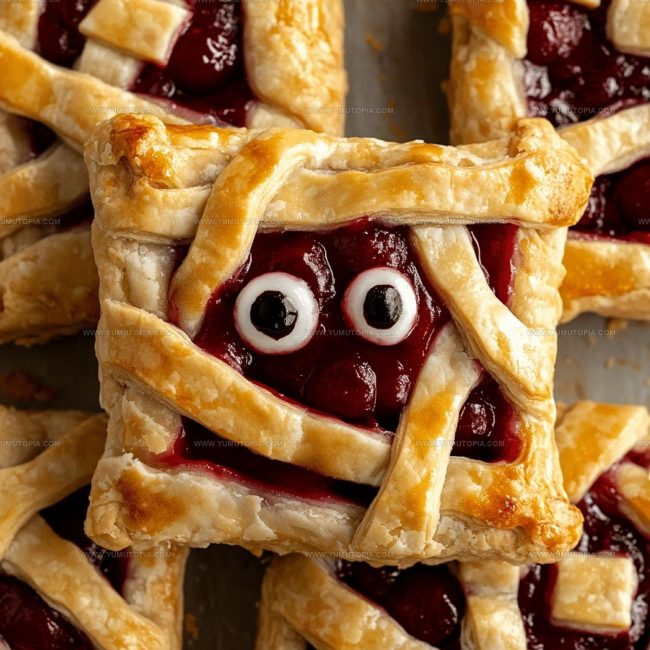
Let the hand pies cool for a few minutes. If you’re feeling playful, add some googly eyes or other fun decorations while they’re still warm.
Key Cooking Insights for Cherry Hand Pie
What Are Cherry Hand Pie Variations
Best Serving Options For Cherry Hand Pies
Storage And Reheating Notes For Cherry Hand Pie
Cherry Hand Pie Common Questions
Can I use canned cherry pie filling?
Store-bought works perfectly! Just drain extra liquid to prevent soggy pastry and ensure your hand pies stay crisp and delicious.
How do fresh cherries compare to frozen?
Fresh cherries create the most vibrant flavor. If using frozen, thaw and drain completely to prevent excess moisture from ruining your pastry texture.
What type of pie dough works best?
Homemade or store-bought all-butter pie dough delivers excellent results. Shortcrust or puff pastry create wonderfully flaky hand pies.
Should the filling be cold before assembling?
Room temperature filling works best. Too hot, and it could tear your delicate pastry; too cold, and it won’t spread smoothly.
Can these be made ahead?
Absolutely! Assemble hand pies, cover, and refrigerate for several hours before baking. They freeze beautifully for future enjoyment.
How do I prevent filling from leaking?
Seal edges completely with a fork, brush egg wash thoroughly, and cut small steam vents to help prevent messy blowouts during baking.

Cherry Hand Pie Recipe
- Total Time: 35-40 minutes
- Yield: 4 1x
Description
Whipping up Cherry Hand Pies brings pure joy to your kitchen with minimal fuss and maximum flavor. Grab some fresh cherries, fold them into buttery pastry, and savor these delightful personal-sized treats that’ll make your taste buds dance.
Ingredients
Main Ingredients:
- 1 cup cherry pie filling
- 1 pie crust
Baking Ingredients:
- ¼ cup milk
- ¼ teaspoon almond extract
Decoration:
- Googly eyes
- Coarse sugar
Instructions
- Preheat your oven to 400°F and line a baking sheet with parchment paper. Grab your pie dough and roll it out to ⅛-inch thickness.
- Use a knife or pastry cutter to slice the dough into 8 equal rectangular shapes, ensuring clean edges for your hand pies.
- Position each rectangle on the prepared baking sheet, leaving space between them for expansion during baking.
- Measure 2 tablespoons of cherry pie filling and carefully place it in the center of 4 rectangles, keeping a clear border around the edges.
- Whisk 1 egg with ¼ cup milk to create a golden egg wash. Brush the edges of each filled rectangle with the mixture.
- Top each filled rectangle with a second plain rectangle. Press the edges firmly with a fork to create a tight seal.
- Cut small ventilation slits across the top of each hand pie to allow steam to escape during baking.
- Brush the entire surface of each hand pie with remaining egg wash for a beautiful golden color.
- Sprinkle coarse sugar over the tops if you want extra crunch and sweetness.
- Bake in the preheated 400°F oven for 20-25 minutes until the crust turns a rich golden brown.
- Remove from the oven and let the hand pies cool on the baking sheet for 10 minutes before transferring to a wire rack.
- Optional: Add playful googly eyes or decorative touches while the pies are still warm and slightly soft.
Notes
- Always use cold butter and keep pie dough chilled to ensure a flaky, tender crust that won’t become tough or dense.
- Make sure your cherry filling isn’t too wet, which could cause soggy bottoms and prevent proper sealing of the hand pies.
- Cut precise rectangles and leave enough space around filling edges to create a solid seal and prevent leaking during baking.
- When crimping edges with a fork, press firmly but gently to create a decorative seal that keeps filling secure and prevents splitting during baking.
- Prep Time: 15 minutes
- Cook Time: 20-25 minutes
- Category: Pies
- Method: Baking
- Cuisine: American
Nutrition
- Serving Size: 4
- Calories: 270 kcal
- Sugar: 15 g
- Sodium: 180 mg
- Fat: 14 g
- Saturated Fat: 5 g
- Unsaturated Fat: 7 g
- Trans Fat: 0.5 g
- Carbohydrates: 32 g
- Fiber: 2 g
- Protein: 3 g
- Cholesterol: 25 mg
Madison Wyman
Recipe Developer & Food Storyteller
Expertise
Recipe Research and Adaptation, Food Writing and Cultural Storytelling, Sustainable and Ethical Sourcing, Dietary Adaptations (e.g., gluten-free, plant-based)
Education
Oregon Health & Science University
Portland Community College
Madison’s passion for flavor and culture ignited amidst the rich Southern cooking traditions of her upbringing, where cherished family recipes told delicious tales.
Armed with a Master’s in Food Systems and Society from Oregon Health & Science University and a Culinary Arts Certificate from Portland Community College, Madison truly excels at transforming rich, intricate flavors into dishes that are both approachable and heartfelt.
For her, cooking is a vibrant blend of science, art, and heritage – a powerful way to connect us to our roots and each other. Her recipes invite you to delve deeper, uncovering the fascinating stories woven into every ingredient.