
Classic Cherry Lemon Cheesecake Recipe for Summer Gatherings
Cherry Lemon Cheesecake fuses two beloved flavors in one showstopping dessert that feels special without being complicated.
Whether celebrating a milestone or simply treating yourself on a weekend, it provides that perfect balance of creamy richness and bright, refreshing notes.
The combination works beautifully for spring gatherings, summer potlucks, or anytime you want something both elegant and comforting.
It’s one of those desserts that looks impressive on the table yet won’t stress you out in the kitchen.
Friends and family always ask for seconds, and honestly, it’s hard to say no.
If you love desserts that feel both classic and just a little bit fancy, you’ve found the right match.
Scroll down and see how simple it is to make something that tastes absolutely incredible.
Reasons Cherry Lemon Cheesecake Recipe Balances Sweet and Tart
What Ingredients Build Cherry Lemon Cheesecake
Crust:Cheesecake Filling:Topping:What Tools Bake Cherry Lemon Cheesecake?
How to Bake Cherry Lemon Cheesecake Step by Step
Prepare the Oven
Heat your oven to exactly 325F (160C). Grab a 9-inch springform pan and get ready to create something delicious.
Make the Crust
Grab a mixing bowl and combine the crust ingredients:
Press this mixture firmly into the bottom of your springform pan, creating a solid, even base that will hold your cheesecake perfectly.
Create the Creamy Filling
In a large mixing bowl, whip up the cream cheese filling:
Beat these together until they’re completely smooth and creamy. No lumps allowed!
Add the Eggs
Crack in the eggs one at a time, mixing thoroughly after each addition:
Make sure each egg is fully incorporated before adding the next.
Mix in Flavor Enhancers
Stir in these zesty ingredients to give your cheesecake a bright, fresh taste:
Blend everything until the mixture is completely smooth and well combined.
Bake the Cheesecake
Pour the cream cheese mixture over the crust in your springform pan. Slide it into the preheated 325F oven and bake for 55-60 minutes. You’ll know it’s done when the center looks set but still has a slight jiggle.
Cool and Chill
Remove the cheesecake from the oven and let it cool completely at room temperature. Once cooled, pop it in the refrigerator for at least 4 hours – overnight is even better for maximum flavor development.
Final Touch
Just before serving, top the chilled cheesecake with:
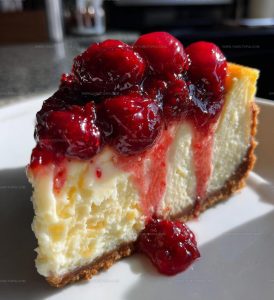
Spread the cherries evenly across the top, creating a beautiful and delicious finish.
Effective Tips for Smooth Cherry Lemon Cheesecake
Simple Variations for Cherry Lemon Cheesecake
Serving Suggestions for Cherry Lemon Cheesecake
Storage Advice That Works for Cherry Lemon Cheesecake
Cherry Lemon Cheesecake FAQ Breakdown
Can I use bottled lemon juice instead of fresh?
Fresh lemon juice provides the brightest flavor, but bottled will work if that’s what you have on hand. Just make sure it’s 100% pure lemon juice without added preservatives.
How do I prevent cracks in my cheesecake?
Bake the cheesecake in a water bath and avoid overmixing the batter. Gently fold ingredients together and tap the pan on the counter to release air bubbles before baking.
What if my cream cheese isn’t at room temperature?
Cold cream cheese can create lumps in your batter. Let it sit out for about 30 minutes before mixing to ensure a smooth, creamy texture.
Can I freeze this cheesecake?
Absolutely! Wrap the cooled cheesecake tightly in plastic wrap and aluminum foil. It will keep in the freezer for up to 2 months. Thaw overnight in the refrigerator before serving.
How do I know when the cheesecake is done baking?
The edges will be set, but the center should have a slight jiggle when you gently shake the pan. It will continue to set as it cools.
Cherry Lemon Cheesecake Recipe
- Total Time: 5 hours 15-20 minutes
- Yield: 8 to 10 1x
Description
Cherry lemon cheesecake blends bright citrus and sweet cherries into a creamy, sunshine-tasting dessert. A graham crust and fruity topping make it extra special.
Ingredients
Main Ingredients:
- 4 (8 ounces) packages cream cheese, softened
- 4 large eggs
- 1 cup sugar
Supporting Ingredients:
- ¼ cup fresh lemon juice
- 1 tablespoon lemon zest
- 1 teaspoon vanilla extract
Crust Ingredients:
- 1 ½ cups graham cracker crumbs
- ½ cup unsalted butter, melted
- 1 can (21 ounces) cherry pie filling
Instructions
- Warm your oven to precisely 325F and grab a 9-inch springform pan.
- Melt ½ cup unsalted butter and mix it thoroughly with 1 ½ cups graham cracker crumbs until your mixture looks like damp sand.
- Press the crumb mixture firmly across the bottom of your pan, creating an even layer that will serve as your cheesecake’s foundation.
- In a large mixing bowl, beat 4 packages of softened cream cheese with 1 cup sugar until the texture becomes completely smooth and creamy.
- Crack your 4 large eggs into the cream cheese mixture one at a time, blending completely after each egg to ensure a silky consistency.
- Gently fold in 1 teaspoon vanilla extract, ¼ cup fresh lemon juice, and 1 tablespoon lemon zest, stirring until ingredients are fully incorporated.
- Carefully pour your cream cheese batter over the prepared graham cracker crust, smoothing the top with a spatula.
- Place the cheesecake in the preheated 325F oven and bake for 55-60 minutes, watching for the center to set but still have a subtle wobble.
- Remove from oven and let the cheesecake cool completely at room temperature for approximately 2 hours.
- Refrigerate the cheesecake for at least 4 hours to allow it to firm up and develop its full flavor profile.
- Before serving, generously spread 1 can of cherry pie filling across the top of your chilled cheesecake.
Notes
- Swap out graham crackers for gluten-free cookies to make this cheesecake celiac-friendly and delicious.
- Prevent cracks in the cheesecake by baking in a water bath, which helps the cake cook evenly and stay smooth.
- Use room temperature cream cheese and eggs to ensure a silky, lump-free batter that blends perfectly.
- Zest the lemon before juicing to maximize flavor and get the most out of your citrus fruit, creating a brighter, more vibrant cheesecake.
- Prep Time: 20 minutes
- Cook Time: 55-60 minutes
- Category: Cheesecakes
- Method: Baking
- Cuisine: American
Nutrition
- Serving Size: 8 to 10
- Calories: 450 kcal
- Sugar: 33 g
- Sodium: 280 mg
- Fat: 29 g
- Saturated Fat: 18 g
- Unsaturated Fat: 10 g
- Trans Fat: 0.5 g
- Carbohydrates: 38 g
- Fiber: 1 g
- Protein: 7 g
- Cholesterol: 115 mg
Logan Lemaster
Founder & Culinary Innovator
Expertise
Recipe Development and Innovation, Menu Design and Optimization, Fine Dining Techniques, Ingredient Pairing and Flavor Science
Education
Metropolitan Culinary Arts Institute
Logan’s culinary journey kicked off in his vibrant Chicago family kitchen, where fresh, seasonal ingredients and bold flavors were always front and center.
After graduating from the Metropolitan Culinary Arts Institute in Arlington, Virginia, and honing his skills in renowned restaurants, Logan mastered the art of blending classic techniques with exciting, modern twists.
His kitchen is a dynamic lab for flavor exploration. Through Yum Utopia, Logan aims to empower you to cook with both confidence and creativity, turning simple ingredients into spectacular meals.