
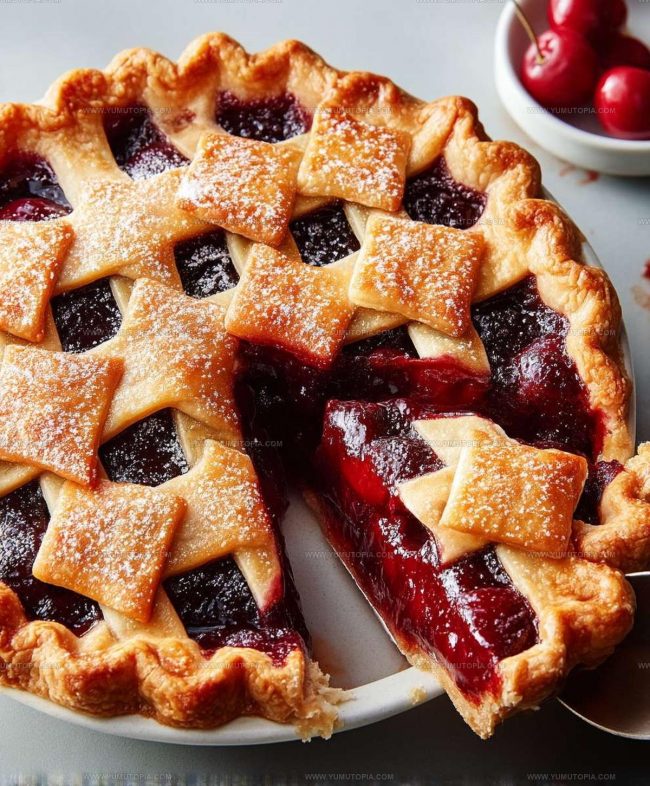
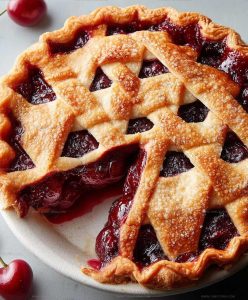
Cherry Pie Recipe for Summer Gatherings and Sweet Celebrations
Cherry pie holds a special place in American baking traditions and continues to win hearts at dinner tables everywhere.
The combination of flaky pastry and sweet-tart filling creates something truly memorable that works beautifully for celebrations or casual weeknight desserts.
Whether you serve it warm with a scoop of vanilla ice cream or enjoy it at room temperature with morning coffee, the appeal never fades.
The deep red color and inviting aroma make it a showstopper without requiring advanced baking skills.
Summer gatherings feel incomplete without a homemade dessert that gives everyone together, and few options deliver that sense of comfort quite so well.
Making one from scratch fills the kitchen with warmth and gives you something genuinely satisfying to share.
When you pull a golden-brown beauty from the oven, the sense of accomplishment matches the delicious reward waiting inside.
Classic Dessert Reasons to Bake Cherry Pie
Ingredients That Shape Cherry Pie
Pie Crust:Cherry Filling:Finishing Touches:What Tools Bake Cherry Pie
Baking Guide for Homemade Cherry Pie
Make Pie Dough
Grab a large mixing bowl and whisk 2 1/2 cups of flour with 1 teaspoon of salt. The salt adds a subtle flavor that makes your crust extra tasty.
Cut in Cold Butter
Drop in your cold butter and shortening:
Use your fingertips to quickly break these into the flour until you see pea-sized crumbs. Speed matters here – keep everything cold!
Add Ice Water
Sprinkle 6-8 tablespoons of ice water into the dough, one tablespoon at a time. Gently mix until the dough just starts to come together. Some crumbly spots are perfect.
Rest the Dough
Split the dough into two equal disks about 1 inch thick. Wrap each disk in plastic and park them in the refrigerator for at least 2 hours.
Prepare Cherry Filling
Mix your cherries with the filling ingredients:
Let this sit for 15-20 minutes so the cherries release their juices.
Prepare Oven and Baking Sheet
Heat the oven to 400°F. Place a baking sheet on the lower rack.
Roll Out Bottom Crust
Dust your counter with flour and roll one dough disk into a 12-inch circle. Transfer carefully to a 9-inch pie plate.
Add Cherry Filling
Pour the cherry mixture into the crust. Dot the top with:
Create Top Crust
Roll the second dough disk into a 12-inch circle. Cut some decorative vents in the top.
Seal and Decorate
Lay the top crust over the filling. Trim the edges, leaving a 1-inch overhang. Crimp the edges to seal.
Egg Wash
Whisk together:
Brush this over the top crust. Sprinkle with turbinado sugar.
Bake the Pie
Slide the pie onto the preheated baking sheet. Bake at 400°F for 15 minutes.
Finish Baking
Reduce oven to 350°F. Bake another 45-50 minutes until the crust turns golden and filling bubbles. Cover with foil if the crust browns too quickly.
Cool and Serve
Let the pie cool completely on a wire rack before slicing. Enjoy your homemade cherry pie!
Best Tips for Cherry Pie
Classic Cherry Pie Variations
How to Serve Cherry Pie Warm
How to Store Cherry Pie Neatly?
Cherry Pie Common Baking Questions
What makes the crust so flaky?
Keeping the butter and shortening cold is crucial. When you work quickly and leave small cold fat pieces in the dough, those chunks create beautiful layers when baked.
Can fresh or frozen cherries work?
Both are great! Fresh cherries offer the best flavor, but frozen cherries work perfectly too. Just thaw and drain them before using to prevent excess liquid.
How do I know if the pie filling is done?
Look for bubbling filling and a golden-brown crust. The bubbles indicate the cornstarch has activated and thickened the juices, creating that perfect pie consistency.
Why should I let the cherry mixture sit before baking?
Letting the cherries rest helps release their juices and allows the cornstarch to absorb liquid, which prevents a runny filling and ensures a thick, delicious result.
Can this pie be made ahead of time?
Absolutely! The pie dough can be prepared and refrigerated up to 2 days in advance. You can also assemble the entire pie and refrigerate it for several hours before baking.
Cherry Pie Recipe
- Total Time: 3 hours 35-45 minutes
- Yield: 12 1x
Description
Homemade cherry pie delivers pure comfort straight from Grandma’s kitchen, with fresh cherries nestled in a golden, buttery crust that melts in your mouth. Slice after slice, this classic dessert brings pure joy to your family’s table with its sweet and tangy cherry goodness.
Ingredients
Main Ingredients:
- 6 cups cherries
- 2.5 cups all-purpose flour
- 1 cup unsalted butter
- 0.5 cup vegetable shortening
Filling Ingredients:
- 0.75 cup granulated sugar
- 0.25 cup cornstarch
- 2 tablespoons lemon juice
- 1 teaspoon almond extract
- 0.25 teaspoon salt
Finishing Ingredients:
- 2 tablespoons unsalted butter
- 1 large egg
- 1 tablespoon milk
- 1 teaspoon salt
- Turbinado sugar or granulated sugar
Instructions
- Mix 2½ cups flour and 1 teaspoon salt in a large mixing bowl, ensuring even distribution.
- Cut 2 sticks of cold butter and ½ cup cold shortening into tiny cubes. Quickly blend them into the flour mixture using a pastry blender until the texture resembles coarse crumbs.
- Pour ice water into the mixture 1 tablespoon at a time, gently stirring until the dough just begins to clump together. Stop adding water when the mixture holds its shape.
- Split the dough into two equal portions. Flatten each piece into a 1-inch thick disk and wrap tightly in plastic wrap.
- Chill the dough disks in the refrigerator for at least 2 hours to firm up the fat and relax the gluten.
- Combine 6 cups of pitted cherries with ¾ cup sugar, ¼ cup cornstarch, 2 tablespoons lemon juice, 1 teaspoon almond extract, and ¼ teaspoon salt in a large bowl.
- Allow the cherry mixture to rest for 15-20 minutes, letting the juices develop and mingle.
- Heat the oven to 400°F and place a baking sheet on the lower rack to catch any potential drips.
- Dust your work surface with flour and roll one dough disk into a 12-inch circle, keeping the thickness even.
- Transfer the dough carefully into a 9-inch pie plate, pressing it gently into the corners and trimming excess dough to create a 1-inch overhang.
- Pour the cherry filling into the crust, spreading it evenly. Dot the top with 2 tablespoons of small butter pieces.
- Roll the second dough disk into another 12-inch circle on a floured surface.
- Create decorative vents in the top crust using a sharp knife or pie cutter.
- Drape the top crust over the filling, trimming the edges to match the bottom crust’s overhang.
- Pinch and crimp the pie edges together to create a tight seal around the circumference.
- Whisk 1 egg with 1 tablespoon milk and brush the entire top crust surface.
- Sprinkle turbinado sugar generously across the egg-washed crust.
- Bake at 400°F for 15 minutes on the prepared baking sheet.
- Reduce the oven temperature to 350°F and continue baking 45-50 minutes until the crust turns golden and filling bubbles. Cover with foil if browning too quickly.
- Remove the pie from the oven and cool completely on a wire rack before slicing.
Notes
- Keep your butter and shortening ice-cold to ensure a perfectly flaky pie crust that will melt in your mouth.
- Work quickly when cutting fat into flour to prevent warming, which can make the crust tough instead of tender.
- Allow cherry filling to rest for 15-20 minutes before baking to help cornstarch thicken and release natural fruit juices.
- Place the pie on a preheated baking sheet to help crisp the bottom crust and prevent a soggy bottom, which can ruin an otherwise perfect pie.
- Prep Time: 2 hours 35-40 minutes
- Cook Time: 1 hour – 1 hour 5 minutes
- Category: Pies
- Method: Baking
- Cuisine: American
Nutrition
- Serving Size: 12
- Calories: 282 kcal
- Sugar: 20 g
- Sodium: 180 mg
- Fat: 14 g
- Saturated Fat: 7 g
- Unsaturated Fat: 6 g
- Trans Fat: 0.2 g
- Carbohydrates: 36 g
- Fiber: 2 g
- Protein: 3 g
- Cholesterol: 30 mg
Madison Wyman
Recipe Developer & Food Storyteller
Expertise
Recipe Research and Adaptation, Food Writing and Cultural Storytelling, Sustainable and Ethical Sourcing, Dietary Adaptations (e.g., gluten-free, plant-based)
Education
Oregon Health & Science University
Portland Community College
Madison’s passion for flavor and culture ignited amidst the rich Southern cooking traditions of her upbringing, where cherished family recipes told delicious tales.
Armed with a Master’s in Food Systems and Society from Oregon Health & Science University and a Culinary Arts Certificate from Portland Community College, Madison truly excels at transforming rich, intricate flavors into dishes that are both approachable and heartfelt.
For her, cooking is a vibrant blend of science, art, and heritage – a powerful way to connect us to our roots and each other. Her recipes invite you to delve deeper, uncovering the fascinating stories woven into every ingredient.