
Coconut Bars Recipe for Soft and Chewy Tropical Treats
Chewy coconut bars belong in every dessert lover’s collection because they combine simplicity with satisfying results that never disappoint.
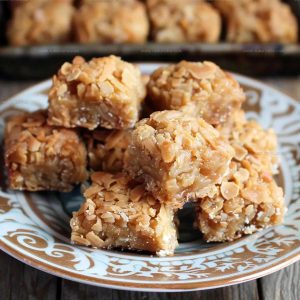
There’s something about that soft, dense texture that makes every bite feel like a special treat, even on ordinary days.
You can enjoy them as an afternoon snack, pack them in lunchboxes, or serve them when company stops by unexpectedly.
They come together quickly using pantry staples most people already have on hand, so last-minute cravings are easily satisfied.
The subtle sweetness and rich flavor make them appealing across all age groups without being too heavy or overwhelming.
Baking a pan fills the kitchen with warmth and comfort that signals homemade goodness at its finest.
Perfect for potlucks, bake sales, or simply keeping stocked for whenever hunger strikes, they store beautifully and taste just as delicious days later.
Make a batch soon and watch how quickly they disappear from the counter.
Why Chewy Coconut Bars Always Delivers
Essential Ingredients in Chewy Coconut Bars
Base Ingredients:Dry Ingredients:Topping Ingredient:Essential Kitchen Tools for Chewy Coconut Bars
Preparing Chewy Coconut Bars Step by Step

Prep the Oven and Pan
Heat the oven to 350°F. Grab your 9-inch square baking pan and line it with parchment paper. Give the paper a quick spray of nonstick cooking spray to make sure nothing sticks.
Brown the Butter
Grab a medium saucepan and melt 1/2 cup (1 stick) of unsalted butter over medium-low heat. Keep swirling the pan until the butter turns a beautiful golden brown. This adds a nutty flavor that makes the bars extra delicious.
Mix in the Sweet Stuff
Take the pan off the heat and whisk in 2 cups of packed light brown sugar until it’s smooth and combined.
Add the Wet Ingredients
Crack in 2 large eggs and add 2 tsp of vanilla extract. Sprinkle in 1/2 tsp of kosher salt and 1 tsp of baking powder. Whisk everything together until it’s completely blended.
Fold in the Dry Ingredients
Gently stir in 1 cup of all-purpose flour. Then fold in:
Make sure everything is well mixed but don’t overmix.
Bake the Bars
Pour the batter into your prepared pan. Slide it into the 350°F oven and bake for 20 minutes. The edges should look set, but the middle will still be slightly soft.
Cool and Serve
Let the bars cool completely in the pan. Once cooled, cut into squares. These bars will stay fresh in an airtight container at room temperature for up to 3 days – if they last that long!
Smart Kitchen Notes For Chewy Coconut Bars
Simple Variations for Chewy Coconut Bars
How To Slice And Serve Chewy Coconut Bars
Smart Storage Tips for Chewy Coconut Bars
Chewy Coconut Bars Helpful FAQs
Can I use unsweetened coconut instead of sweetened?
Yes, you can swap types of coconut. Just be aware that unsweetened will make the bars less sweet, so consider adding a bit more brown sugar to balance the flavor.
What does browning the butter do for this recipe?
Browning butter creates a rich, nutty flavor that adds depth to the coconut bars. The process caramelizes the milk solids, giving the dessert a more complex taste profile.
How do I know when the bars are perfectly baked?
Look for edges that are set and slightly golden, with the center still appearing soft but not liquid. The bars will continue cooking slightly after removing from the oven.
Can these bars be frozen for later?
Absolutely! Wrap the cooled bars tightly in plastic wrap, then place in a freezer bag. They’ll keep well for up to 3 months.
Are these bars gluten-free?
Not as written. To make them gluten-free, substitute the all-purpose flour with a gluten-free flour blend that contains xanthan gum.
Chewy Coconut Bars Recipe
- Total Time: 30 minutes
- Yield: 16 1x
Description
Coconut bars deliver a sweet tropical escape right in your kitchen, packed with toasted coconut and rich buttery goodness that melts deliciously on your taste buds. Grab some ingredients and prepare for a simple treat that brings sunshine to your snack time.
Ingredients
Main Ingredients:
- 2 cups light brown sugar
- 1 ½ cups sweetened flaked coconut
- 1 cup all-purpose flour
Supporting Ingredients:
- 2 large eggs
- ½ cup unsalted butter
- 2 teaspoons vanilla extract
Finishing Ingredients:
- 1 teaspoon baking powder
- ½ teaspoon kosher salt
Instructions
- Melt ½ cup butter in a medium saucepan over medium-low heat, swirling until it turns golden brown and releases a nutty aroma.
- Remove the pan from heat and thoroughly blend 2 cups brown sugar into the browned butter until smooth and combined.
- Vigorously whisk 2 large eggs, 2 teaspoons vanilla extract, ½ teaspoon kosher salt, and 1 teaspoon baking powder into the butter-sugar mixture until fully integrated.
- Gently fold 1 cup all-purpose flour and 1 ½ cups sweetened flaked coconut into the batter until just incorporated.
- Transfer the batter to a parchment-lined 9-inch square pan that has been sprayed with nonstick cooking spray.
- Bake at 350°F for exactly 20 minutes, ensuring the edges are set but the center remains slightly soft.
- Let the bars cool completely inside the pan to maintain their delicate texture.
- Slice into square pieces once the bars have reached room temperature.
- Store the bars in an airtight container at room temperature for maximum freshness, consuming within 3 days.
Notes
- Brown the butter carefully to develop a rich, nutty flavor that enhances the coconut’s sweetness.
- Check the bars at 18 minutes since oven temperatures vary and prevent over-baking for the perfect chewy texture.
- Use unsweetened coconut for a more balanced sweetness and better control of the overall sugar level in your bars.
- Toast the coconut beforehand for an extra layer of depth and a more intense coconut flavor that will make these bars really pop.
- Prep Time: 10 minutes
- Cook Time: 20 minutes
- Category: Dessert Bars
- Method: Baking
- Cuisine: American
Nutrition
- Serving Size: 16
- Calories: 250 kcal
- Sugar: 22 g
- Sodium: 90 mg
- Fat: 12 g
- Saturated Fat: 9 g
- Unsaturated Fat: 3 g
- Trans Fat: 0.1 g
- Carbohydrates: 33 g
- Fiber: 1 g
- Protein: 2 g
- Cholesterol: 37 mg
Logan Lemaster
Founder & Culinary Innovator
Expertise
Recipe Development and Innovation, Menu Design and Optimization, Fine Dining Techniques, Ingredient Pairing and Flavor Science
Education
Metropolitan Culinary Arts Institute
Logan’s culinary journey kicked off in his vibrant Chicago family kitchen, where fresh, seasonal ingredients and bold flavors were always front and center.
After graduating from the Metropolitan Culinary Arts Institute in Arlington, Virginia, and honing his skills in renowned restaurants, Logan mastered the art of blending classic techniques with exciting, modern twists.
His kitchen is a dynamic lab for flavor exploration. Through Yum Utopia, Logan aims to empower you to cook with both confidence and creativity, turning simple ingredients into spectacular meals.