
Warm Chocolate Lava Cakes Recipe with Gooey Center
Chocolate lava cakes bring pure joy to any dessert table with their show-stopping appeal and guaranteed crowd-pleasing results.
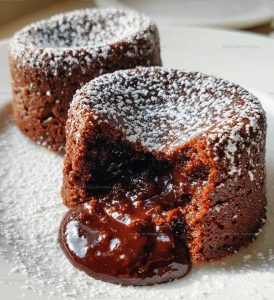
When you cut into one of those warm, tender rounds, something magical happens that makes everyone at the table pause in anticipation.
This dessert works beautifully for romantic dinners, celebrations, or simply when you need something special to cap off an ordinary weeknight.
The combination of textures and temperatures creates an experience that feels indulgent without requiring hours in the kitchen.
Best of all, you can prepare everything ahead of time and pop them in the oven just before serving.
Each portion arrives at the table looking elegant and restaurant-inspired, making it easy to impress without stress.
They’re surprisingly approachable for home cooks of any skill level, and the results always feel worth celebrating.
Jump into the recipe below and see how simple it is to create dessert magic at home.
Top Reasons Chocolate Lava Cakes Never Disappoint
All Ingredients Needed for Chocolate Lava Cakes
Chocolate Base:Sweetening Agents:Binding Ingredients:Dry Ingredients:Core Kitchen Tools for Chocolate Lava Cakes
Step By Step Instructions For Chocolate Lava Cakes
Prep the Oven
Heat your oven to exactly 425°F. This precise temperature is crucial for getting those perfect lava cakes.
Ready the Baking Dishes
Grab four 6-ounce ramekins. Coat each one carefully with butter, then dust with a light layer of flour. This helps the cakes slide out smoothly later.
Melt the Chocolate Base
Set up a double boiler or microwave to melt your chocolate and butter. Take your time and stir gently until:
The mixture should look silky and completely combined.
Mix in the Sweet Stuff
Stir in powdered sugar until the mixture looks smooth and glossy. Add your wet ingredients next.
Combine Wet Ingredients
Whisk in your eggs with careful attention:
Mix until everything is well incorporated.
Final Batter Prep
Fold in your dry ingredients carefully:
Stir just until everything comes together. Don’t overmix.
Fill the Ramekins
Divide the batter evenly among your prepared ramekins. Fill each one about 3/4 full.
Bake to Perfection
Place ramekins in the oven and bake for exactly 12-14 minutes. You want firm edges but a super soft center.
Serve Immediately
Wait just 1 minute after removing from the oven. Then carefully flip each ramekin onto a plate. The center should ooze out like warm chocolate magic.
Easy Notes for Lava-Centered Chocolate Cakes
Chocolate Lava Cakes With Filling Variations
Best Ways To Serve Chocolate Lava Cakes
Chocolate Lava Cakes Storage Without Losing The Center
Chocolate Lava Cakes Questions Answered
Can I make these ahead of time?
Prepare the batter and refrigerate in ramekins up to 24 hours before baking. Let them sit at room temperature for 30 minutes before placing in the oven.
What chocolate works best?
High-quality dark chocolate with 60-70% cocoa content delivers the richest flavor and perfect molten center.
How do I know when the cakes are perfectly done?
Watch for slightly firm edges and a soft, jiggly center. Overbaking will lose that signature gooey middle.
Can these be made gluten-free?
Swap regular flour with almond flour or a gluten-free blend for an equally delicious dessert.
Why did my center collapse?
Likely the chocolate was too cool when mixing or the oven temperature wasn’t accurate. Use room temperature ingredients and check your oven calibration.
Are ramekins mandatory?
No problem if you don’t have them. Use a muffin tin with generous butter and flour coating as an alternative.
Chocolate Lava Cakes Recipe
- Total Time: 27-29 minutes
- Yield: 4 1x
Description
Chocolate Lava Cakes melt right through your heart with rich, gooey chocolate goodness that spills onto your plate like liquid gold. Grab your ramekins and whip up this simple dessert that makes dinner guests swoon without any complicated techniques.
Ingredients
Main Ingredients:
- 1 cup dark chocolate
- 2 large eggs
- 2 large egg yolks
- ½ cup all-purpose flour
Supporting Ingredients:
- ½ cup unsalted butter
- 1 cup powdered sugar
Finishing Ingredients:
- 1 teaspoon vanilla extract
- 1 pinch salt
Instructions
- Heat the oven to 425F and prepare four 6-ounce ramekins by coating them thoroughly with 1 tablespoon softened butter and sprinkling 1 tablespoon flour inside each.
- Combine 1 cup chopped dark chocolate and ½ cup unsalted butter in a microwave-safe bowl, melting in 30-second intervals until completely smooth and glossy.
- Whisk 1 cup powdered sugar into the chocolate mixture until fully incorporated and no lumps remain.
- Crack 2 large whole eggs and 2 large egg yolks into the chocolate mixture, stirring quickly to create a uniform blend.
- Pour 1 teaspoon vanilla extract, ½ cup all-purpose flour, and a pinch of salt into the batter, stirring gently until ingredients are just combined.
- Distribute the batter evenly among the prepared ramekins, filling each about ¾ full.
- Place ramekins on a baking sheet and slide into the 425F oven for exactly 12-14 minutes, watching for firm edges but a slightly jiggly center.
- Remove from oven and let the cakes rest for 1 minute to set slightly.
- Carefully invert each ramekin onto a serving plate, allowing the warm chocolate cake to release smoothly.
Notes
- Use high-quality dark chocolate with at least 60% cocoa solids for the best rich flavor and smooth texture.
- Check the cakes carefully during baking, as overcooking will eliminate the signature molten center.
- Serve immediately after inverting to enjoy the warm, gooey chocolate flowing out when cut.
- For a gluten-free version, replace wheat flour with almond flour or a gluten-free baking blend.
- Prep Time: 15 minutes
- Cook Time: 12-14 minutes
- Category: Cakes
- Method: Baking
- Cuisine: French
Nutrition
- Serving Size: 4
- Calories: 440 kcal
- Sugar: 41 g
- Sodium: 50 mg
- Fat: 30 g
- Saturated Fat: 18 g
- Unsaturated Fat: 12 g
- Trans Fat: 0.2 g
- Carbohydrates: 43 g
- Fiber: 3 g
- Protein: 7 g
- Cholesterol: 210 mg
Logan Lemaster
Founder & Culinary Innovator
Expertise
Recipe Development and Innovation, Menu Design and Optimization, Fine Dining Techniques, Ingredient Pairing and Flavor Science
Education
Metropolitan Culinary Arts Institute
Logan’s culinary journey kicked off in his vibrant Chicago family kitchen, where fresh, seasonal ingredients and bold flavors were always front and center.
After graduating from the Metropolitan Culinary Arts Institute in Arlington, Virginia, and honing his skills in renowned restaurants, Logan mastered the art of blending classic techniques with exciting, modern twists.
His kitchen is a dynamic lab for flavor exploration. Through Yum Utopia, Logan aims to empower you to cook with both confidence and creativity, turning simple ingredients into spectacular meals.