
Chocolate Oreo Cheesecake Brownie Trifle Recipe for Dessert Lovers
Sweet chocolate oreo cheesecake brownie trifle promises pure dessert magic for anyone craving serious comfort.
Decadent layers of rich chocolate and creamy textures create an ultimate indulgence that feels like pure celebration.
Dessert enthusiasts will absolutely swoon over this magnificent crowd-pleasing treat that screams pure deliciousness.
Every single spoonful combines intense flavor profiles guaranteed to impress friends and family gatherings.
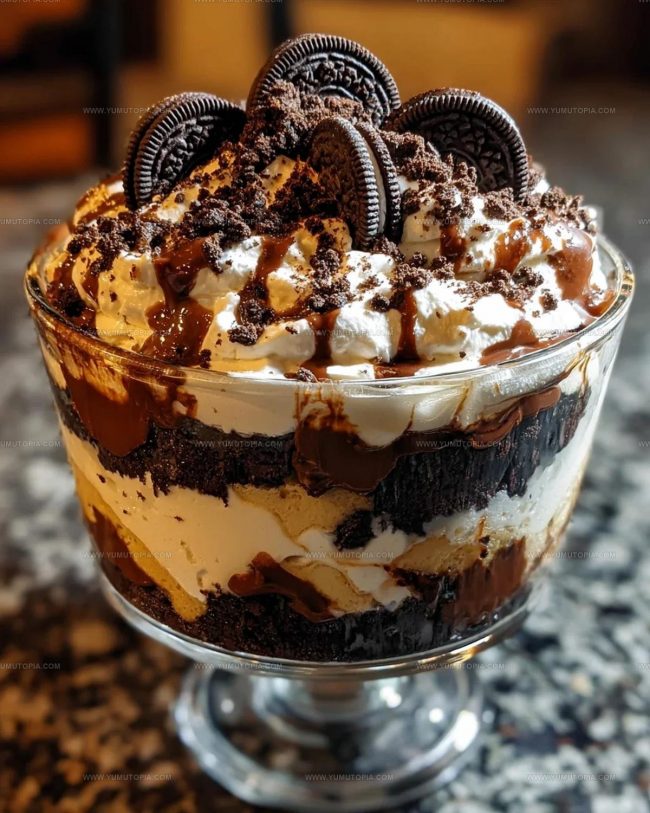
Stunning visual presentation makes this recipe perfect for special occasions or spontaneous weekend celebrations.
Chocolate lovers understand the irresistible power of combining multiple dessert elements into one spectacular creation.
Your guests will be blown away by this show-stopping dessert that delivers maximum deliciousness with minimal effort.
What Makes Chocolate Oreo Cheesecake Brownie Trifle So Special

Building Blocks of Oreo Cheesecake Brownie Trifle
Main Chocolate Components:Creamy Cheesecake Layer:Flavor Enhancers:Finishing Touches:Essential Kitchen Tools for Oreo Cheesecake Brownie Trifle
Complete Instructions For Chocolate Oreo Cheesecake Brownie Trifle
Bake Brownies
Heat the oven to 350°F. Grab a 9×13 inch pan and grease it lightly. In a large pan, melt 1 cup unsalted butter over low heat. Pull the pan off the stove and mix in:
Stir until everything looks smooth. Add the dry ingredients:
Mix gently until just combined. Sprinkle in 1 cup chocolate chips and fold them through. Pour the batter into your prepared pan. Bake for 25-30 minutes until a toothpick comes out with just a few moist crumbs. Let the brownies cool completely.
Make Cheesecake Mixture
Grab a mixing bowl and beat 16 oz softened cream cheese with 1 cup powdered sugar until super creamy. Add 1 teaspoon vanilla extract and mix again. In another bowl, whip 1 cup chilled heavy cream until it forms stiff peaks. Fold the whipped cream into the cream cheese mixture carefully. Stir in 1/2 cup crushed Oreo cookies.
Create Trifle Layers
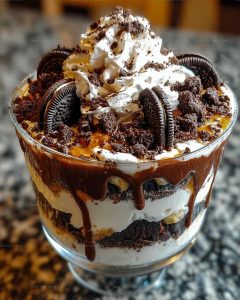
Cut the cooled brownies into bite-sized squares. In a large trifle dish or serving glasses, create your first layer with half the brownie pieces. Spread half the cheesecake mixture over the brownies. Sprinkle with a layer of crushed Oreos. Repeat the layers one more time.
Finish and Chill
Drizzle 1/4 cup chocolate syrup over the top. Add a generous dollop of whipped cream and scatter some extra crushed Oreos for decoration. Cover the trifle with plastic wrap and refrigerate for at least 3 hours. The longer it chills, the better the flavors blend together.
Making It Better With Chocolate Oreo Cheesecake Brownie Trifle
Creative Variations for Oreo Cheesecake Brownie Trifle
Presentation Ideas for This Recipe: Oreo Cheesecake Brownie Trifle
Storage Instructions For Chocolate Oreo Cheesecake Brownie Trifle
Oreo Cheesecake Brownie Trifle Helpful FAQs
Can I make this trifle ahead of time?
Absolutely! This trifle actually tastes better when prepared in advance. Refrigerating for several hours lets the flavors blend perfectly and makes your dessert even more delicious.
What if I don’t have a trifle dish?
No worries. You can use any clear glass bowl or individual serving glasses. The goal is to show off those gorgeous layers everyone will love.
Are there any substitutions for Oreos?
Definitely! Chocolate sandwich cookies work great if you don’t have Oreos. Chocolate graham crackers can also create a similar texture and flavor profile.
How long does this dessert stay fresh?
When stored properly in the refrigerator with plastic wrap, your trifle will taste amazing for 3-4 days. Just keep it chilled and covered.
Can I freeze this trifle?
Freezing isn’t recommended because the cream cheese and whipped cream layers might separate or become watery when thawed. Fresh is always best with this dessert.
Do I need any special equipment to make this?
Not at all. Just standard mixing bowls, a whisk or mixer, and a baking pan are all you’ll need to create this crowd-pleasing dessert.
Chocolate Oreo Cheesecake Brownie Trifle Recipe
- Total Time: 3 hours 55 minutes to overnight (including refrigeration)
- Yield: 8 1x
Description
Chocolate Oreo Cheesecake Brownie Trifle layers rich chocolate and creamy cheesecake into a dessert dream that’ll make your taste buds dance. Grab a spoon and dive into this delightful treat that brings together all the best dessert flavors in one amazing bowl.
Ingredients
Main Ingredients:
- 2 cups all-purpose flour
- 1 cup cocoa powder
- 1 cup unsalted butter
- 2 cups granulated sugar
- 4 large eggs
- 16 oz cream cheese
- 1 cup heavy whipping cream
- 2.5 cups crushed Oreo cookies
Supporting Ingredients:
- 1 cup chocolate chips
- 1 cup powdered sugar
- ¼ cup chocolate syrup
Seasonings and Extracts:
- 2 teaspoons vanilla extract
- ½ teaspoon salt
- ½ teaspoon baking powder
Instructions
- Preheat your oven to 350°F. Grease a 9×13 inch baking pan thoroughly with butter or cooking spray.
- Melt 1 cup unsalted butter in a large saucepan over low heat. Remove from heat immediately after melting.
- Stir 2 cups granulated sugar into the melted butter. Mix 4 large eggs and 1 teaspoon vanilla extract until the mixture looks smooth and glossy.
- Sift 1 cup all-purpose flour, 1 cup cocoa powder, ½ teaspoon salt, and ½ teaspoon baking powder into the wet ingredients.
- Gently fold 1 cup chocolate chips into the brownie batter. Do not overmix.
- Pour batter into the prepared pan. Spread evenly using a spatula.
- Bake the brownies for 25-30 minutes at 350°F. Check doneness with a toothpick – it should have a few moist crumbs.
- Let brownies cool completely at room temperature. This takes approximately 1-2 hours.
- Beat 16 oz softened cream cheese with 1 cup powdered sugar until completely smooth.
- Add 1 teaspoon vanilla extract to the cream cheese mixture. Mix thoroughly.
- In a separate cold bowl, whip 1 cup heavy cream until stiff peaks form.
- Fold the whipped cream into the cream cheese mixture gently.
- Stir ½ cup crushed Oreo cookies into the cheesecake mixture.
- Cut cooled brownies into small, bite-sized squares.
- Layer half the brownie pieces in a trifle dish or serving glasses.
- Spoon half the cheesecake mixture over the brownies.
- Sprinkle 1 cup crushed Oreo cookies as the next layer.
- Repeat the layering process with remaining brownies, cheesecake mixture, and Oreos.
- Drizzle ¼ cup chocolate syrup across the top layer.
- Add a dollop of whipped cream and extra crushed Oreos for garnish.
- Cover the trifle with plastic wrap. Refrigerate for at least 3 hours or overnight to enhance flavors.
Notes
- Cool the brownies completely before assembling to prevent the cheesecake layer from melting and losing its structure.
- Use full-fat cream cheese for the smoothest, richest cheesecake layer that holds its shape perfectly.
- For a gluten-free version, swap the regular brownie mix with a gluten-free brownie recipe or mix.
- Refrigerate the trifle for at least 4 hours to let the flavors blend and the dessert set properly, creating a more cohesive and delicious treat.
- Prep Time: 30 minutes
- Cook Time: 25-30 minutes
- Category: Trifles
- Method: Baking
- Cuisine: American
Nutrition
- Serving Size: 8
- Calories: 547
- Sugar: 46 g
- Sodium: 160 mg
- Fat: 37 g
- Saturated Fat: 22 g
- Unsaturated Fat: 13 g
- Trans Fat: 0.5 g
- Carbohydrates: 52 g
- Fiber: 4 g
- Protein: 7 g
- Cholesterol: 110 mg
Logan Lemaster
Founder & Culinary Innovator
Expertise
Recipe Development and Innovation, Menu Design and Optimization, Fine Dining Techniques, Ingredient Pairing and Flavor Science
Education
Metropolitan Culinary Arts Institute
Logan’s culinary journey kicked off in his vibrant Chicago family kitchen, where fresh, seasonal ingredients and bold flavors were always front and center.
After graduating from the Metropolitan Culinary Arts Institute in Arlington, Virginia, and honing his skills in renowned restaurants, Logan mastered the art of blending classic techniques with exciting, modern twists.
His kitchen is a dynamic lab for flavor exploration. Through Yum Utopia, Logan aims to empower you to cook with both confidence and creativity, turning simple ingredients into spectacular meals.