
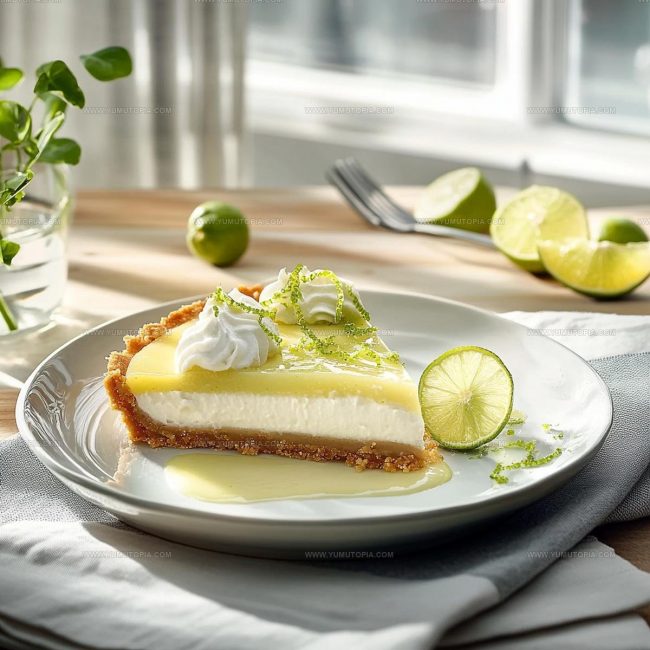
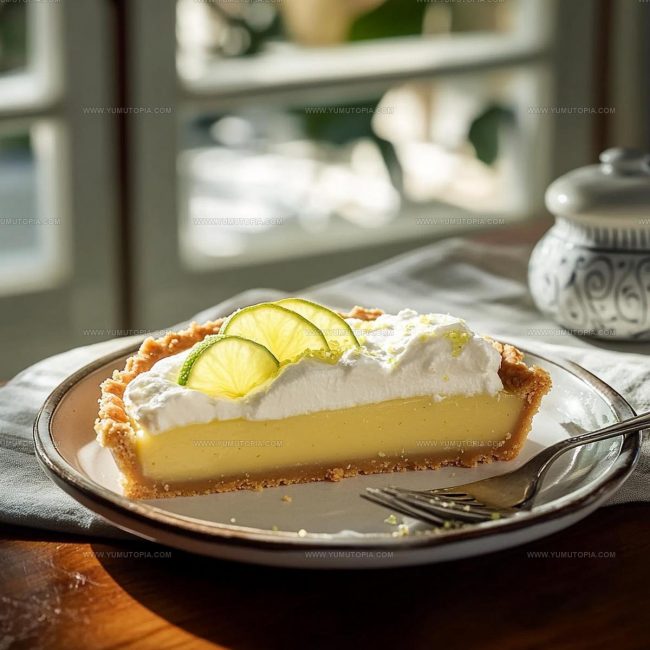
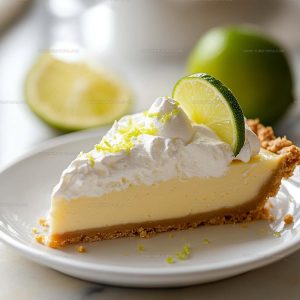
Key Lime Pie Recipe With Zesty Creamy Filling
Key lime pie captures that perfect balance of sweet and tart flavors that makes every bite feel like a tropical escape.
This beloved dessert has won hearts across generations with its creamy texture and refreshing taste.
The iconic pale yellow filling sits beautifully atop a crumbly crust, creating a dessert that feels both elegant and comforting at once.
Whether served at summer gatherings or enjoyed as a weeknight treat, this classic never fails to impress.
The simplicity of preparation makes it accessible for bakers at all skill levels.
Each slice offers a taste of sunshine that brightens any occasion.
What Makes Key Lime Pie So Bright & Zesty
What Goes Into Key Lime Pie
Pie Crust:Pie Filling:Topping:Tools for Zesting and Mixing Key Lime Pie
Step-By-Step Preparation for Tangy Key Lime Pie
Prepare the Oven
Crank up your oven to a toasty 350°F (175°C) and grab your 9-inch pie pan. This temperature will help create that perfect golden crust.
Create the Crunchy Crust
Grab a mixing bowl and combine your graham cracker ingredients:
Mix these until they’re perfectly blended. Press the mixture firmly into the bottom and sides of your pie pan, creating a solid base for your tangy filling.
Bake the Crust
Slide the pan into the preheated oven and bake for 8 minutes. Watch for a beautiful golden-brown color. Once done, pull it out and let it cool completely.
Whip Up the Filling
In a clean bowl, grab your lime and filling ingredients:
Whisk these together until the mixture becomes smooth and creamy. Make sure everything is well combined.
Bake the Pie
Pour the lime filling over your cooled crust. Return the pie to the 350°F (175°C) oven and bake for 10 minutes. The filling should look set but still have a slight jiggle.
Chill and Set
Remove the pie from the oven and let it cool completely at room temperature. Once it’s no longer warm, pop it in the refrigerator. Let it chill for at least 3 hours or overnight for the best texture.
Final Touch
Before serving, add a generous dollop of whipped cream on top. If you’re feeling fancy, sprinkle some fresh lime zest for an extra pop of flavor.
Baking and Setting Notes for Key Lime Pie
Flavor Options for Key Lime Pie
Serving Key Lime Pie Cool and Bright
How to Store Key Lime Pie
Key Lime Pie: What Readers Want to Know
What are key limes and how do they differ from regular limes?
Key limes are smaller, more aromatic citrus fruits from Mexico with a stronger, more tart flavor compared to standard Persian limes. They give this pie its distinctive tangy taste.
Can fresh key lime juice be substituted with bottled juice?
Absolutely fresh key lime juice provides the best flavor, but high-quality bottled key lime juice works well if fresh limes are unavailable. Avoid regular lime juice, as it won’t deliver the same authentic taste.
How do I know when the pie filling is properly set?
The filling should look slightly firm and not liquid when you gently shake the pie. It will continue to set while cooling and chilling in the refrigerator.
What if my filling looks curdled or separated?
Whisk the ingredients thoroughly and ensure your eggs and milk are at room temperature before mixing. Gentle, consistent whisking prevents separation.
Why does the crust need to be pre-baked?
Pre-baking helps the graham cracker crust become crisp and golden, preventing sogginess and creating a sturdy base for the creamy filling.
Can this pie be frozen for later?
The pie freezes beautifully for up to one month. Wrap carefully in plastic wrap and thaw in the refrigerator before serving.
Classic Key Lime Pie Recipe
- Total Time: 3 hours 33 minutes
- Yield: 8 1x
Description
Key Lime Pie brings zesty sunshine straight from the Florida Keys to your dessert table, creating a creamy tang that makes taste buds dance with pure tropical delight.
Ingredients
Main Ingredients:
- 1 cup key lime juice
- 4 large egg yolks
- 1 can (14 ounces/400 grams) sweetened condensed milk
Supporting Ingredients:
- 1 ½ cups graham cracker crumbs
- ½ cup unsalted butter (melted)
Topping:
- Whipped cream
Instructions
- Preheat the oven to 350°F (175°C), ensuring your rack is positioned in the center for even baking.
- Combine 1½ cups graham cracker crumbs with ½ cup melted unsalted butter in a mixing bowl, stirring until the mixture resembles wet sand.
- Transfer the crumb mixture into a 9-inch pie pan, pressing firmly and evenly across the bottom and sides using the back of a measuring cup.
- Slide the crust into the preheated oven and bake for 8 minutes until the edges turn a light golden brown.
- Remove the crust and let it cool completely on a wire rack for approximately 15 minutes.
- Whisk 4 large egg yolks in a medium bowl until they become smooth and slightly pale.
- Add 1 can (14 ounces) sweetened condensed milk to the egg yolks, stirring until completely integrated.
- Pour 1 cup of freshly squeezed key lime juice into the mixture, whisking continuously until the filling becomes uniform and silky.
- Carefully pour the lime filling into the cooled graham cracker crust, spreading it evenly to the edges.
- Return the pie to the 350°F oven and bake for 10-12 minutes until the filling is just set but still slightly jiggly in the center.
- Transfer the pie to a cooling rack and let it rest at room temperature for 30 minutes.
- Refrigerate the pie for a minimum of 3 hours or ideally overnight to allow the filling to completely set.
- Before serving, top with freshly whipped cream and garnish with delicate lime zest curls.
Notes
- Use fresh key lime juice for the most authentic and bright flavor in your pie.
- Crush graham crackers finely and press the crust mixture firmly to create a solid, crisp base.
- Zest your limes before juicing to capture maximum citrus essence and enhance the overall taste.
- For a lighter version, swap full-fat condensed milk with a low-fat alternative and use a reduced-fat graham cracker crust.
- Prep Time: 15 minutes
- Cook Time: 18 minutes
- Category: Pies
- Method: Baking
- Cuisine: American
Nutrition
- Serving Size: 8
- Calories: 354 kcal
- Sugar: 35 g
- Sodium: 180 mg
- Fat: 18 g
- Saturated Fat: 10 g
- Unsaturated Fat: 7 g
- Trans Fat: 0.2 g
- Carbohydrates: 39 g
- Fiber: 1 g
- Protein: 5 g
- Cholesterol: 135 mg
Logan Lemaster
Founder & Culinary Innovator
Expertise
Recipe Development and Innovation, Menu Design and Optimization, Fine Dining Techniques, Ingredient Pairing and Flavor Science
Education
Metropolitan Culinary Arts Institute
Logan’s culinary journey kicked off in his vibrant Chicago family kitchen, where fresh, seasonal ingredients and bold flavors were always front and center.
After graduating from the Metropolitan Culinary Arts Institute in Arlington, Virginia, and honing his skills in renowned restaurants, Logan mastered the art of blending classic techniques with exciting, modern twists.
His kitchen is a dynamic lab for flavor exploration. Through Yum Utopia, Logan aims to empower you to cook with both confidence and creativity, turning simple ingredients into spectacular meals.