
Classic Lemon Bars Recipe That Balances Sweet and Tart
Classic lemon bars recipe lovers know that few desserts deliver such a perfect balance of sweet and tart in every bite.
The combination of a buttery crust with a smooth, citrus topping has made this dessert a favorite at potlucks, bake sales, and family gatherings for generations.
Whether served on a warm spring afternoon or as a bright finish to a winter meal, this treat always manages to lift spirits and satisfy cravings.
Once you master the technique, it becomes one of those reliable desserts that never disappoints and always earns compliments.
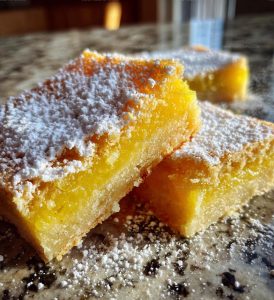
The squares cut cleanly, look beautiful on a platter, and taste like sunshine captured in dessert form.
Best of all, they keep well and actually taste even better the next day after the flavors have had time to settle.
Go straight to the recipe and see how easy it is to create this beloved classic at home.
What Makes Lemon Bars Baking Staples
Full Ingredient List for Classic Lemon Bars
Crust Ingredients:Filling Ingredients:Supporting Ingredient:What Tools Bake Classic Lemon Bars
How to Bake Classic Lemon Bars
Prepare the Oven
Heat the oven to 350°F and grab an 8-inch square baking pan. Grease the pan thoroughly so your crust won’t stick.
Make the Crust
Grab a mixing bowl and combine these ingredients for the crust:
Use your fingers to mix everything until the mixture looks like coarse crumbs. Press this mixture firmly into the bottom of the prepared pan, creating an even layer.
Bake the Crust
Slide the pan into the preheated oven and bake for exactly 15 minutes. The edges should look lightly golden when done.
Prepare Lemon Filling
While the crust bakes, whip up the tangy filling in a clean bowl. Grab these ingredients:
Whisk everything together until smooth and well combined.
Add Lemon Layer
Pour the bright lemon mixture directly over the hot crust, making sure it spreads evenly to all corners.
Final Bake
Return the pan to the 350°F oven and bake for another 20 minutes. The filling should look set but still slightly jiggly in the center.
Cool and Serve
Remove the pan from the oven and let it cool completely on a wire rack. Once cooled, slice into neat squares and dust with a sprinkle of powdered sugar if you like.
Classic Baking Tips for Lemon Bars
What Classic Lemon Bar Variations Are Timeless
Classic Serving Styles for Lemon Bars
How to Store Classic Lemon Bars
Classic Lemon Bars FAQs That Never Fail
Can I use bottled lemon juice instead of fresh lemons?
Fresh lemon juice delivers the brightest flavor. Bottled juice works in a pinch, but your bars won’t have the same vibrant taste and zesty aroma.
Why did my crust turn out crumbly and dry?
Make sure your butter is at room temperature and mix just until the ingredients come together. Overmixing can create a tough, dry crust that falls apart easily.
How do I get clean, perfect-looking bar edges?
Chill the bars completely before cutting. Use a sharp knife and wipe the blade clean between each cut for crisp, smooth edges.
Can these bars be made gluten-free?
Absolutely! Replace the all-purpose flour with a gluten-free flour blend. Look for one that includes xanthan gum for best texture.
What if my lemon filling seems too runny?
Your mixture should look slightly liquid before baking. The eggs will help it set during baking. If concerned, add an extra teaspoon of cornstarch to thicken.
How can I prevent the crust from getting soggy?
Bake the crust until it’s lightly golden before adding the lemon filling. This creates a protective barrier that keeps your base crisp and delicious.
Classic Lemon Bars Recipe
- Total Time: 45 minutes
- Yield: 7 1x
Description
Classic lemon bars deliver a zesty punch of sunshine right onto your dessert plate. Sweet, tangy, and perfectly balanced, these bars will make your taste buds dance with pure citrusy joy.
Ingredients
Crust:
- 1 cup all-purpose flour
- ½ cup unsalted butter, softened
- ¼ cup granulated sugar
- ¼ teaspoon salt
Filling:
- 2 large eggs
- 1 cup granulated sugar
- ¼ cup fresh lemon juice
- 1 tablespoon lemon zest
Leavening:
- ¼ teaspoon baking powder
Instructions
- Combine 1 cup flour, ½ cup softened butter, ¼ cup sugar, and ¼ teaspoon salt in a mixing bowl. Work the ingredients with your fingers until the mixture resembles coarse crumbs.
- Press the crumbly mixture firmly into a greased 8-inch square baking pan, creating an even bottom layer.
- Slide the pan into a preheated 350F oven and bake for exactly 15 minutes until the crust turns a delicate golden color.
- Crack 2 large eggs into a separate mixing bowl and whisk them together with 1 cup sugar, ¼ cup fresh lemon juice, 1 tablespoon lemon zest, and ¼ teaspoon baking powder until completely smooth.
- Remove the golden crust from the oven and carefully pour the lemony egg mixture over the hot base, ensuring complete and even coverage.
- Return the pan to the 350F oven and bake an additional 20 minutes until the top sets and appears slightly firm.
- Transfer the pan to a cooling rack and allow the lemon bars to rest at room temperature for at least 1 hour before slicing into neat squares.
Notes
- Use room temperature ingredients to ensure smooth mixing and even baking.
- Line the pan with parchment paper for easier removal and clean cutting of bars.
- Zest the lemons before juicing to get maximum flavor and make the process more efficient.
- For a gluten-free version, swap regular flour with almond flour or a gluten-free blend, which will create a slightly different but delicious texture.
- Prep Time: 10 minutes
- Cook Time: 35 minutes
- Category: Dessert Bars
- Method: Baking
- Cuisine: American
Nutrition
- Serving Size: 7
- Calories: 222 kcal
- Sugar: 25 g
- Sodium: 94 mg
- Fat: 11 g
- Saturated Fat: 7 g
- Unsaturated Fat: 4 g
- Trans Fat: 0.3 g
- Carbohydrates: 31 g
- Fiber: 1 g
- Protein: 3 g
- Cholesterol: 55 mg
Logan Lemaster
Founder & Culinary Innovator
Expertise
Recipe Development and Innovation, Menu Design and Optimization, Fine Dining Techniques, Ingredient Pairing and Flavor Science
Education
Metropolitan Culinary Arts Institute
Logan’s culinary journey kicked off in his vibrant Chicago family kitchen, where fresh, seasonal ingredients and bold flavors were always front and center.
After graduating from the Metropolitan Culinary Arts Institute in Arlington, Virginia, and honing his skills in renowned restaurants, Logan mastered the art of blending classic techniques with exciting, modern twists.
His kitchen is a dynamic lab for flavor exploration. Through Yum Utopia, Logan aims to empower you to cook with both confidence and creativity, turning simple ingredients into spectacular meals.