
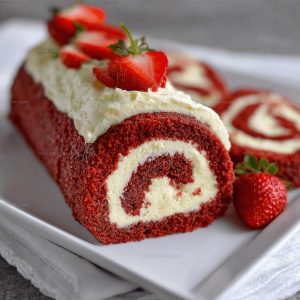
Red Velvet Cake Roll Recipe That Swirls With Rich Cocoa Cream
Red velvet cake roll combines luxurious Southern charm with elegant European pastry techniques.
Sophisticated dessert lovers appreciate its stunning visual appeal and rich crimson hue.
Smooth cream cheese filling nestled within soft, velvety cake creates pure decadence for special occasions.
Impressive presentation meets mouthwatering flavor in this show-stopping sweet treat.
Delightful texture and gorgeous swirl make every slice memorable and Instagram-worthy.
Perfect for celebrations or weekend indulgences, this dessert promises to dazzle dinner guests and family alike.
What Makes Red Velvet Cake Roll Worth Making
Red Velvet Cake Roll Baking Basics
Primary Cake Ingredients:Supporting Ingredients:Filling Ingredients:Garnish:What Kitchen Tools Do You Need for Red Velvet Cake Roll
Cooking Method for Red Velvet Cake Roll

Prepare Baking Pan
Grab your 15×10-inch jelly roll pan and line it with parchment paper. Spray the paper with nonstick cooking spray so your cake slides out like a dream at 350°F.
Create Cake Base
Whisk 3 large eggs and 1 cup granulated sugar in a big bowl for 2-3 minutes until the mixture looks super light and fluffy. Then blend in:
Mix Dry Ingredients
Sift the following dry ingredients into your wet mixture:
Fold gently until everything just comes together.
Add Color
Pour in 1 tablespoon red food coloring and mix until your batter transforms into a bold red shade. Spread the batter evenly across your prepared pan.
Bake Cake
Slide the pan into a 350°F oven for 12-15 minutes. The cake is done when it springs back after a light touch. Immediately flip the hot cake onto a kitchen towel dusted with powdered sugar.
Initial Roll
Carefully roll the warm cake with the towel, starting from the short end. Let the cake cool completely in this rolled position for 30-40 minutes.
Prepare Filling
Blend 8 oz cream cheese and 1/4 cup softened butter until smooth. Gradually mix in:
Add 1-2 tablespoons milk if the mixture needs a more spreadable consistency.
Fill Cake
Gently unroll the cooled cake and spread the cream cheese filling across the surface, leaving a small border around the edges.
Final Roll
Roll the cake again without the towel, tucking the filling inside. Wrap in plastic wrap and chill in the refrigerator for at least 1 hour.
Serve
Dust the cake roll with powdered sugar right before serving. Slice and enjoy chilled.
Key Cooking Notes For Red Velvet Cake Roll
What Creative Spins Reinvent Red Velvet Cake Roll
Elegant Serving Ideas For Red Velvet Cake Roll
How Long Does Red Velvet Cake Roll Keep
Red Velvet Cake Roll Common Questions
Can I substitute the red food coloring?
Natural alternatives like beet juice work well, but they might change the cake’s texture and flavor slightly. Commercial gel food coloring provides the most vibrant red color.
How do I prevent my cake from cracking when rolling?
Ensure you roll the cake while it’s still warm and use a clean, powdered sugar-dusted kitchen towel. Rolling gently and evenly helps prevent cracks.
What if my cream cheese filling seems too thick?
Add milk one teaspoon at a time until you reach a spreadable consistency that’s easy to work with across your cake surface.
Can this cake be made ahead of time?
Absolutely! The cake roll keeps well in the refrigerator for 2-3 days when wrapped tightly in plastic wrap.
Does the vinegar really matter in this recipe?
White vinegar helps activate the baking soda, creating a softer, more tender cake texture that’s essential for successful rolling.
How thin should the cake batter be spread in the pan?
Spread the batter evenly to about 1/4-inch thickness, ensuring a consistent layer that will roll smoothly without breaking.
Cream Cheese Filled Red Velvet Cake Roll Recipe
- Total Time: 35 minutes
- Yield: 8 1x
Description
Red Velvet Cake Roll brings Southern charm straight to your dessert table with a delightful swirl of cocoa-rich cake and creamy cream cheese filling that’ll make your taste buds dance. Rolled with care and topped with a delicate dusting of powdered sugar, this elegant treat turns an ordinary afternoon into a sweet celebration.
Ingredients
Primary Ingredients:
- 3 large eggs
- 1 cup all-purpose flour
- 1 cup granulated sugar
- 1 tablespoon unsweetened cocoa powder
Supporting Ingredients:
- ⅓ cup vegetable oil
- 1 teaspoon white vinegar
- 1 teaspoon vanilla extract
- 1 tablespoon red food coloring
- 1 teaspoon baking powder
- ½ teaspoon baking soda
- ½ teaspoon salt
Filling Ingredients:
- 8 ounces cream cheese
- ¼ cup unsalted butter
- 1 cup powdered sugar
- 1 teaspoon vanilla extract
- 1–2 tablespoons milk
Garnish:
- Powdered sugar
Instructions
- Preheat your oven to 350°F and line a 15×10-inch jelly roll pan with parchment paper. Spray the parchment with nonstick cooking spray to ensure smooth cake removal.
- Whisk 3 large eggs and 1 cup granulated sugar in a large bowl for 2-3 minutes until the mixture becomes pale and fluffy. Incorporate ⅓ cup vegetable oil, 1 teaspoon vanilla extract, and 1 teaspoon white vinegar.
- Sift 1 cup all-purpose flour, 1 tablespoon cocoa powder, 1 teaspoon baking powder, ½ teaspoon baking soda, and ½ teaspoon salt into the wet ingredients. Gently fold until just combined.
- Add 1 tablespoon red food coloring and mix until the batter turns a vibrant red color. Pour the batter evenly into the prepared pan and spread with a spatula.
- Bake for 12-15 minutes at 350°F until the cake springs back when lightly touched. Remove from the oven and immediately flip onto a clean kitchen towel dusted with powdered sugar.
- Carefully roll the warm cake with the towel, starting from the short end. Allow the cake to cool completely in this rolled position, about 30-40 minutes at room temperature.
- Beat 8 oz cream cheese and ¼ cup softened butter until smooth. Gradually add 1 cup powdered sugar and 1 teaspoon vanilla extract. Add 1-2 tablespoons milk if needed for spreadable consistency.
- Unroll the cooled cake carefully and spread the cream cheese filling evenly across the surface, leaving a small border around the edges.
- Re-roll the cake without the towel, tucking the filling inside. Wrap in plastic wrap and refrigerate for at least 1 hour to set the filling.
- Before serving, dust the cake roll with additional powdered sugar. Slice and serve chilled.
Notes
- Use a jelly roll pan with parchment paper for easy cake removal and smooth rolling.
- Carefully unroll the warm cake on a clean kitchen towel dusted with powdered sugar to prevent sticking.
- Beat the cream cheese filling until completely smooth to avoid lumps in the final texture.
- Refrigerate the cake roll for at least an hour before serving to help it set and make slicing cleaner and more precise.
- Prep Time: 20 minutes
- Cook Time: 15 minutes
- Category: Cakes
- Method: Baking
- Cuisine: American
Nutrition
- Serving Size: 8
- Calories: 375 kcal
- Sugar: 33 g
- Sodium: 220 mg
- Fat: 22 g
- Saturated Fat: 7 g
- Unsaturated Fat: 14 g
- Trans Fat: 0.3 g
- Carbohydrates: 38 g
- Fiber: 1 g
- Protein: 5 g
- Cholesterol: 50 mg
Logan Lemaster
Founder & Culinary Innovator
Expertise
Recipe Development and Innovation, Menu Design and Optimization, Fine Dining Techniques, Ingredient Pairing and Flavor Science
Education
Metropolitan Culinary Arts Institute
Logan’s culinary journey kicked off in his vibrant Chicago family kitchen, where fresh, seasonal ingredients and bold flavors were always front and center.
After graduating from the Metropolitan Culinary Arts Institute in Arlington, Virginia, and honing his skills in renowned restaurants, Logan mastered the art of blending classic techniques with exciting, modern twists.
His kitchen is a dynamic lab for flavor exploration. Through Yum Utopia, Logan aims to empower you to cook with both confidence and creativity, turning simple ingredients into spectacular meals.