
Cream Puff Cake Recipe That Melts Away
Cream puff cake offers all the elegance of classic French pastry in a form that feels approachable and fun for any occasion.
Soft layers meet silky filling in a dessert that looks impressive but comes together more easily than you might expect.
The contrast between delicate texture and rich satisfaction makes every bite feel special, perfect for celebrations or simply treating yourself on a quiet afternoon.
You won’t need fancy equipment or professional training to pull off something that tastes bakery-worthy.
The combination works beautifully for potlucks, holidays, or whenever you want to serve something memorable without spending all day in the kitchen.
This recipe proves that homemade desserts can feel luxurious and achievable all at once.
Reasons Cream Puff Cake Always Feels Worth the Effort

Essential Ingredients for Cream Puff Cake
Pastry Base:Cream Filling:Topping:What Tools Are Used for Cream Puff Cake
How to Prepare Cream Puff Cake
Prepare Oven and Pan
Heat your oven to 450°F. Grab a 9×13 inch baking pan and coat it thoroughly with butter or cooking spray to prevent sticking.
Create Dough Base
Combine in a saucepan:
Bring this mixture to a rolling boil, then remove from heat and transfer to a mixing bowl.
Mix Flour into Dough
Stir in 1 cup all-purpose flour. Beat the mixture until it forms a smooth ball. Keep mixing until the texture looks completely uniform.
Rest and Add Eggs
Let the dough cool for 10 minutes. Then add 4 eggs one at a time, beating thoroughly after each addition. The final mixture should look glossy and thick.
Bake First Round
Spread the dough evenly across your prepared pan. Bake at 450°F for 15 minutes until it puffs up nicely.
Adjust Baking
Poke about 15 holes across the puffy surface with a knife. Reduce oven temperature to 350°F and continue baking for another 20 minutes.
Cool Crust
Remove from oven and let the crust cool completely for 30-45 minutes.
Prepare Cream Filling
In a large mixing bowl, blend:
Mix slowly at first, then beat until smooth and creamy.
Assemble Cream Puff Cake
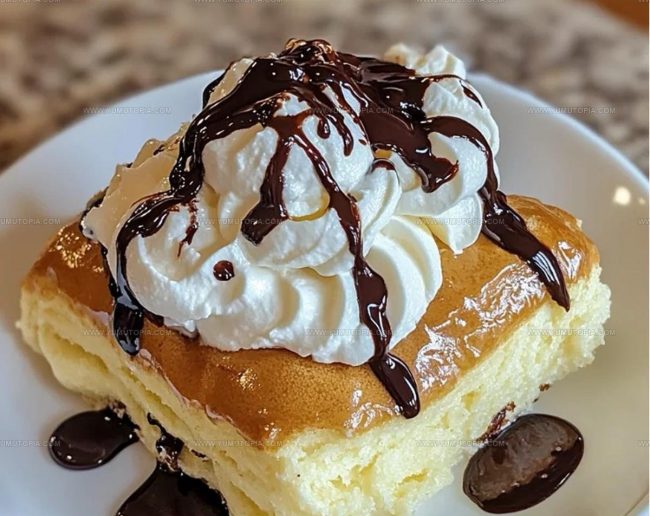
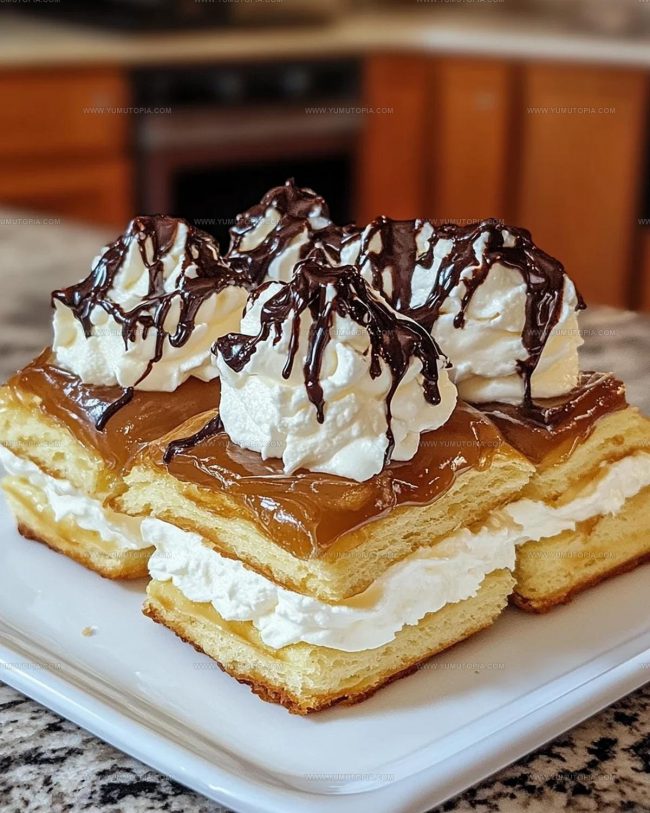
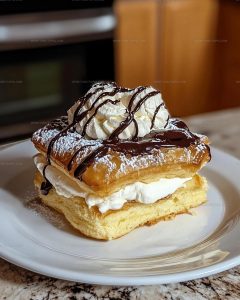
Pour the cream filling over the cooled crust. Top with 8 ounces of defrosted whipped topping.
Final Touch
Drizzle 1/4 cup chocolate syrup across the top. Refrigerate until ready to serve.
Must Know Tips For Cream Puff Cake

Easy Variations for Cream Puff Cake
Best Ways to Slice and Serve Cream Puff Cake
Cream Puff Cake Storage And Chilling Tips
Cream Puff Cake Questions Answered
What type of crust does this dessert have?
This cream puff cake has a light, puffy pastry base made from a classic choux pastry that rises beautifully in the oven and creates a delicate foundation for the creamy filling.
Can I make this recipe ahead of time?
Absolutely! The cream puff base can be prepared earlier in the day, and the entire dessert can be assembled and refrigerated several hours before serving.
Do I need any special baking skills to make this?
Not at all. Even beginner bakers can master this recipe with simple steps like boiling ingredients, mixing dough, and beating cream cheese with pudding mix.
What makes the crust puff up so nicely?
The magic happens when water, butter, and flour create steam during baking, causing the pastry to rise and form those gorgeous puffy layers.
Can I substitute ingredients in the filling?
The cream cheese and pudding filling is pretty forgiving. You could swap instant pudding flavors or use different brands of cream cheese without affecting the overall texture.
How do I know when the crust is fully baked?
The pastry will turn golden brown and look slightly puffy. Pricking the center helps release steam and ensures a crisp, even texture throughout the base.
Cream Puff Cake Recipe
- Total Time: 55 – 70 minutes
- Yield: 8 1x
Description
Cream puff cake brings pure delight straight from French pastry traditions to your dessert table. Layers of delicate choux pastry and rich custard cream make this elegant treat a crowd-pleasing showstopper for special gatherings.
Ingredients
Cake Base:
- 1 cup water
- ½ cup butter
- 1 cup all-purpose flour
- 4 eggs
- ¼ teaspoon salt
Filling:
- 2 3.9-ounce boxes instant vanilla pudding
- 3 ½ cups milk
- 8 ounces cream cheese
- 8 ounces whipped topping
Topping:
- ¼ cup chocolate syrup
Instructions
- Crank the oven to a scorching 450°F and thoroughly coat a 9×13″ pan with butter or cooking spray.
- Combine 1 cup water, ½ cup butter, and ¼ teaspoon salt in a saucepan. Bring to a rapid boil, then transfer to a mixing bowl.
- Vigorously stir in 1 cup flour until the mixture forms a cohesive ball, about 2 minutes of mixing.
- Let the dough rest and cool for 10 minutes at room temperature.
- Crack 4 eggs into the dough and beat until the mixture becomes glossy and smooth with a satin-like texture.
- Allow the dough to cool another 5 minutes, giving it time to settle.
- Spread the dough evenly across the greased pan, pressing it flat with your fingers.
- Bake at 450°F for exactly 15 minutes until the surface begins to puff.
- Pierce the puffy center about 15 times with a sharp knife to release trapped air.
- Reduce oven temperature to 350°F and continue baking for 20 more minutes.
- Remove from oven and let the base cool completely for 30-45 minutes.
- In a large bowl, beat 8 ounces of softened cream cheese until smooth.
- Whisk 2 boxes of vanilla pudding mix with 3 ½ cups milk until fully combined.
- Gently fold the pudding mixture into the cream cheese, mixing thoroughly.
- Spread the pudding filling evenly over the cooled pastry base.
- Top with 8 ounces of defrosted whipped topping.
- Drizzle ¼ cup chocolate syrup in an artistic pattern across the surface.
- Refrigerate for at least 1 hour before serving to allow flavors to meld.
Notes
- Always use room temperature eggs when adding them to the dough for smoother incorporation and better texture.
- Pricking the puffed center helps prevent a soggy bottom and ensures an even bake with crisp edges.
- For a gluten-free version, swap regular flour with a cup-for-cup gluten-free blend to maintain the cake’s delicate structure.
- Chill the cream filling for at least an hour before spreading to help it set firmly and create cleaner slices.
- Prep Time: 20 minutes
- Cook Time: 35 minutes
- Category: Cakes
- Method: Baking
- Cuisine: French
Nutrition
- Serving Size: 8
- Calories: 378 kcal
- Sugar: 19 g
- Sodium: 188 mg
- Fat: 23 g
- Saturated Fat: 13 g
- Unsaturated Fat: 9 g
- Trans Fat: 0.5 g
- Carbohydrates: 32 g
- Fiber: 1 g
- Protein: 7 g
- Cholesterol: 102 mg
Logan Lemaster
Founder & Culinary Innovator
Expertise
Recipe Development and Innovation, Menu Design and Optimization, Fine Dining Techniques, Ingredient Pairing and Flavor Science
Education
Metropolitan Culinary Arts Institute
Logan’s culinary journey kicked off in his vibrant Chicago family kitchen, where fresh, seasonal ingredients and bold flavors were always front and center.
After graduating from the Metropolitan Culinary Arts Institute in Arlington, Virginia, and honing his skills in renowned restaurants, Logan mastered the art of blending classic techniques with exciting, modern twists.
His kitchen is a dynamic lab for flavor exploration. Through Yum Utopia, Logan aims to empower you to cook with both confidence and creativity, turning simple ingredients into spectacular meals.