
Old-Fashioned Apple Pie Recipe
Classic apple pie stands as one of America’s most beloved desserts, gracing tables at holidays, family gatherings, and Sunday dinners alike.
Golden, flaky pastry cradles warm, cinnamon-kissed fruit that fills every room with an inviting aroma.
Comfort and tradition merge beautifully in every slice, creating memories that span generations.
Simple yet satisfying, it pairs wonderfully with vanilla ice cream or stands perfectly fine on its own.
Baking one from scratch feels rewarding and fills your home with unmatched warmth.
Perfect for potlucks, celebrations, or quiet afternoons, it never fails to please a crowd.
When you need a dessert that feels like home, nothing quite compares.
What Makes Classic Apple Pie Worth Making
Ingredient List for Classic Apple Pie
Finishing Touches:Common Cooking Tools for Classic Apple Pie
Classic Way to Make Apple Pie
Chill the Pie Crust
Pull out your pie dough and let it rest in the refrigerator for at least 1 hour. Cold dough is the secret to a flaky, perfect crust.
Prepare the Apple Filling
Grab your Granny Smith apples and slice them into half-inch pieces. In a large mixing bowl, combine the apples with:
Toss everything together until the apples are evenly coated with the sweet, spicy mixture.
Preheat and Position
Set your oven to 400°F and place the rack right in the center. Getting the temperature and rack position just right makes all the difference.
Roll Out the Bottom Crust
Take one pie crust and roll it out to 12 inches in diameter, making sure it’s about 1/8-inch thick.
Gently drape the crust into a deep dish pie plate, smoothing it into all the corners.
Fill the Pie
Pour your apple mixture into the bottom crust. If there’s extra liquid in the bowl, leave it behind – we don’t want a soggy pie bottom.
Top and Seal the Pie
Roll out the second pie crust and carefully place it over the apples. Trim the edges, then fold and crimp them to seal in all that delicious filling.
Cut a few slits in the top to let steam escape.
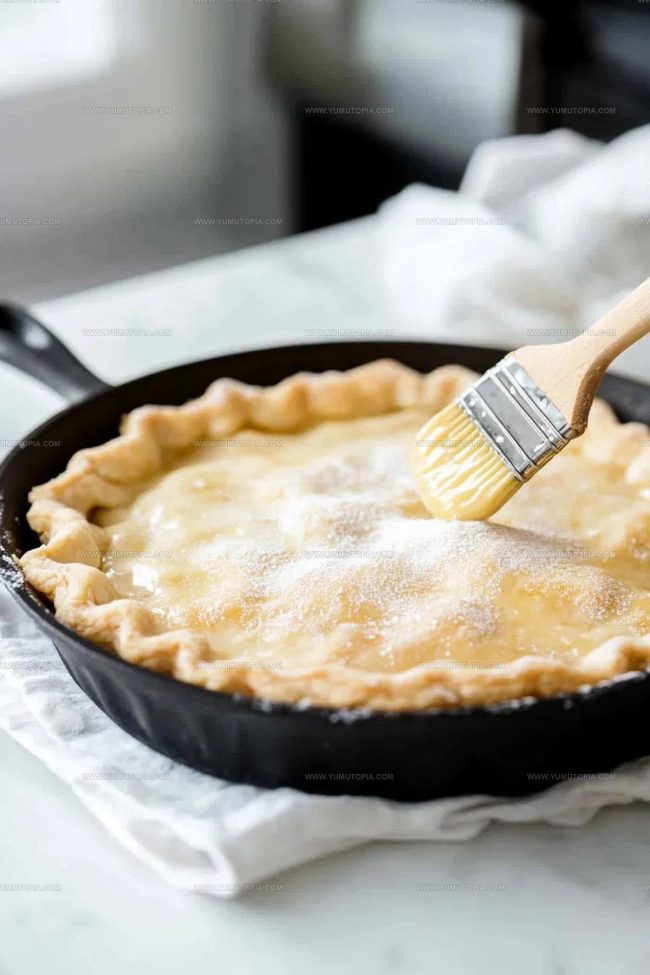
Prepare for Baking
Grab a large egg and beat it lightly. Brush the pie crust with the egg wash, then sprinkle 2 tablespoons of sanding sugar on top.
Cover the pie edges with foil or a pie shield to prevent burning.
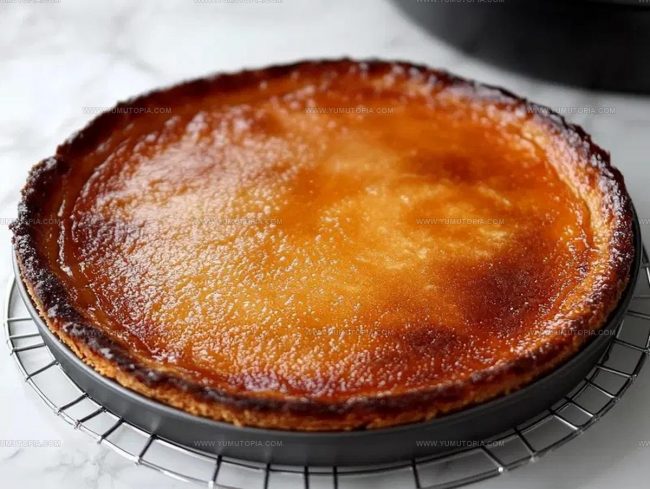
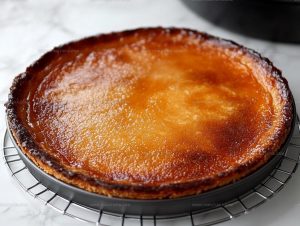
Bake to Golden Perfection
Slide the pie into the 400°F oven and bake for 25 minutes. Then lower the temperature to 375°F, remove the shield, and continue baking for 30-35 minutes until the crust turns a beautiful golden brown and the filling is bubbling.
Cool and Serve
Let the pie cool for a full 3 hours before slicing. This gives the filling time to set and makes cutting clean slices a breeze.
Cooking Notes for Classic Apple Pie
Different Takes on Classic Apple Pie
Presentation Notes for Classic Apple Pie
Proper Storage For Classic Apple Pie
Classic Apple Pie Answers To Common Questions
Can I make the pie crust from scratch?
Absolutely! Homemade pie crust gives the best flavor and flaky texture. Just mix flour, salt, cold butter, and ice water carefully to get that perfect consistency.
How do I prevent a soggy bottom crust?
Sprinkle a thin layer of breadcrumbs or ground nuts on the bottom crust before adding filling. This helps absorb extra moisture and keeps your crust crisp.
What apples work best for this pie?
Granny Smith, Honeycrisp, and Braeburn are fantastic choices. They hold their shape and offer a nice balance of tartness and sweetness.
How can I tell if the pie is fully baked?
Look for a golden-brown crust and bubbling filling around the edges. The apples should be tender when pierced with a knife.
Can I freeze this apple pie?
Yes! Wrap the baked and cooled pie tightly in plastic wrap and foil. It will keep in the freezer for up to 3 months.
Should I let the pie cool completely?
Definitely. Letting the pie rest allows the filling to set and makes slicing much easier. Patience delivers the perfect slice.
Deep-Dish Classic Apple Pie Recipe
- Total Time: 2 hours 15-20 minutes
- Yield: 6 to 8 1x
Description
Homemade Apple Pie brings warm memories of grandma’s kitchen, filling your home with sweet cinnamon comfort. Buttery crust and tender apples create a classic dessert that connects generations with pure deliciousness.
Ingredients
Primary Ingredients:
- 7 large Granny Smith apples
- 2 9″ pie crusts
Sweeteners:
- ½ cup granulated sugar
- ½ cup light brown sugar
Supporting Ingredients:
- 2 tablespoons all-purpose flour
- 1 teaspoon ground cinnamon
- ⅛ teaspoon ground nutmeg
- 1 tablespoon lemon juice
- 1 large egg
- 2 tablespoons sanding sugar
Instructions
- Remove your pie crusts from the refrigerator and let them sit at room temperature for 10 minutes to become pliable.
- Preheat your oven to 400°F and position the rack directly in the center for even baking.
- Peel 7 large Granny Smith apples and slice them precisely into half-inch thick wedges.
- Combine ½ cup granulated sugar, ½ cup brown sugar, 2 tablespoons flour, 1 teaspoon cinnamon, and ⅛ teaspoon nutmeg in a large mixing bowl.
- Toss your apple slices with the sugar mixture and 1 tablespoon lemon juice until every slice is thoroughly coated.
- Roll out the first pie crust to a 12-inch diameter and about ⅛-inch thickness, then gently drape it into a 9-inch deep dish pie plate.
- Pour the seasoned apple mixture into the bottom crust, making sure to leave behind any excess liquid.
- Roll out the second pie crust and carefully place it over the apple filling.
- Trim the excess dough around the edges, then pinch and fold the edges under to create a neat seal.
- Cut 4-5 small slits across the top crust to allow steam to escape during baking.
- Brush the entire top crust with 1 beaten egg and sprinkle 2 tablespoons of sanding sugar evenly.
- Cover the pie edges with aluminum foil to prevent excessive browning.
- Bake at 400°F for 25 minutes, then reduce the temperature to 375°F and remove the foil.
- Continue baking for an additional 30-35 minutes until the crust turns golden brown and the filling bubbles.
- Remove from the oven and let the pie cool completely for 3 hours before slicing to allow the filling to set.
Notes
- Chilling the pie dough helps prevent shrinkage and creates a flakier crust, so take the time to refrigerate it before rolling.
- Choose firm, tart apples like Granny Smith or Honeycrisp for the best balance of texture and flavor in your pie filling.
- For a gluten-free version, swap traditional flour with a cup-for-cup gluten-free blend and use a gluten-free pie crust recipe.
- Letting the pie cool completely allows the filling to set and makes slicing much easier, so resist the temptation to cut into it too soon.
- Prep Time: 1 hour 20 minutes
- Cook Time: 55 minutes – 1 hour
- Category: Pies
- Method: Baking
- Cuisine: American
Nutrition
- Serving Size: 6 to 8
- Calories: 295 kcal
- Sugar: 38 g
- Sodium: 155 mg
- Fat: 10 g
- Saturated Fat: 3 g
- Unsaturated Fat: 7 g
- Trans Fat: 0.2 g
- Carbohydrates: 50 g
- Fiber: 3 g
- Protein: 2 g
- Cholesterol: 35 mg
Logan Lemaster
Founder & Culinary Innovator
Expertise
Recipe Development and Innovation, Menu Design and Optimization, Fine Dining Techniques, Ingredient Pairing and Flavor Science
Education
Metropolitan Culinary Arts Institute
Logan’s culinary journey kicked off in his vibrant Chicago family kitchen, where fresh, seasonal ingredients and bold flavors were always front and center.
After graduating from the Metropolitan Culinary Arts Institute in Arlington, Virginia, and honing his skills in renowned restaurants, Logan mastered the art of blending classic techniques with exciting, modern twists.
His kitchen is a dynamic lab for flavor exploration. Through Yum Utopia, Logan aims to empower you to cook with both confidence and creativity, turning simple ingredients into spectacular meals.