
Cherry Pie Bombs Recipe With Flaky Golden Crust
Cherry Pie Bombs Recipe turns a classic dessert into fun, portable bites that everyone can enjoy in just minutes.
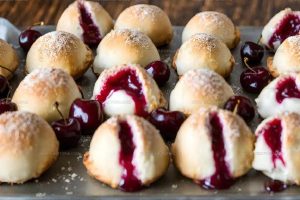
Flaky pastry wraps around sweet cherry filling to create poppable treats perfect for parties, picnics, or anytime cravings strike.
The handheld format makes them ideal for serving at gatherings without needing plates or forks.
Golden and glossy on the outside with a fruity center, they disappear fast from any dessert table.
Each bite delivers that familiar pie flavor in a more playful, shareable form.
If you love desserts that look impressive but come together quickly, scroll down for the full recipe and start baking today.
Why Cherry Pie Bombs Are So Fun

Cherry Pie Bombs Ingredient Breakdown
Dry Ingredients:Fat and Liquid Ingredients:Filling and Flavor Ingredients:Binding and Finishing Ingredients:Frying Ingredient:Kitchen Tools Needed for Cherry Pie Bombs
Cherry Pie Bombs Step-by-Step Preparation
Prepare Dry Ingredients
Grab a large mixing bowl and toss in 2 cups all-purpose flour, 1/4 cup sugar, 1 tsp baking powder, and 1/2 tsp salt. Whisk these together until they’re well combined and looking friendly.
Work in Cold Butter
Chop 1/2 cup cold butter into tiny cubes. Use your fingertips to work the butter into the flour mixture until it looks like rough, sandy crumbs. Keep working it until there are no big butter chunks left.
Form the Dough
Pour 1/2 cup cold milk into the bowl and gently stir until a soft dough comes together. Don’t get too rough with the mixing – you want a tender dough.
Knead and Roll
Dust your countertop with a bit of flour and give the dough a quick, gentle knead. Roll it out to about 1/4-inch thickness and grab a 3-inch round cutter or glass.
Prepare Cherry Filling
Pit those fresh cherries and chop them into tiny pieces. Mix 1 cup chopped cherries with 1/4 cup cherry preserves in a small bowl. This is where the magic happens!
Fill the Dough Circles
Place a tablespoon of cherry mixture right in the center of each dough circle. Don’t overfill, or you’ll have a messy situation.
Seal the Bombs
Fold the dough over the filling and pinch those edges super tight. Make sure nothing can escape during frying.
Egg Wash
Whisk 1 egg with 2 tbsp water to create a nice egg wash. Brush this all over the sealed dough bombs to help them get a beautiful golden color.
Prepare for Frying
Heat 2 cups vegetable oil in a deep pot to exactly 350°F. Use a thermometer to be precise – temperature matters!
Fry the Bombs
Carefully drop 3-4 dough bombs into the hot oil. Fry for 2-3 minutes, flipping once, until they turn a gorgeous golden brown.
Drain and Cool
Pull the bombs out with a slotted spoon and let them drain on paper towels. They’ll need a minute to cool down and lose some oil.
Make the Glaze
Mix 1/4 cup powdered sugar with 1 tsp vanilla extract and 1/2 tsp almond extract in a small bowl.
Final Touch
Drizzle that sweet glaze over the warm cherry bombs right before serving. Get ready for a seriously delicious treat!
Things Worth Knowing About Cherry Pie Bombs
Cherry Pie Bombs With Flavor Swaps
Best Ways to Serve Cherry Pie Bombs
Proper Storage For Cherry Pie Bombs
Frequently Asked Questions About Cherry Pie Bombs
What ingredients make the dough tender?
Cold butter and cold milk help create a flaky, soft texture when worked gently into the flour mixture.
Can fresh or frozen cherries work best?
Fresh pitted cherries provide the most vibrant flavor, but frozen cherries (thawed and drained) also create delicious results.
How do I know when the oil is hot enough?
Use a digital thermometer to check 350°F, or drop a small piece of dough into oil – it should sizzle and rise immediately.
Why seal edges completely?
Sealing prevents filling from leaking during frying and ensures your cherry bombs stay intact and crispy.
What if my dough seems too sticky?
Dust your work surface with extra flour and handle the dough gently to prevent overworking, which can make it tough.
Can these be baked instead of fried?
Baking changes the texture, but you can brush with egg wash and bake at 375°F for 15-18 minutes until golden brown.
Deep-Fried Cherry Pie Bombs Recipe
- Total Time: 30 minutes
- Yield: 8 1x
Description
Fresh from the oven, Cherry Pie Bombs deliver pure dessert magic in bite-sized parcels that’ll make your taste buds dance with delight. Crispy pastry wraps around sweet cherries, creating a perfect handheld treat perfect for sharing with friends and family.
Ingredients
Main Ingredients:
- 2 cups all-purpose flour
- 1 cup fresh cherries
- ½ cup cold butter
- ½ cup cold milk
- 2 cups vegetable oil
Filling and Sweeteners:
- ¼ cup cherry preserves
- ¼ cup sugar
- ¼ cup powdered sugar
Leavening and Flavor Enhancers:
- 1 egg
- 1 teaspoon baking powder
- ½ teaspoon salt
- 2 tablespoons water
- 1 teaspoon vanilla extract
- ½ teaspoon almond extract
Instructions
- Combine 2 cups flour, ¼ cup sugar, 1 tsp baking powder, and ½ tsp salt in a mixing bowl.
- Cut ½ cup cold butter into tiny cubes and blend into the flour mixture until it looks like rough breadcrumbs.
- Add ½ cup cold milk and gently combine until a soft dough emerges.
- Transfer dough to a flour-dusted surface and knead briefly until smooth.
- Roll the dough to a ¼-inch thickness and use a 3-inch round cutter to create circles.
- Remove cherry pits and dice 1 cup fresh cherries into small pieces.
- Blend chopped cherries with ¼ cup cherry preserves in a separate container.
- Place 1 tablespoon of cherry mixture exactly in the center of each dough circle.
- Fold dough over filling and firmly press edges to create a complete seal.
- Whisk 1 egg with 2 tablespoons water to create an egg wash.
- Brush each sealed dough bomb thoroughly with the egg wash.
- Pour 2 cups vegetable oil into a deep pot and heat to precisely 350°F.
- Carefully slide 3-4 dough bombs into the hot oil using a slotted spoon.
- Fry each batch for 2-3 minutes, rotating once, until achieving a golden-brown color.
- Extract bombs from oil and let drain on paper towels to remove excess oil.
- Blend ¼ cup powdered sugar with 1 tsp vanilla and ½ tsp almond extract.
- Drizzle the glaze generously over warm cherry bombs before serving.
Notes
- Chill your dough for about 30 minutes before rolling to ensure a flakier texture and easier handling.
- Use fresh, ripe cherries for the best flavor, and make sure to remove all pits completely before chopping.
- If deep-frying makes you nervous, these can also be baked at 375°F for 15-18 minutes until golden brown.
- For a lower-fat version, swap deep-frying with baking and use a light spray of cooking oil to help achieve a crisp exterior.
- Prep Time: 25 minutes
- Cook Time: 5 minutes
- Category: Pies
- Method: Frying
- Cuisine: American
Nutrition
- Serving Size: 8
- Calories: 355 kcal
- Sugar: 15 g
- Sodium: 190 mg
- Fat: 22 g
- Saturated Fat: 7 g
- Unsaturated Fat: 14 g
- Trans Fat: 0.5 g
- Carbohydrates: 36 g
- Fiber: 2 g
- Protein: 4 g
- Cholesterol: 40 mg
Madison Wyman
Recipe Developer & Food Storyteller
Expertise
Recipe Research and Adaptation, Food Writing and Cultural Storytelling, Sustainable and Ethical Sourcing, Dietary Adaptations (e.g., gluten-free, plant-based)
Education
Oregon Health & Science University
Portland Community College
Madison’s passion for flavor and culture ignited amidst the rich Southern cooking traditions of her upbringing, where cherished family recipes told delicious tales.
Armed with a Master’s in Food Systems and Society from Oregon Health & Science University and a Culinary Arts Certificate from Portland Community College, Madison truly excels at transforming rich, intricate flavors into dishes that are both approachable and heartfelt.
For her, cooking is a vibrant blend of science, art, and heritage – a powerful way to connect us to our roots and each other. Her recipes invite you to delve deeper, uncovering the fascinating stories woven into every ingredient.