
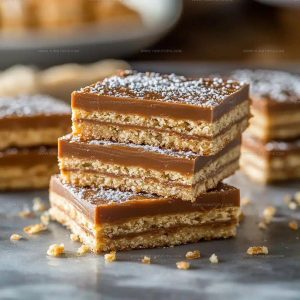
Dessert Bars Recipe That Disappears from the Pan in Minutes
Decadent dessert bars promise pure sweet satisfaction for any gathering or craving.
Soft, rich, and utterly delightful, these treats spark joy with every delectable bite.
Comfort meets celebration in one simple, crowd-pleasing creation that everyone adores.
Dessert bars offer magical moments of shared happiness around any table.
Smooth textures and incredible flavors combine into something truly memorable for friends and family.
Simple enough for weeknight enjoyment yet special enough for memorable occasions, these bars represent pure culinary comfort.
The Appeal Of Dessert Bars
Ingredients You’ll Need for Dessert Bars
Base Layer:Supporting Layer Ingredients:Liquid Components:Topping Ingredients:Finishing Touch:Tools To Have Ready for Dessert Bars
Basic Preparation Steps for Dessert Bars

Prepare Baking Dish
Grab your 9×13-inch pan and line it with parchment paper. Let the edges hang over so you can easily lift out the bars later. Spread 1 box (about 13 oz) of Club crackers across the bottom in a neat, single layer.
Create Caramel Base
Grab a saucepan and combine:
Melt these together over medium heat, stirring constantly. Keep cooking until the mixture bubbles and simmers for 4-5 minutes. The texture should look slightly thickened. Pull the pan off the heat and whisk in 1 cup heavy cream until smooth.
First Caramel Layer
Pour half the caramel over your cracker base. Use a spatula to spread it evenly across every inch of the crackers.
Add Second Cracker Layer
Place another layer of crackers on top of the caramel. Press them gently so they settle into the sticky surface.
Final Caramel Pour
Drizzle the remaining caramel over this new cracker layer. Smooth it out carefully with your spatula.
Chocolate Topping Preparation
Combine in a microwave-safe bowl:
Microwave in 30-second intervals, stirring between each session until the mixture becomes completely smooth.
Chocolate Layer
Pour the chocolate-peanut butter mixture over the top cracker layer. Use your spatula to spread it to all edges, creating a perfect chocolate blanket.
Final Touch
Sprinkle ½ teaspoon sea salt across the warm chocolate surface.
Chill and Set
Refrigerate the bars for 2-3 hours until the chocolate sets completely.
Serve
Lift the bars out using the parchment paper edges. Slice into squares and serve chilled.
Cooking Notes for Dessert Bars
Creative Variations For Dessert Bars
Creative Serving Ideas For Dessert Bars
Storage Notes For Dessert Bars
Dessert Bars Questions And Answers
Can I use a different type of cracker?
Any rectangular, thin cracker works well. Graham crackers or saltine crackers are great alternatives that will give similar results.
How do I prevent the caramel from burning?
Stir constantly and keep the heat at medium. Watch for bubbling and remove from heat once the mixture thickens slightly, which typically takes 4-5 minutes.
What if my caramel separates?
Whisk the caramel vigorously when adding cream. If it still separates, return the pan to low heat and continue stirring until smooth.
Can these bars be frozen?
Absolutely. Wrap them tightly in plastic wrap and store in a freezer-safe container for up to 3 months. Thaw in the refrigerator before serving.
Is it necessary to use sea salt?
Sea salt adds a fantastic flavor contrast, but regular salt works if that’s what your pantry has. Just use a lighter sprinkle.
How do I know when the chocolate is properly melted?
Stir between each 30-second microwave interval. The mixture should look smooth and glossy with no solid chocolate chunks remaining.
Dessert Bars Recipe
- Total Time: 2 hours 25 minutes to 3 hours 25 minutes
- Yield: 8 1x
Description
Raspberry Swirl Cheesecake Bars blend creamy richness with bright berry flavor. Each slice looks stunning and tastes even better.
Ingredients
Chocolate and Base:
- 2½ cups semisweet chocolate chips
- 1 box Club crackers or Ritz crackers
Creamy Ingredients:
- 1 cup butter
- 1 cup brown sugar
- 1 cup heavy cream
- 1 cup creamy peanut butter
Finishing Ingredient:
- 0.5 teaspoon sea salt
Instructions
- Line a 9×13-inch baking dish with parchment paper, letting edges hang over for easy removal. Create a single layer of Club crackers across the bottom.
- Melt 1 cup butter and 1 cup brown sugar in a saucepan over medium heat. Stir constantly until boiling, then simmer for 4-5 minutes until thickened.
- Remove caramel from heat and whisk in 1 cup heavy cream until smooth and uniform.
- Pour half the caramel over cracker layer, spreading evenly with a spatula.
- Add another cracker layer, pressing gently to help them adhere to the caramel.
- Pour remaining caramel over the new cracker layer, spreading smoothly.
- Top with a final cracker layer.
- Melt 2½ cups chocolate chips and 1 cup peanut butter in microwave, using 30-second intervals and stirring between each.
- Pour chocolate mixture over top cracker layer, spreading to cover all edges completely.
- Sprinkle ½ teaspoon sea salt evenly across warm chocolate surface.
- Refrigerate bars for 2-3 hours until fully set.
- Remove from refrigerator and lift entire dessert out using parchment paper edges.
- Slice into square portions and serve chilled.
Notes
- Use room temperature ingredients to ensure smooth, even caramel and chocolate layers that blend perfectly.
- Cracker placement matters, so arrange them carefully without gaps for a consistent base that supports the entire dessert.
- Maintain medium heat when making caramel to prevent burning and achieve the right thick, glossy consistency.
- Sprinkle sea salt immediately after pouring chocolate to help it stick and create a delightful sweet-salty contrast that enhances the overall flavor profile.
- Prep Time: 15 minutes
- Cook Time: 10 minutes
- Category: Dessert Bars
- Method: Boiling
- Cuisine: American
Nutrition
- Serving Size: 8
- Calories: 657
- Sugar: 45 g
- Sodium: 170 mg
- Fat: 48 g
- Saturated Fat: 19 g
- Unsaturated Fat: 27 g
- Trans Fat: 0.5 g
- Carbohydrates: 54 g
- Fiber: 4 g
- Protein: 9 g
- Cholesterol: 70 mg
Logan Lemaster
Founder & Culinary Innovator
Expertise
Recipe Development and Innovation, Menu Design and Optimization, Fine Dining Techniques, Ingredient Pairing and Flavor Science
Education
Metropolitan Culinary Arts Institute
Logan’s culinary journey kicked off in his vibrant Chicago family kitchen, where fresh, seasonal ingredients and bold flavors were always front and center.
After graduating from the Metropolitan Culinary Arts Institute in Arlington, Virginia, and honing his skills in renowned restaurants, Logan mastered the art of blending classic techniques with exciting, modern twists.
His kitchen is a dynamic lab for flavor exploration. Through Yum Utopia, Logan aims to empower you to cook with both confidence and creativity, turning simple ingredients into spectacular meals.