
Ding Dong Cake Recipe With Creamy Chocolate Filling
Ding dong cake is a homemade dessert that channels all the fun of a beloved childhood snack into something special enough for any celebration.
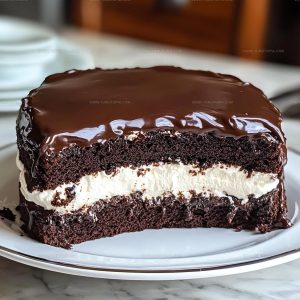
Rich chocolate layers paired with a lusciously sweet cream filling make every slice feel like a small indulgence worth savoring.
Birthdays, potlucks, and casual weekend gatherings all become more memorable when you serve something that sparks conversation and genuine smiles.
The combination of moist cake and smooth filling creates a contrast in both texture and flavor that keeps people coming back for seconds.
Simple enough for weeknight baking yet impressive enough for company, it fits seamlessly into busy schedules without sacrificing quality.
Chocolate lovers of all ages appreciate the balance of sweetness and depth that makes each bite satisfying.
Perfect alongside coffee or a cold glass of milk, it’s comfort food at its finest, ready to become a go-to recipe in any home kitchen.
Special Features That Make Ding Dong Cake Nostalgic
All the Ingredients for Classic Ding Dong Cake
Cake Base:Filling Ingredients:Frosting Ingredients:Essential Tools for Ding Dong Cake
Step by Step Baking for Ding Dong Cake
Bake the Chocolate Cake
Grab a box of chocolate cake mix and follow the package directions to create a delicious base. For this recipe, I’m using a 9×13 inch pan. Bake at 350°F for about 30-35 minutes. After removing from the oven, let the cake rest for 10 minutes, then transfer to a cooling rack.
Cool and Slice the Cake
Wait until the cake is completely cool to the touch. Using a long serrated knife, carefully slice the cake horizontally into two even layers. Gently place the bottom layer back into the original baking pan.
Whip Up the Creamy Filling
Grab your mixing bowl and prepare the dreamy filling. You’ll need to combine these ingredients:
Beat these ingredients until they’re smooth and creamy. Then gently fold in the entire container of Cool Whip until everything is well blended.
Create the Cake Layer
Spread the cream cheese mixture evenly across the bottom cake layer. Make sure to cover every inch so each bite is packed with delicious filling.
Top and Seal
Carefully place the second cake layer on top of the cream cheese filling, creating a perfect sandwich.
Chocolate Frosting Magic
In a small bowl, mix the entire can of chocolate frosting with 2 tablespoons of milk. Stir until the frosting becomes smooth and slightly runny. Pour and spread the frosting over the top of the cake, letting it drip down the sides.
Chill and Enjoy
Pop the cake into the refrigerator for at least one hour. This helps the layers set and makes cutting easier. When you’re ready to serve, slice and watch everyone’s eyes light up!
Refined Cooking Notes for Ding Dong Cake
Ding Dong Cake Filling and Frosting Swaps
Sweet Ways to Enjoy Ding Dong Cake
How Should Ding Dong Cake Be Stored
Ding Dong Cake Q&A
What makes this cake different from a regular chocolate cake?
The cream cheese filling gives this cake a creamy, decadent twist that transforms an ordinary chocolate cake into something special.
Can I use homemade frosting instead of store-bought?
Absolutely! Homemade chocolate frosting works perfectly. Just ensure it’s smooth and spreadable for the best results.
How do I know when the cake is completely cooled?
Touch the cake gently – if it feels cool to the hand and doesn’t steam, it’s ready for filling and frosting.
What if my cream cheese filling looks lumpy?
Ensure your cream cheese is softened at room temperature and beat it thoroughly to create a smooth, creamy mixture.
Can this cake be made ahead of time?
Definitely! Prepare the cake a day before serving, and store it covered in the refrigerator to let the flavors meld together.
Do I need any special baking tools for this recipe?
Not at all. A standard mixer, mixing bowls, and a cake pan are all you need to create this delicious dessert.
Ding Dong Cake Recipe
- Total Time: 2 hours 5 minutes
- Yield: 12 1x
Description
Ding Dong Cake brings childhood memories flooding back with its chocolate layers and creamy filling that melt together perfectly. Chocolate fans will adore this nostalgic dessert that feels like a warm hug from your favorite bakery.
Ingredients
Main Ingredients:
- 1 box chocolate cake mix
- 1 container Cool Whip
- 1 can chocolate frosting
Dairy Components:
- 1 (8 ounces) package cream cheese, softened
- 1 stick margarine, softened
- 3 cups powdered sugar
Liquid Ingredients:
- 2 tablespoons milk
Instructions
- Preheat your oven to 350°F and prepare a 9×13 inch baking pan with cooking spray. Mix the chocolate cake mix according to package directions, using the specified amounts of eggs, oil, and water.
- Bake the cake for 30-35 minutes until a toothpick inserted in the center comes out clean. Allow the cake to cool in the pan for 15 minutes.
- Transfer the cake to a cooling rack and let it reach room temperature for 45 minutes. Carefully slice the cake horizontally into two even layers using a long serrated knife.
- Place the bottom cake layer back into the original baking pan. In a large mixing bowl, beat 8 ounces of softened cream cheese with 3 cups powdered sugar and 1 stick softened margarine until completely smooth.
- Gently fold 1 container of Cool Whip into the cream cheese mixture until fully incorporated. Spread this filling evenly across the bottom cake layer.
- Carefully position the top cake layer over the cream cheese filling. In a separate small bowl, whisk 1 container of chocolate frosting with 2 tablespoons milk until the consistency becomes slightly runny.
- Pour and spread the thinned chocolate frosting across the entire top of the cake, ensuring an even coverage. Refrigerate the cake for 1-2 hours to help the layers set firmly.
Notes
- Check cake mix instructions carefully to ensure perfect texture and prevent dryness.
- Use room temperature cream cheese for the smoothest, lump-free filling that spreads easily.
- Refrigerating before serving helps layers set and enhances the cake’s rich flavor and creamy consistency.
- For a lighter version, swap full-fat ingredients with low-fat cream cheese and sugar-free whipped topping.
- Prep Time: 1 hour 30 minutes
- Cook Time: 35 minutes
- Category: Cakes
- Method: Baking
- Cuisine: Filipino
Nutrition
- Serving Size: 12
- Calories: 370 kcal
- Sugar: 34 g
- Sodium: 220 mg
- Fat: 22 g
- Saturated Fat: 6 g
- Unsaturated Fat: 12 g
- Trans Fat: 0.5 g
- Carbohydrates: 45 g
- Fiber: 1 g
- Protein: 3 g
- Cholesterol: 10 mg
Logan Lemaster
Founder & Culinary Innovator
Expertise
Recipe Development and Innovation, Menu Design and Optimization, Fine Dining Techniques, Ingredient Pairing and Flavor Science
Education
Metropolitan Culinary Arts Institute
Logan’s culinary journey kicked off in his vibrant Chicago family kitchen, where fresh, seasonal ingredients and bold flavors were always front and center.
After graduating from the Metropolitan Culinary Arts Institute in Arlington, Virginia, and honing his skills in renowned restaurants, Logan mastered the art of blending classic techniques with exciting, modern twists.
His kitchen is a dynamic lab for flavor exploration. Through Yum Utopia, Logan aims to empower you to cook with both confidence and creativity, turning simple ingredients into spectacular meals.