
Cobbler Cheesecake Cones Recipe Everyone Will Adore
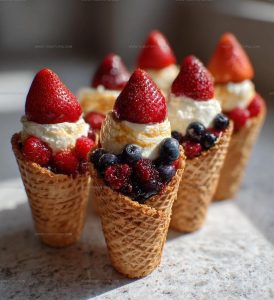
Peach Cobbler Cheesecake Cones are fun handheld desserts that combine two beloved treats into one delightful creation.
Warm fruit flavors meet cool, creamy filling in a crispy cone shell that makes every bite exciting.
This dessert works beautifully for backyard gatherings, summer parties, or casual weeknight treats when something sweet sounds good.
No plates or forks are needed, which makes cleanup incredibly simple and serving a breeze.
Kids love holding their own personal dessert, while grown-ups appreciate the clever twist on familiar favorites.
The presentation alone will have everyone reaching for seconds before finishing their first cone.
Every cone offers that perfect balance of textures and temperatures that keeps people coming back for more all season long.
Why You’ll Love Cobbler Cheesecake Cones
Cobbler Cheesecake Cones Ingredient Overview
Main Ingredients:Whipping and Filling:Cone Base:Complete Dessert Tools for Cobbler Cheesecake Cones
Preparation Guide for Cobbler Cheesecake Cones
Soften the Cream Cheese
Grab your cream cheese and let it sit at room temperature for about 15 minutes. This helps it blend super smoothly when you’re ready to mix. Take a large mixing bowl and drop in the full 1 cup of cream cheese.
Create the Creamy Base
Beat the cream cheese until it looks silky and free of lumps. Now add your 1/2 cup powdered sugar and 1 teaspoon vanilla extract. Whisk everything together until the mixture feels light and fluffy.
Fold in the Whipped Cream
Carefully mix in the 1 cup of whipped cream. Use gentle folding motions to keep the mixture airy and soft. You want a consistent, smooth texture that looks like a dreamy cloud.
Prepare the Cones
Line up your 12 ice cream cones on a clean surface. Grab a piping bag or a spoon to fill each cone with the cheesecake mixture. Make sure to fill them almost to the top, leaving a little space.
Add the Fruit Topping
Spoon about 2-3 tablespoons of fruit cobbler filling over the top of each filled cone. Spread it evenly so each bite gets a nice fruity touch.
Chill and Set
Place the cones in the refrigerator for exactly 30 minutes at 40°F. This helps them firm up and blend the flavors together. When they’re done, they’re ready to serve and enjoy!
Helpful Notes for Clean Cobbler Cheesecake Cones
Which Are Each Cobbler Cheesecake Cones Flavor Options
Each Cobbler Cheesecake Cones Serving Displays
Cobbler Cheesecake Cones Storage Notes
Cobbler Cheesecake Cones Common Questions
Can I use store-bought whipped cream instead of making my own?
Definitely! Grab a container of whipped topping from the grocery store for an easy shortcut that works perfectly.
How do I prevent the ice cream cones from getting soggy?
Choose waffle cones and fill them just before serving to keep the crispy texture intact. The less time the filling sits, the crunchier the cone remains.
What if my cream cheese is too cold?
Let the cream cheese sit at room temperature for about 30 minutes before mixing. This helps create a smoother, lump-free filling that blends easily.
Are there gluten-free options for this dessert?
Select gluten-free waffle cones available at specialty grocery stores or online. Check the packaging to ensure complete gluten-free certification.
Can I prepare these cones in advance?
Absolutely! Assemble the cheesecake cones up to 4 hours before your event and store them in the refrigerator. The flavors will blend beautifully while chilling.
What fruit cobblers work best for topping?
Peach, berry, and cherry cobblers are fantastic choices. Pick a fruity filling that complements the creamy cheesecake base for maximum flavor.
Each Cobbler Cheesecake Cones Recipe
- Total Time: 10 minutes
- Yield: 12 1x
Description
Cheesecake Cones bring dessert magic right to your cone-shaped dreams, blending creamy cheesecake goodness with crispy waffle cones for a delightful sweet treat that will make your taste buds dance with joy.
Ingredients
Main Ingredients:
- 12 ice cream cones
- 1 cup fruit cobbler filling
- 1 cup cream cheese
Dairy and Sweeteners:
- 1 cup whipped cream
- ½ cup powdered sugar
Flavor Enhancers:
- 1 teaspoon vanilla extract
Instructions
- Grab a mixing bowl and beat 1 cup cream cheese until it turns silky and completely smooth.
- Incorporate ½ cup powdered sugar and 1 teaspoon vanilla extract, stirring until the mixture becomes uniform and creamy.
- Carefully fold 1 cup whipped cream into the cream cheese blend, using gentle circular motions to maintain the airy texture.
- Select 12 ice cream cones and carefully pipe or spoon the cheesecake mixture into each cone, filling them about ¾ full.
- Crown each cone with a generous tablespoon of fruit cobbler filling, allowing it to cascade slightly over the edges.
- Transfer the filled cones to the refrigerator and chill for exactly 30 minutes at 40°F to set the filling and enhance the flavors.
Notes
- Softening cream cheese at room temperature makes mixing smoother and prevents lumps.
- Whip cream carefully to maintain its fluffy texture and avoid deflating the mixture.
- For a gluten-free version, select gluten-free ice cream cones and check cobbler filling ingredients.
- Experiment with different fruit cobbler toppings like peach, blueberry, or mixed berry to create variety in your dessert.
- Prep Time: 10 minutes
- Cook Time: 0 minutes
- Category: Cheesecakes
- Method: Chilling
- Cuisine: American
Nutrition
- Serving Size: 12
- Calories: 204 kcal
- Sugar: 14 g
- Sodium: 87 mg
- Fat: 16 g
- Saturated Fat: 10 g
- Unsaturated Fat: 5 g
- Trans Fat: 0.3 g
- Carbohydrates: 12 g
- Fiber: 0.3 g
- Protein: 2.8 g
- Cholesterol: 49 mg
Logan Lemaster
Founder & Culinary Innovator
Expertise
Recipe Development and Innovation, Menu Design and Optimization, Fine Dining Techniques, Ingredient Pairing and Flavor Science
Education
Metropolitan Culinary Arts Institute
Logan’s culinary journey kicked off in his vibrant Chicago family kitchen, where fresh, seasonal ingredients and bold flavors were always front and center.
After graduating from the Metropolitan Culinary Arts Institute in Arlington, Virginia, and honing his skills in renowned restaurants, Logan mastered the art of blending classic techniques with exciting, modern twists.
His kitchen is a dynamic lab for flavor exploration. Through Yum Utopia, Logan aims to empower you to cook with both confidence and creativity, turning simple ingredients into spectacular meals.