
Homemade Crunch Bars Recipe for Crispy Chocolate Treats
Few desserts match the satisfying snap and creamy sweetness of easy homemade crunch bars when cravings strike for something both simple and spectacular.
Kitchens across the country have embraced desserts that deliver maximum flavor with minimal fuss, and nothing fits that description better than a treat that comes together in minutes yet tastes like it took hours.
What makes them so appealing is how effortlessly they bridge the gap between weeknight simplicity and celebration-worthy decadence, fitting seamlessly into busy schedules while still impressing at parties and potlucks.
Whether serving at family gatherings, packing in lunchboxes, or simply enjoying a quiet moment with something sweet, bars like these prove that homemade doesn’t have to mean complicated.
They store beautifully, travel well, and somehow taste even better the next day when flavors have had time to meld together perfectly.
Practical Reasons to Try Homemade Crunch Bars
What Goes Into Homemade Crunch Bars
Base Ingredients:Binding Ingredients:Tools Used for Homemade Crunch Bars
Step-by-Step Guide for Homemade Crunch Bars
Melt Butter and Peanut Butter
Grab a saucepan and set it on the stove at low heat (around 200°F). Toss in 1/4 cup butter and 1/2 cup peanut butter. Let these two become best friends and melt together smoothly.
Add Chocolate
Drop 1 cup chocolate chips into the melted butter and peanut butter mixture. Stir gently until everything looks super glossy and completely combined.
Mix in Marshmallows
Take the pan off the heat and add 1 cup mini marshmallows. Stir until those fluffy little squares melt and blend into the chocolate mixture.
Combine with Cereal
Pour the warm chocolate mixture over 3 cups crispy rice cereal in a large mixing bowl. Use a spatula to coat every single cereal piece with the chocolatey goodness.
Prepare the Pan
Grease a 9×13 inch baking pan with a light butter coating. Transfer the cereal mixture into the pan.
Press and Shape
Use the back of a spatula or clean hands to press the mixture evenly across the pan. Make sure it’s packed down nicely and looks smooth.
Cool and Cut
Let the pan sit at room temperature for about 45 minutes until the bars are completely set. Slice into rectangular bars using a sharp knife.
Best Tips for Homemade Crunch Bars
Easy Homemade Crunch Bar Variations to Make
Easy Serving Styles for Homemade Crunch Bars
Smart Storage Advice for Homemade Crunch Bars
Homemade Crunch Bars Questions Answered
Can I use a different type of cereal?
Crispy rice cereal works best, but you can experiment with corn flakes or other crunchy cereals for a similar texture.
How do I prevent the bars from sticking to the pan?
Grease the pan thoroughly with butter or use parchment paper with overhang for easy removal.
Are these bars safe for people with nut allergies?
No, the recipe contains peanut butter. For an allergy-friendly version, swap peanut butter with sunflower seed butter.
Can I make these bars ahead of time?
Absolutely! Prepare them up to 3 days in advance and store at room temperature in an airtight container.
What if my chocolate seizes while melting?
Add a tablespoon of oil or butter to help smooth out the chocolate and prevent clumping.
Do these bars need refrigeration?
Store them at room temperature in a sealed container for up to 5 days.
Easy Homemade Crunch Bars Recipe
- Total Time: 15 minutes
- Yield: 8 1x
Description
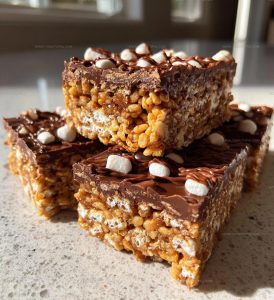
Whip up these Easy Homemade Crunch Bars when chocolate cravings strike and your sweet tooth needs satisfaction. Crispy, sweet, and totally addictive, these bars deliver pure homemade happiness in just minutes with simple ingredients you probably already have in your kitchen.
Ingredients
Main Ingredients:
- 1 cup chocolate chips
- 1 cup mini marshmallows
- 3 cups crispy rice cereal
Supporting Ingredients:
- ½ cup peanut butter
- ¼ cup butter
Instructions
- Melt ¼ cup butter and ½ cup peanut butter in a saucepan over low heat (around 200°F), stirring gently until completely combined.
- Add 1 cup chocolate chips to the melted butter mixture, stirring continuously until the chocolate becomes smooth and glossy.
- Remove the saucepan from heat and immediately fold in 1 cup mini marshmallows, ensuring they start to melt slightly.
- Pour the warm chocolate mixture over 3 cups crispy rice cereal in a large mixing bowl, using a spatula to coat every single piece evenly.
- Transfer the coated cereal mixture into a 9×13 inch pan greased with cooking spray, pressing firmly with the back of a spatula to create an even layer.
- Allow the crunch bar mixture to cool at room temperature for 45-60 minutes until it sets completely and becomes firm to the touch.
- Once cooled, slice into 16 uniform rectangular bars using a sharp knife, making clean and precise cuts.
Notes
- Use low heat when melting butter and peanut butter to prevent burning and ensure smooth consistency.
- Choose crisp, fresh rice cereal for maximum crunch and texture in the bars.
- For a gluten-free version, check that your rice cereal is certified gluten-free and use dairy-free chocolate chips.
- Store bars in an airtight container at room temperature for up to five days to maintain their delicious crunch.
- Prep Time: 10 minutes
- Cook Time: 5 minutes
- Category: Dessert Bars
- Method: Blending
- Cuisine: American
Nutrition
- Serving Size: 8
- Calories: 248 kcal
- Sugar: 14 g
- Sodium: 83 mg
- Fat: 13 g
- Saturated Fat: 4 g
- Unsaturated Fat: 7 g
- Trans Fat: 0 g
- Carbohydrates: 29 g
- Fiber: 2 g
- Protein: 5 g
- Cholesterol: 11 mg
Logan Lemaster
Founder & Culinary Innovator
Expertise
Recipe Development and Innovation, Menu Design and Optimization, Fine Dining Techniques, Ingredient Pairing and Flavor Science
Education
Metropolitan Culinary Arts Institute
Logan’s culinary journey kicked off in his vibrant Chicago family kitchen, where fresh, seasonal ingredients and bold flavors were always front and center.
After graduating from the Metropolitan Culinary Arts Institute in Arlington, Virginia, and honing his skills in renowned restaurants, Logan mastered the art of blending classic techniques with exciting, modern twists.
His kitchen is a dynamic lab for flavor exploration. Through Yum Utopia, Logan aims to empower you to cook with both confidence and creativity, turning simple ingredients into spectacular meals.