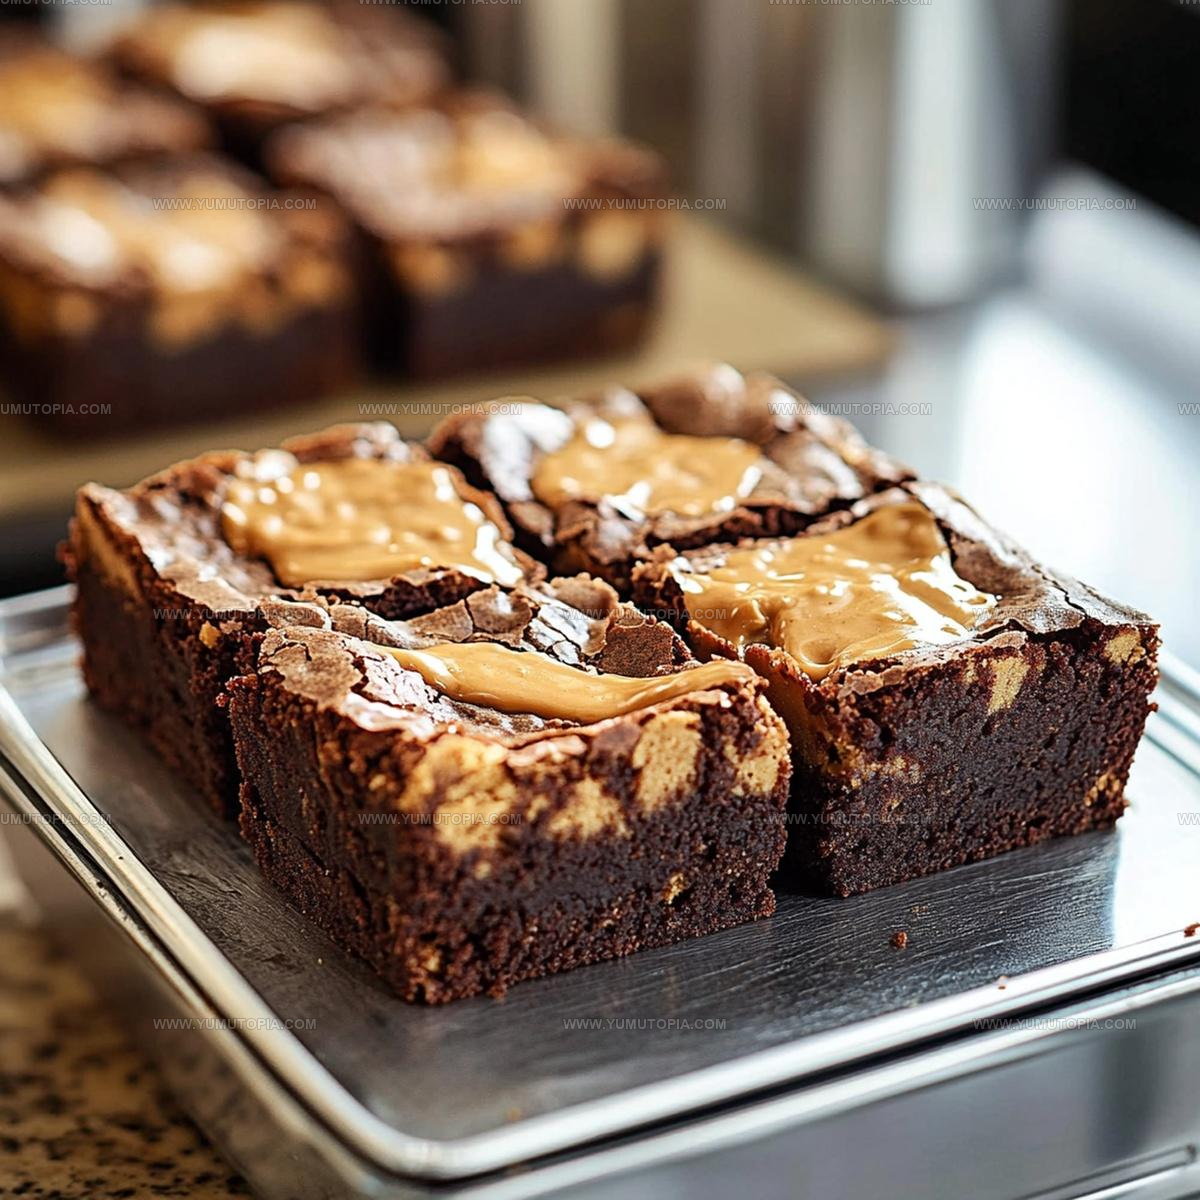
Peanut Butter Brownies Recipe To Enjoy Gooey Perfection
Peanut butter brownies deliver the perfect marriage of rich chocolate and creamy nutty flavor in every decadent bite.
These treats satisfy both chocolate lovers and peanut butter fans with equal enthusiasm.
The fudgy texture combined with that distinctive savory-sweet taste creates an experience that feels indulgent yet comforting.
Perfect for potlucks, bake sales, or simply enjoying with a cold glass of milk, these brownies never fail to impress a crowd.
They’re simple enough for beginners but impressive enough to serve at any gathering.
Whether you crave an after-dinner dessert or an afternoon pick-me-up, this recipe captures satisfaction every time.
Why Peanut Butter Brownies Are Hard to Resist

What Goes Into Peanut Butter Brownies
Dry Ingredients:Sweeteners:Wet Ingredients:Tools That Help Nail Peanut Butter Brownies
Step-by-Step Guide to Peanut Butter Brownies
Prepare Baking Setup
Warm up the oven to 350°F (175°C). Grab an 8-inch square pan and give it a light coating of cooking spray or butter to prevent sticking.
Mix Dry Ingredients
Grab a medium bowl and combine your dry ingredients carefully.
Whisk these together until they’re evenly blended.
Create Wet Mixture
In a separate larger bowl, grab your mixer or whisk to blend the wet ingredients until super smooth.
Beat everything together for about 2 minutes until the mixture looks glossy and well combined.
Combine Batters
Slowly pour the dry ingredients into the wet mixture. Stir gently just until everything comes together. Don’t overmix – keep the batter relaxed and soft.
Bake the Brownies
Transfer the batter into your prepared pan, spreading it evenly across the surface. Slide the pan into the preheated oven and bake for 25-30 minutes. Check doneness by inserting a toothpick – it should come out with a few moist crumbs.
Cool and Serve
Remove the pan from the oven and let the brownies rest for 15-20 minutes. Cut into square pieces and enjoy your delicious treat straight from the pan.
Baking Tips for Swirled Brownies
Flavor Changes for Peanut Butter Brownies
How Peanut Butter Brownies Are Served
Proper Storage for Brownies
Peanut Butter Brownie Questions
Can I use natural peanut butter?
Natural peanut butter works, but stir it well and expect a slightly different texture since it separates more easily.
How do I know when the brownies are perfectly baked?
When a toothpick inserted near the center shows moist crumbs, not wet batter, they’re ready. The edges will look set and slightly pulled away from the pan.
What if my batter seems too thick?
Gently add a tablespoon of milk to help thin the mixture and create a smoother consistency.
Can I make these brownies gluten-free?
Replace the all-purpose flour with a gluten-free flour blend that includes xanthan gum for best results.
Why did my brownies turn out dry?
Overmixing the batter or baking too long can cause dryness. Mix just until ingredients combine and check them early.
Should the peanut butter be room temperature?
Yes, room temperature peanut butter blends more smoothly and helps create a consistent batter texture.

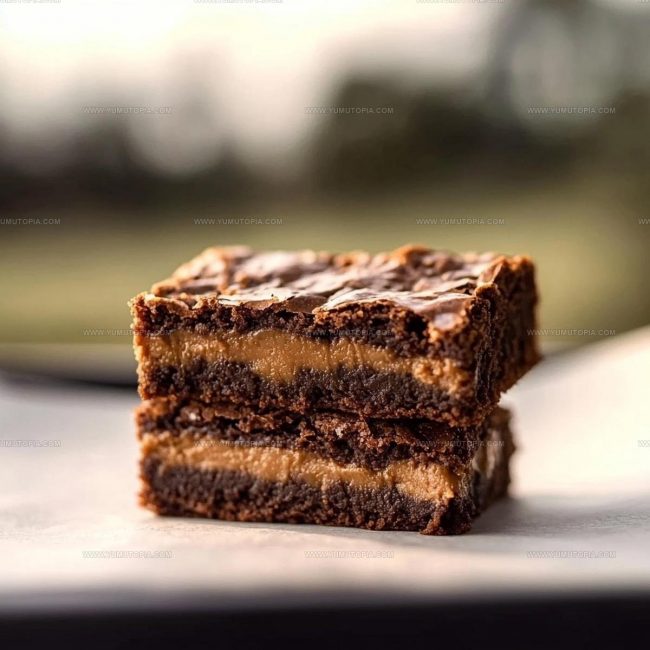
Fudgy Peanut Butter Brownies Recipe
- Total Time: 40-45 minutes
- Yield: 8 1x
Description
Peanut Butter Brownies bring pure comfort straight from your kitchen, melding rich chocolate and creamy peanut butter into one seriously satisfying treat. Grab your mixing bowl and prepare for a simple dessert that delivers maximum flavor with minimal effort.
Ingredients
Main Ingredients:
- 1 cup all-purpose flour
- ¾ cup unsweetened cocoa powder
- 1 cup granulated sugar
- ½ cup packed brown sugar
- ½ cup creamy peanut butter
- 2 large eggs
Supporting Ingredients:
- 1 teaspoon vanilla extract
- ½ teaspoon baking powder
- ¼ teaspoon salt
Instructions
- Prepare your workspace by preheating the oven to 350°F (175°C). Thoroughly coat an 8-inch square baking pan with cooking spray or butter.
- Sift together 1 cup all-purpose flour, ¾ cup unsweetened cocoa powder, ½ teaspoon baking powder, and ¼ teaspoon salt in a medium mixing bowl. Set the dry ingredients aside.
- Cream 1 cup granulated sugar, ½ cup brown sugar, and ½ cup creamy peanut butter in a separate large bowl. Add 2 large eggs and 1 teaspoon vanilla extract, whisking until the mixture becomes smooth and glossy.
- Gradually fold the dry ingredient mixture into the wet ingredients. Mix gently with a wooden spoon until just combined, avoiding overmixing.
- Transfer the batter into the prepared pan, using a spatula to spread it evenly across the surface. Create a uniform layer that reaches all corners.
- Place the pan in the preheated oven and bake for 25-30 minutes. Check doneness by inserting a toothpick – it should emerge with a few moist crumbs clinging to it.
- Remove the pan from the oven and let the brownies cool completely in the pan for approximately 45-60 minutes before slicing into squares.
Notes
- Swap smooth peanut butter for crunchy if you prefer more texture in your brownies.
- For a gluten-free version, replace regular flour with almond flour or a 1:1 gluten-free baking blend.
- Check brownies at 25 minutes to avoid overbaking, which can make them dry and crumbly.
- Enhance the peanut butter flavor by adding a drizzle of melted peanut butter on top after baking.
- Prep Time: 15 minutes
- Cook Time: 25-30 minutes
- Category: Brownies
- Method: Baking
- Cuisine: American
Nutrition
- Serving Size: 8
- Calories: 243 kcal
- Sugar: 16 g
- Sodium: 116 mg
- Fat: 12 g
- Saturated Fat: 3 g
- Unsaturated Fat: 7 g
- Trans Fat: 0 g
- Carbohydrates: 29 g
- Fiber: 2 g
- Protein: 6 g
- Cholesterol: 37 mg
Logan Lemaster
Founder & Culinary Innovator
Expertise
Recipe Development and Innovation, Menu Design and Optimization, Fine Dining Techniques, Ingredient Pairing and Flavor Science
Education
Metropolitan Culinary Arts Institute
Logan’s culinary journey kicked off in his vibrant Chicago family kitchen, where fresh, seasonal ingredients and bold flavors were always front and center.
After graduating from the Metropolitan Culinary Arts Institute in Arlington, Virginia, and honing his skills in renowned restaurants, Logan mastered the art of blending classic techniques with exciting, modern twists.
His kitchen is a dynamic lab for flavor exploration. Through Yum Utopia, Logan aims to empower you to cook with both confidence and creativity, turning simple ingredients into spectacular meals.