
Spooky Meringue Cookie Recipe for Halloween Treats
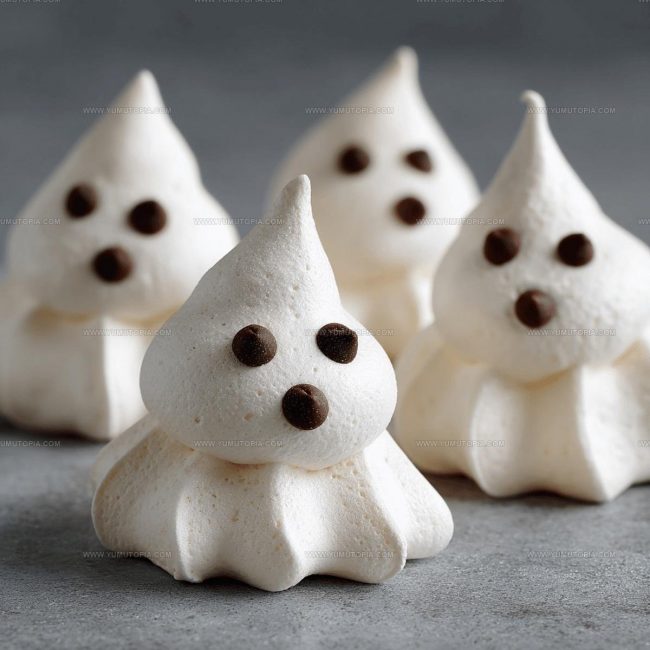
Spooky ghost meringue cookies capture the playful spirit of Halloween with their adorable haunting charm.
Pale and wispy, these spectral treats float between festive dessert and whimsical decoration.
Sweet memories of childhood costume parties and pumpkin patch adventures come rushing back with each delicate bite.
Perfectly crisp edges give way to a marshmallow-soft interior that melts delightfully on your tongue.
Baking these phantoms requires minimal ingredients and simple techniques that welcome bakers of all skill levels.
Delightful decorative potential means you can customize each ghostly creation with personality and flair.
Halloween celebrations deserve something magical that sparks joy and creates memorable moments around the table.
Why Ghostly Meringue Cookies Spooky Sweet Treat Works
Ghost Meringue Cookies Ingredient Breakdown
Egg Whites:Stabilizing Agents:Flavor Enhancer:Decoration:Required Kitchen Tools for Ghost Meringue Cookies
Steps for Making Ghost Meringue Cookies
Prep the Workspace
Set your oven to 200°F and grab two baking sheets. Line them with parchment paper, smoothing out any wrinkles so your ghosts have a perfect surface to rest on.
Separate Egg Whites
Crack open those eggs with care. Separate the whites into a squeaky-clean metal bowl. Watch out for any sneaky yolk that might try to crash the party – even a tiny bit will mess up your meringue magic.
Start Whipping
Grab your electric mixer and beat those egg whites with 1/4 teaspoon cream of tartar and a pinch of salt. Whip on medium speed until soft, cloud-like peaks start to form, about 2-3 minutes.
Add Sugar Slowly
Time to sweeten things up. Sprinkle in 3/4 cup granulated sugar, one tablespoon at a time. Keep that mixer going on high speed until the mixture turns glossy and forms stiff peaks – around 4-5 minutes. Fold in 1 teaspoon vanilla extract with a gentle hand.
Prepare Piping Bag
Fill a piping bag with your ghostly white mixture. Use a large round tip to make this part easier.
Create Ghost Shapes
Squeeze out 2-inch tall ghost shapes onto your prepared baking sheets. Leave about an inch between each spooky treat.
Give Them Eyes
Place 2 mini chocolate chips on each meringue to create those haunting eyes. Press them in gently so they stick.
Slow Bake
Slide the baking sheets into the 200°F oven. Bake for 90 minutes without opening the door – patience is key here.
Cool Down
Turn off the oven after 90 minutes. Leave the meringues inside for another hour to dry out completely and get that perfect crispy texture.
Serve and Enjoy
Carefully peel the ghostly treats from the parchment paper. Arrange on a fun Halloween plate and get ready to impress your friends with these adorable spectral sweets!
Smart Kitchen Notes For Ghost Meringue Cookies
Flavor Twists for Ghost Meringue Cookies
Best Ways To Serve Ghost Meringue Cookies
Safe Storage For Ghost Meringue Cookies
Ghost Meringue Cookies Common Questions
Can I make these meringues without an electric mixer?
Hand whisking works, but takes considerable arm strength and patience to achieve the right peak consistency for ghostly shapes.
Why do my meringues look flat or weepy?
Ensure your mixing bowl is completely grease-free and egg whites have zero yolk contamination, which prevents proper whipping and structure.
How do meringues get their crisp texture?
The low, slow baking process allows moisture to evaporate gradually, creating that signature delicate crunch when you bite into your ghost.
What if my meringue doesn’t form stiff peaks?
Room temperature egg whites whip better. Separate eggs when cold, then let whites sit for 30 minutes before beating to achieve maximum volume.
Can chocolate chips melt during baking?
The extremely low oven temperature keeps mini chocolate chips intact, so your ghost eyes stay perfectly in place throughout drying process.
Are meringues difficult to make?
Practice makes perfect. Start slowly, follow each step carefully, and remember that even imperfect ghosts taste delicious.

Ghost Meringue Cookies Recipe
- Total Time: 1 hour 20 minutes
- Yield: 3 1x
Description
Ghostly Meringue Cookies become your Halloween party’s most adorable spectral snack, with wispy white peaks that float like tiny edible phantoms across your dessert table. Crisp meringue spirits whisper sweet memories of playful seasonal baking.
Ingredients
Main Ingredients:
- 3 large egg whites
- ¾ cup granulated sugar
Supporting Ingredients:
- ¼ teaspoon cream of tartar
- 1 teaspoon vanilla extract
- 1 pinch salt
Decoration:
- Mini chocolate chips
Instructions
- Preheat your oven to 200°F and line two baking sheets with parchment paper, ensuring the surface is completely flat and smooth.
- Separate 3 large egg whites into a spotless metal or glass mixing bowl, making absolutely certain no yolk touches the whites. Add ¼ teaspoon cream of tartar and a pinch of salt.
- Whip the egg whites using an electric mixer on medium speed until soft peaks form, approximately 2-3 minutes. Gradually sprinkle in ¾ cup granulated sugar, one tablespoon at a time.
- Continue beating the mixture on high speed until stiff, glossy peaks develop and sugar dissolves completely, about 4-5 minutes. Gently fold in 1 teaspoon vanilla extract.
- Transfer the meringue into a piping bag fitted with a large round tip. Squeeze 2-inch tall ghost shapes onto prepared baking sheets, leaving 1 inch between each meringue.
- Place 2 mini chocolate chips on each meringue to create spooky ghost eyes, pressing them gently into the surface.
- Slide the baking sheets into the preheated 200°F oven. Bake for 90 minutes without opening the oven door, allowing meringues to dry out slowly.
- After baking, turn off the oven and leave meringues inside for an additional hour to cool completely and crisp up.
- Carefully remove the ghostly meringues from the parchment paper and serve on a festive Halloween platter.
Notes
- Separate egg whites carefully, ensuring no yolk contaminates the whites for perfect meringue volume.
- Use room temperature eggs for easier separation and more stable whipped peaks.
- Pipe ghost shapes with steady hand pressure for consistent, spooky meringue figures.
- Store cooled meringues in airtight container to maintain crisp texture and prevent softening.
- Prep Time: 20 minutes
- Cook Time: 1 hour
- Category: Cookies
- Method: Baking
- Cuisine: American
Nutrition
- Serving Size: 3
- Calories: 230 kcal
- Sugar: 55 g
- Sodium: 60 mg
- Fat: 0 g
- Saturated Fat: 0 g
- Unsaturated Fat: 0 g
- Trans Fat: 0 g
- Carbohydrates: 55 g
- Fiber: 0 g
- Protein: 9 g
- Cholesterol: 0 mg
Madison Wyman
Recipe Developer & Food Storyteller
Expertise
Recipe Research and Adaptation, Food Writing and Cultural Storytelling, Sustainable and Ethical Sourcing, Dietary Adaptations (e.g., gluten-free, plant-based)
Education
Oregon Health & Science University
Portland Community College
Madison’s passion for flavor and culture ignited amidst the rich Southern cooking traditions of her upbringing, where cherished family recipes told delicious tales.
Armed with a Master’s in Food Systems and Society from Oregon Health & Science University and a Culinary Arts Certificate from Portland Community College, Madison truly excels at transforming rich, intricate flavors into dishes that are both approachable and heartfelt.
For her, cooking is a vibrant blend of science, art, and heritage – a powerful way to connect us to our roots and each other. Her recipes invite you to delve deeper, uncovering the fascinating stories woven into every ingredient.