
Fudgy Oreo Dump Cake Recipe for Chocolate Lovers
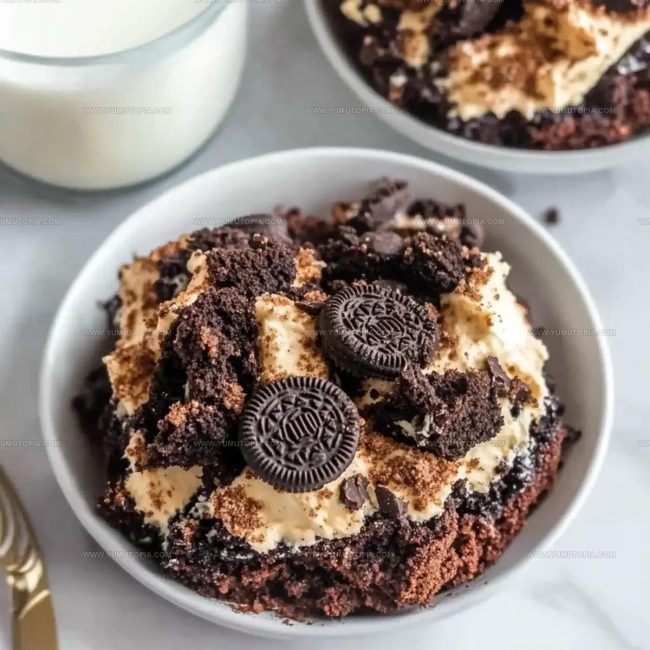
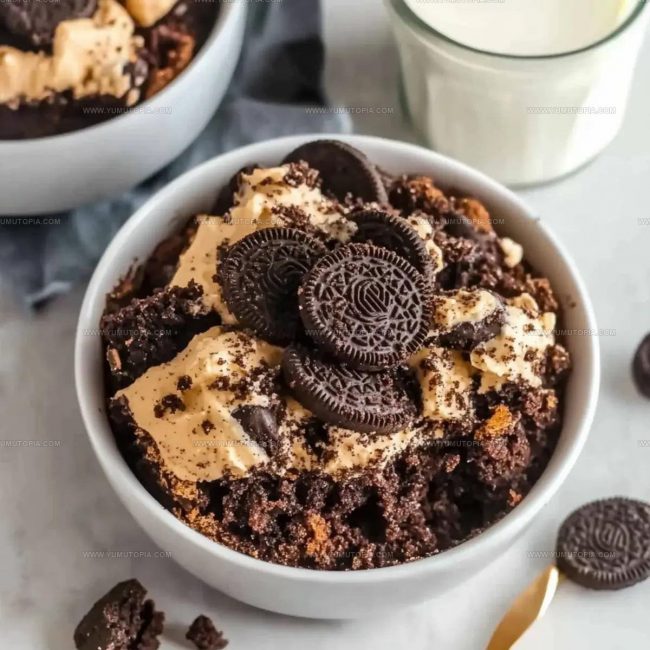
Gooey Oreo dump cake has become a phenomenon in home kitchens because it delivers pure chocolate satisfaction with minimal effort required.
What makes it so beloved is how it combines rich, fudgy layers with crunchy cookie pieces for multiple textures in every bite.
Whether you need something sweet for a potluck, weeknight dessert, or casual celebration, it fits the bill perfectly.
The beauty lies in how forgiving and flexible it is, making it ideal when time is tight but expectations remain high.
Dessert doesn’t have to be complicated to feel special, and this proves that point deliciously.
Even if baking intimidates you, the straightforward approach here builds confidence while delivering impressive results.
When something this decadent comes together so easily, it’s hard not to make it a regular rotation favorite.
What Makes Oreo Dump Cake So Foolproof
Oreo Dump Cake Full Ingredient List
Cake Base Ingredients:Oreo Layer:Creamy Ingredients:Minimal Tools for Oreo Dump Cake
How to Make Oreo Dump Cake with Minimal Effort
Warm Up the Oven
Fire up your oven to exactly 350°F and grab a 9×13-inch baking pan. Give the pan a quick spritz of nonstick cooking spray so nothing sticks.
Create the Oreo Base
Grab those 12 Oreo cookies and create a neat single layer covering the bottom of the pan. Make sure they’re snug and close together.
Pour the Sweet Goodness
Drizzle the entire 14 oz can of sweetened condensed milk across the Oreo layer. Watch how it starts to seep between those chocolate cookies.
Whipped Comfort Layer
Scoop out 8 oz of Cool Whip and smooth it gently over the condensed milk. Use a spatula to spread it evenly, creating a creamy blanket.
Dust with Chocolate
Open that box of chocolate cake mix and sprinkle the entire contents across the Cool Whip layer. Let it fall like a soft chocolate snowfall.
Butter Finishing Touch
Break 1.5 sticks of butter into 1-tablespoon pieces and dot them randomly across the cake mix surface. These little butter gems will help create a delicious crust.
Bake to Golden Perfection
Slide the pan into the 350°F oven and bake for 40-45 minutes. Your kitchen will start smelling amazing as it transforms.
Cool and Serve
Pull the pan out and let it rest for a few minutes. Serve while it’s still warm for maximum deliciousness.
Helpful Notes for Oreo Dump Cake
Oreo Dump Cake with Easy Dessert Twists
How to Present Oreo Dump Cake
Oreo Dump Cake Storage That Keeps Layers Intact
Oreo Dump Cake Common Questions
Can I use generic cookies instead of Oreos?
Absolutely, but classic Oreos deliver the best flavor and texture for this dump cake.
Do the Oreos need to be crushed?
No, place them whole in a single layer across the bottom of the pan. They’ll break down during baking.
What if my Cool Whip is still frozen?
Thaw Cool Whip in the refrigerator for about an hour before starting. Soft, spreadable Cool Whip works best.
Can this dessert be made ahead of time?
Prepare the cake right before baking for the freshest results. Once assembled, bake immediately for optimal texture.
Is this cake best served warm or cold?
Serve warm for the most delicious, gooey experience. The cake tastes fantastic when it’s slightly cooled but still has a warm center.
How do I know when the cake is done baking?
Look for golden edges and a set center. A toothpick inserted near the center should come out mostly clean.

Gooey Oreo Dump Cake Recipe
- Total Time: 50-55 minutes
- Yield: 8 1x
Description
Oreo dump cake comes together in minutes with just a few simple ingredients for a quick dessert that’ll make your family cheer. Dump chocolate sandwich cookies, cake mix, and butter into a baking dish, then bake until golden and crumbly for an easy treat everyone will devour.
Ingredients
Base Ingredients:
- 1 box Chocolate Cake Mix
- 12 cookies Oreos
Main Ingredients:
- 14 ounces Sweetened Condensed Milk
- 1.5 sticks Butter
Supporting Ingredients:
- 8 ounces Cool Whip
Instructions
- Preheat your oven to 350°F, ensuring the rack sits in the center position for even baking.
- Grab a 9×13-inch baking pan and coat the entire surface with nonstick cooking spray to prevent sticking.
- Create a base layer by placing exactly 12 Oreo cookies across the pan’s bottom, ensuring full coverage.
- Pour the entire 14 oz can of sweetened condensed milk directly over the Oreo cookies, spreading it evenly with a spatula.
- Carefully spread the full 8 oz container of thawed Cool Whip across the condensed milk layer, using gentle strokes.
- Open the chocolate cake mix box and sprinkle the entire contents over the Cool Whip, covering the surface completely.
- Cut 1.5 sticks of butter into 1-tablespoon pieces and strategically dot them across the cake mix layer.
- Transfer the pan to the 350°F oven and bake for 40-45 minutes until the top turns golden and edges look slightly crisp.
- Remove from the oven and let the cake rest for 10 minutes before serving to allow layers to settle.
- Slice and serve warm, enjoying the decadent combination of textures and flavors.
Notes
- Crush some Oreos coarsely to add extra cookie texture and crunch to the top of the cake for a more interesting bite.
- Experiment with different Oreo flavors like mint or peanut butter to create unique variations of this dessert.
- For a lighter version, substitute low-fat Cool Whip and use a sugar-free cake mix to reduce overall calories.
- Serve this cake with a scoop of vanilla ice cream to complement the rich chocolate and creamy layers.
- Prep Time: 10 minutes
- Cook Time: 40-45 minutes
- Category: Dump Cakes
- Method: Baking
- Cuisine: American
Nutrition
- Serving Size: 8
- Calories: 445
- Sugar: 38 g
- Sodium: 280 mg
- Fat: 23 g
- Saturated Fat: 13 g
- Unsaturated Fat: 9 g
- Trans Fat: 0.5 g
- Carbohydrates: 56 g
- Fiber: 2 g
- Protein: 3 g
- Cholesterol: 40 mg
Logan Lemaster
Founder & Culinary Innovator
Expertise
Recipe Development and Innovation, Menu Design and Optimization, Fine Dining Techniques, Ingredient Pairing and Flavor Science
Education
Metropolitan Culinary Arts Institute
Logan’s culinary journey kicked off in his vibrant Chicago family kitchen, where fresh, seasonal ingredients and bold flavors were always front and center.
After graduating from the Metropolitan Culinary Arts Institute in Arlington, Virginia, and honing his skills in renowned restaurants, Logan mastered the art of blending classic techniques with exciting, modern twists.
His kitchen is a dynamic lab for flavor exploration. Through Yum Utopia, Logan aims to empower you to cook with both confidence and creativity, turning simple ingredients into spectacular meals.