
Braided Challah Bread Recipe for Shabbat Dinners
Challah bread stands as a cherished symbol of comfort and tradition in many kitchens.
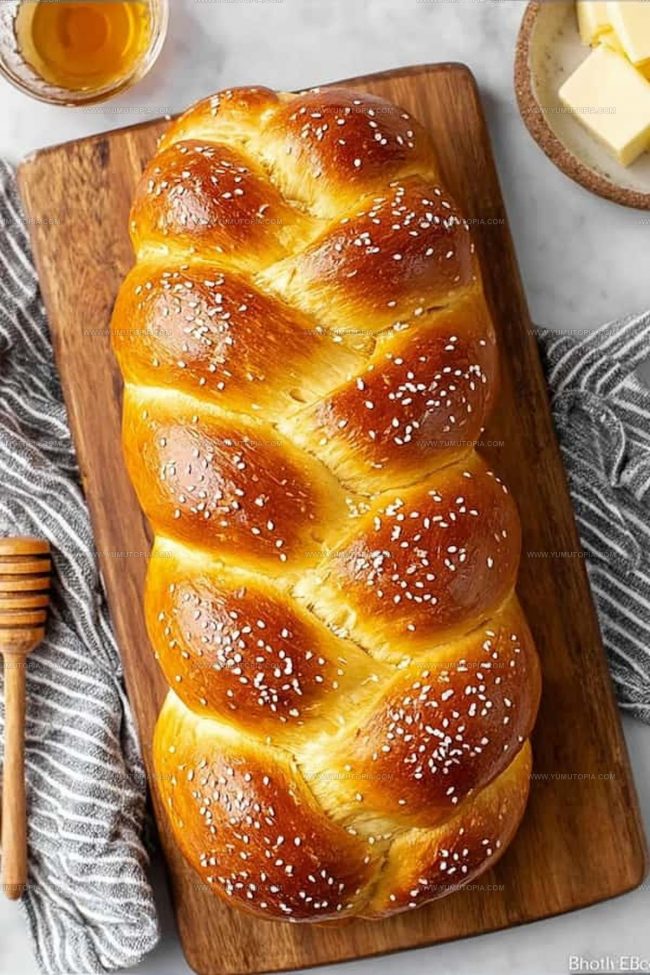
Soft, golden, and wonderfully pillowy, this Jewish bread represents more than just a simple recipe—it’s a connection to cultural heritage and family memories.
Rich with meaning and warmth, challah transforms ordinary moments into something genuinely special.
Braided strands of dough create a stunning visual that makes every table feel more inviting and celebratory.
Weekend bakers and bread enthusiasts appreciate the meditative process of crafting this beautiful loaf from scratch.
Generations have passed down challah techniques, turning each preparation into a loving ritual that connects people through shared experience.
You’ll love creating something so meaningful and delicious that celebrates both culinary skill and cultural tradition.
Standout Reasons Homemade Challah Is Worth It
Core Ingredients for Homemade Challah Bread
Flour Group:Yeast and Sugar Group:Liquid and Binding Group:Egg Wash:Optional Topping:Essential Kitchen Tools for Homemade Challah Bread
Making Homemade Challah Bread From Start To Finish
Activate Yeast
Grab a large mixing bowl and combine 2 ¼ teaspoons instant yeast, ¼ cup granulated sugar, and ¾ cup warm water. Let this mixture sit for 7 minutes until it gets bubbly and fragrant.
Create Dough Base
Crack 2 large eggs directly into the yeast mixture. Pour in ¼ cup vegetable oil and 1 teaspoon salt. Mix everything thoroughly with a wooden spoon until well blended.
Combine Flour
Gradually add 4 cups all-purpose flour to the wet ingredients. Stir until the mixture starts forming a shaggy dough that pulls away from the bowl’s sides.
Knead Dough
Dump the dough onto a floured countertop. Knead the dough for 9 minutes, pushing and folding with the heel of your hand. The dough should become smooth and springy.
First Rise
Place the dough in a lightly oiled bowl, cover with a clean kitchen towel, and let it rise in a warm spot for 1 hour. The dough should double in size.
Divide and Shape
Punch down the risen dough and divide it into 3 equal sections. Roll each section into a long rope about 16 inches long.
Braid Challah
Line up the three ropes and pinch them together at one end. Braid the ropes, tucking the ends underneath to create a neat loaf.
Second Rise
Let the braided loaf rest on a baking sheet for 45 minutes in a warm area.
Prepare Egg Wash
Whisk 1 egg yolk and brush it gently over the entire surface of the braided loaf.
Bake Challah
Preheat the oven to 375°F. Sprinkle sesame or poppy seeds on top if desired. Bake for 30-35 minutes until the bread is golden brown and sounds hollow when tapped.
Key Cooking Notes For Homemade Challah Bread
Easy Variations for Homemade Challah Bread
Best Serving Options for Homemade Challah
How To Store Challah Bread
Common Recipe Questions for Challah Bread
What makes challah bread different from other breads?
Challah is a traditional Jewish braided bread enriched with eggs, giving it a golden color, rich flavor, and slightly sweet taste that sets it apart from standard bread.
Can challah be made without eggs?
Since eggs are essential to authentic challah, replacing them changes the bread’s character. For egg-free versions, consider alternative enriched bread recipes.
Do I need special skills to braid challah?
Basic braiding looks complex but becomes easier with practice. Start with a simple three-strand braid, watching online tutorials if needed. Your first attempt will improve with each try.
How do I know when challah dough is properly kneaded?
The dough should feel smooth, elastic, and spring back when gently pressed. After 8-10 minutes of kneading, it should no longer stick to your hands.
Can challah dough be prepared in advance?
Yes, prepare the dough ahead and refrigerate overnight. Let it come to room temperature and rise before braiding and baking.
Is a stand mixer necessary for making challah?
While helpful, a stand mixer isn’t required. Hand kneading works perfectly and connects you more directly with the bread-making process.

Homemade Challah Bread Recipe
- Total Time: 2 hours 10 minutes
- Yield: 8 1x
Description
Fresh challah bread brings warmth to weekend mornings, weaving comfort and tradition into your kitchen with simple ingredients and a dash of love. Golden braided loaves emerge from the oven, ready to share delicious memories around your family table.
Ingredients
Main Ingredients:
- 4 cups all-purpose flour
- 2 large eggs
- 1 packet (2 ¼ teaspoons) instant yeast
Supporting Ingredients:
- ¼ cup granulated sugar
- 1 teaspoon salt
- ¼ cup vegetable oil
- ¾ cup warm water
Topping:
- 1 egg yolk
- Sesame or poppy seeds (optional)
Instructions
- Mix 2 ¼ teaspoons instant yeast, ¼ cup sugar, and ¾ cup warm water in a large mixing bowl. Wait 5-10 minutes until the mixture becomes frothy and bubbly.
- Whisk 2 large eggs and ¼ cup vegetable oil into the yeast mixture. Sprinkle 1 teaspoon salt over the liquid ingredients.
- Add 4 cups all-purpose flour gradually, stirring until a shaggy dough forms. Turn the dough onto a floured surface.
- Knead the dough for 8-10 minutes, using the heel of your hand to push and fold. Your dough should become smooth and springy.
- Place the dough in a lightly oiled bowl, cover with a clean kitchen towel. Let it rise in a warm spot for 1 hour at room temperature around 75°F until doubled in size.
- Punch down the dough to release air bubbles. Divide into 3 equal portions for braiding.
- Roll each portion into a 16-inch long rope. Pinch the tops together and braid the strands, tucking ends underneath.
- Transfer braided dough to a parchment-lined baking sheet. Cover and let rise another 30 minutes at 80°F.
- Preheat oven to 350°F. Brush the braid with 1 egg yolk and sprinkle sesame or poppy seeds if desired.
- Bake for 25-30 minutes until golden brown and hollow-sounding when tapped on the bottom.
Notes
- Always use fresh, active dry yeast to ensure the best rise and texture for your challah.
- When braiding the dough, work on a lightly floured surface and keep your strands even for a professional-looking loaf.
- Brush the bread with egg wash generously before baking to achieve that gorgeous golden-brown shine and glossy crust.
- Let the challah cool completely on a wire rack to preserve its crisp exterior and soft interior, resisting the temptation to cut into it immediately.
- Prep Time: 1 hour 40 minutes
- Cook Time: 30 minutes
- Category: Breads
- Method: Baking
- Cuisine: Jewish
Nutrition
- Serving Size: 8
- Calories: 210 kcal
- Sugar: 6 g
- Sodium: 150 mg
- Fat: 6 g
- Saturated Fat: 1 g
- Unsaturated Fat: 5 g
- Trans Fat: 0 g
- Carbohydrates: 35 g
- Fiber: 1 g
- Protein: 6 g
- Cholesterol: 40 mg
Madison Wyman
Recipe Developer & Food Storyteller
Expertise
Recipe Research and Adaptation, Food Writing and Cultural Storytelling, Sustainable and Ethical Sourcing, Dietary Adaptations (e.g., gluten-free, plant-based)
Education
Oregon Health & Science University
Portland Community College
Madison’s passion for flavor and culture ignited amidst the rich Southern cooking traditions of her upbringing, where cherished family recipes told delicious tales.
Armed with a Master’s in Food Systems and Society from Oregon Health & Science University and a Culinary Arts Certificate from Portland Community College, Madison truly excels at transforming rich, intricate flavors into dishes that are both approachable and heartfelt.
For her, cooking is a vibrant blend of science, art, and heritage – a powerful way to connect us to our roots and each other. Her recipes invite you to delve deeper, uncovering the fascinating stories woven into every ingredient.