
Flaky Sourdough Pop-Tarts Recipe for Breakfast Treats
Homemade Sourdough Pop-Tarts recipe mixes the beloved breakfast pastry with traditional fermentation for a fun baking project that stands out from store-bought versions.
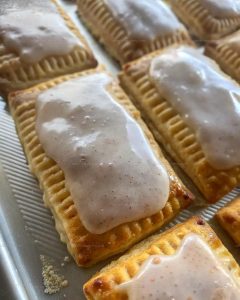
Flaky, buttery pastry encases sweet filling in portable form, making mornings more exciting and snack time memorable.
Sourdough discard finds new purpose here, reducing waste while adding subtle depth and character to familiar flavors.
Kids love the playful shape and colors, while grown-ups appreciate the from-scratch quality and satisfying texture.
Perfect for weekend baking sessions or meal prep, these pastries freeze beautifully and reheat in minutes when hunger strikes.
The combination of homemade care and convenience creates something special that works for busy weekdays or leisurely brunches.
Rolling out dough and sealing edges becomes meditative, and watching golden pastries emerge from the oven feels genuinely rewarding every single time.
Why Sourdough Pop-Tarts with Glaze Are A Hit
Sourdough Pop-Tart Filling and Dough Ingredients
Main Flour Ingredients:Sourdough And Liquid Components:Finishing Components:Basic Recipe Tools for Sourdough Pop Tarts
How to Bake No-Bulk-Fermentation Sourdough

Prepare Dry Ingredients
Grab a large mixing bowl and toss in 2 cups all-purpose flour and 1/2 teaspoon salt. Give them a good mix so the salt spreads evenly through the flour.
Work in Cold Butter
Chop 1/2 cup unsalted butter into tiny cubes. Use your fingertips to massage the butter into the flour mixture until it looks like rough breadcrumbs. This creates those flaky layers that make pastries delicious.
Create Dough Base
Make a little well in the center of your flour mixture. Pour in these ingredients:
Gently mix everything until a shaggy dough starts to form. Don’t overwork the mixture – just combine until it comes together.
Knead and Rest Dough
Dust your countertop with flour and knead the dough for 3-4 minutes until it feels smooth. Wrap the dough in plastic wrap and chill in the refrigerator for 1 hour.
Roll and Cut Dough
After chilling, roll out the dough to 1/8-inch thickness on a floured surface. Use a sharp knife to cut 3×4 inch rectangles.
Fill Pop-Tarts
Place 1 tablespoon of fruit jam in the center of half your dough rectangles. Cover each jam-topped piece with another rectangle.
Seal the Edges
Press the edges of each pop-tart with a fork to seal them completely. This keeps the jam locked inside while baking.
Chill Before Baking
Arrange pop-tarts on a parchment-lined baking sheet. Pop them back in the refrigerator for 30 minutes to help them keep their shape.
Bake Pop-Tarts
Preheat your oven to 375°F. Bake the pop-tarts for 20-25 minutes until they turn a beautiful golden brown.
Make Glaze
While pop-tarts cool, whip up the glaze by whisking together:
Finish and Serve
Drizzle the glaze over completely cooled pop-tarts. Let the glaze set for 10 minutes before serving your homemade treats.
Little Things That Help Homemade Sourdough Pop-Tarts Bake Evenly
Creative Variations for Sourdough Pop Tarts
Best Serving Options For Homemade Sourdough Pop Tarts
Storage And Reheating Notes for Homemade Sourdough Pop-Tarts with Glaze
Homemade Sourdough Pop Tarts Frequently Asked Questions
Can I use a different type of flour?
Absolutely! All-purpose flour works perfectly, but whole wheat or gluten-free flour blends can create interesting flavor profiles in the dough.
How long does my sourdough starter need to be active before making this recipe?
Your starter should be bubbly and recently fed, ideally 4-6 hours after feeding for the best texture and rise.
What jams work best for filling?
Fruit preserves with lower water content are ideal. Strawberry, raspberry, and apricot jams create delicious results and hold their shape nicely during baking.
Do I need any special equipment to make these pop-tarts?
A basic rolling pin, sharp knife, and baking sheet are all you need. A pastry cutter helps create clean edges, but isn’t mandatory.
Can I freeze the unbaked pop-tarts?
Definitely! Assemble pop-tarts, place them on a baking sheet, and freeze until solid. Transfer to a freezer bag and store for up to two months before baking.
How do I know when the pop-tarts are perfectly baked?
Look for golden brown edges and a firm, set crust. The dough should look dry and slightly puffy when done.
Homemade Sourdough Pop-Tarts Recipe
- Total Time: 2 hours
- Yield: 4 1x
Description
Sourdough pop-tarts pack a nostalgic punch of childhood memories with a grown-up twist that turns breakfast into a delightful treat. Flaky, tangy sourdough pastry filled with your favorite jam and topped with a sweet glaze makes mornings something to savor.
Ingredients
Main Ingredients:
- 2 cups all-purpose flour
- ½ cup unsalted butter
- ½ cup fruit jam
Sourdough & Liquid Components:
- ¼ cup active sourdough starter
- ¼ cup cold water
- 1 large egg
- 2 tablespoons milk
Finishing Components:
- 1 cup powdered sugar
- ½ teaspoon salt
- 1 teaspoon vanilla extract
Instructions
- Mix 2 cups flour and ½ teaspoon salt in a large bowl until thoroughly blended.
- Dice ½ cup cold butter into small cubes, then incorporate into flour mixture using fingertips until texture resembles coarse crumbs.
- Form a small crater in flour mixture’s center and pour in ¼ cup sourdough starter, ¼ cup cold water, and 1 beaten egg.
- Combine ingredients gently until a rough, shaggy dough emerges.
- Transfer dough to a floured surface and knead for 3-4 minutes until surface becomes smooth and uniform.
- Wrap dough in plastic film and chill inside refrigerator for exactly 1 hour.
- Roll chilled dough to ⅛-inch thickness on a generously floured workspace.
- Cut dough into precise 3×4 inch rectangular shapes using a sharp knife or pastry cutter.
- Place 1 tablespoon fruit jam directly in the center of half the rectangular dough pieces.
- Cover jam-topped rectangles with remaining dough pieces, pressing edges together.
- Use fork tines to firmly crimp and seal each pop-tart’s perimeter.
- Arrange sealed pop-tarts on a parchment-lined baking sheet.
- Refrigerate pop-tarts for 30 minutes to help maintain their structured shape.
- Preheat oven to precisely 375°F with rack positioned in center position.
- Bake pop-tarts for 20-25 minutes until surfaces turn golden brown.
- Remove baking sheet from oven and transfer pop-tarts to a wire cooling rack.
- Allow pop-tarts to cool completely for approximately 30 minutes.
- Whisk 1 cup powdered sugar, 2 tablespoons milk, and 1 teaspoon vanilla until glaze becomes silky smooth.
- Drizzle prepared glaze generously over cooled pop-tarts.
- Rest pop-tarts for 10 minutes to allow glaze to set before serving.
Notes
- Always use cold butter for the most tender, flaky pastry that breaks apart beautifully when bitten.
- Refrigerating the dough twice helps develop a more complex flavor and prevents the pastry from spreading during baking.
- Work with chilled dough to keep butter solid and create those delicate, layered pastry textures.
- Experiment with different jam flavors like raspberry, blueberry, or apricot to personalize your pop-tarts and keep things interesting.
- Prep Time: 1 hour 40 minutes
- Cook Time: 20-25 minutes
- Category: Tarts
- Method: Baking
- Cuisine: American
Nutrition
- Serving Size: 4
- Calories: 380 kcal
- Sugar: 26 g
- Sodium: 230 mg
- Fat: 18 g
- Saturated Fat: 11 g
- Unsaturated Fat: 7 g
- Trans Fat: 0.5 g
- Carbohydrates: 50 g
- Fiber: 1.5 g
- Protein: 6 g
- Cholesterol: 55 mg
Logan Lemaster
Founder & Culinary Innovator
Expertise
Recipe Development and Innovation, Menu Design and Optimization, Fine Dining Techniques, Ingredient Pairing and Flavor Science
Education
Metropolitan Culinary Arts Institute
Logan’s culinary journey kicked off in his vibrant Chicago family kitchen, where fresh, seasonal ingredients and bold flavors were always front and center.
After graduating from the Metropolitan Culinary Arts Institute in Arlington, Virginia, and honing his skills in renowned restaurants, Logan mastered the art of blending classic techniques with exciting, modern twists.
His kitchen is a dynamic lab for flavor exploration. Through Yum Utopia, Logan aims to empower you to cook with both confidence and creativity, turning simple ingredients into spectacular meals.