Creamy Hot Chocolate Ice Box Pie Recipe
Hot Chocolate Ice Box Pie recipe offers all the cozy comfort of a winter favorite in cool, creamy dessert form.
Rich chocolate flavor meets a silky, no-bake filling that sets up beautifully in the refrigerator while you go about your day.
Every bite offers that familiar warmth and sweetness, reimagined as something refreshingly cold and utterly satisfying.
It works beautifully for potlucks, holiday gatherings, or whenever you want something special without spending hours in the kitchen.
The contrast between the crisp crust and smooth filling creates a texture that keeps you coming back for more.
Simple enough for a weeknight yet impressive enough for company, it fits seamlessly into any occasion.
You can have a stunning dessert ready with minimal effort and maximum reward.
Why You’ll Love Hot Chocolate Icebox Pie
What Goes Into Hot Chocolate Icebox Pie
Crust:Filling Base:Flavor Enhancers:Garnish:Essential Tools for Hot Chocolate Icebox Pie
Easy Instructions For Hot Chocolate Icebox Pie
Whip the Cream
Grab your electric mixer and pour 1 cup of heavy whipping cream into a large bowl. Whip that cream until it forms stiff, sturdy peaks that stand right up when you lift the beaters. This might take about 3-4 minutes at medium-high speed.
Create Chocolate Base
In a separate mixing bowl, combine your ingredients for the creamy chocolate layer:
Stir these together until everything blends smoothly and looks super silky.
Blend Cream and Chocolate
Carefully fold your perfectly whipped cream into the chocolate mixture. Use gentle sweeping motions to keep all that beautiful air in the cream. The goal is a light, fluffy texture that looks dreamy.
Add Marshmallow Fun
Sprinkle 1/2 cup mini marshmallows into your chocolate cream mixture. Stir them in so they’re evenly distributed throughout the filling.
Fill the Crust
Take your pre-made chocolate pie crust and pour the entire marshmallow-chocolate mixture right into it. Smooth the top with a spatula to make it look neat.
Chill and Set
Cover the pie with plastic wrap and slide it into the refrigerator. Let it hang out and get cold and firm for at least 4 hours. This gives the pie time to set up perfectly.
Final Garnish
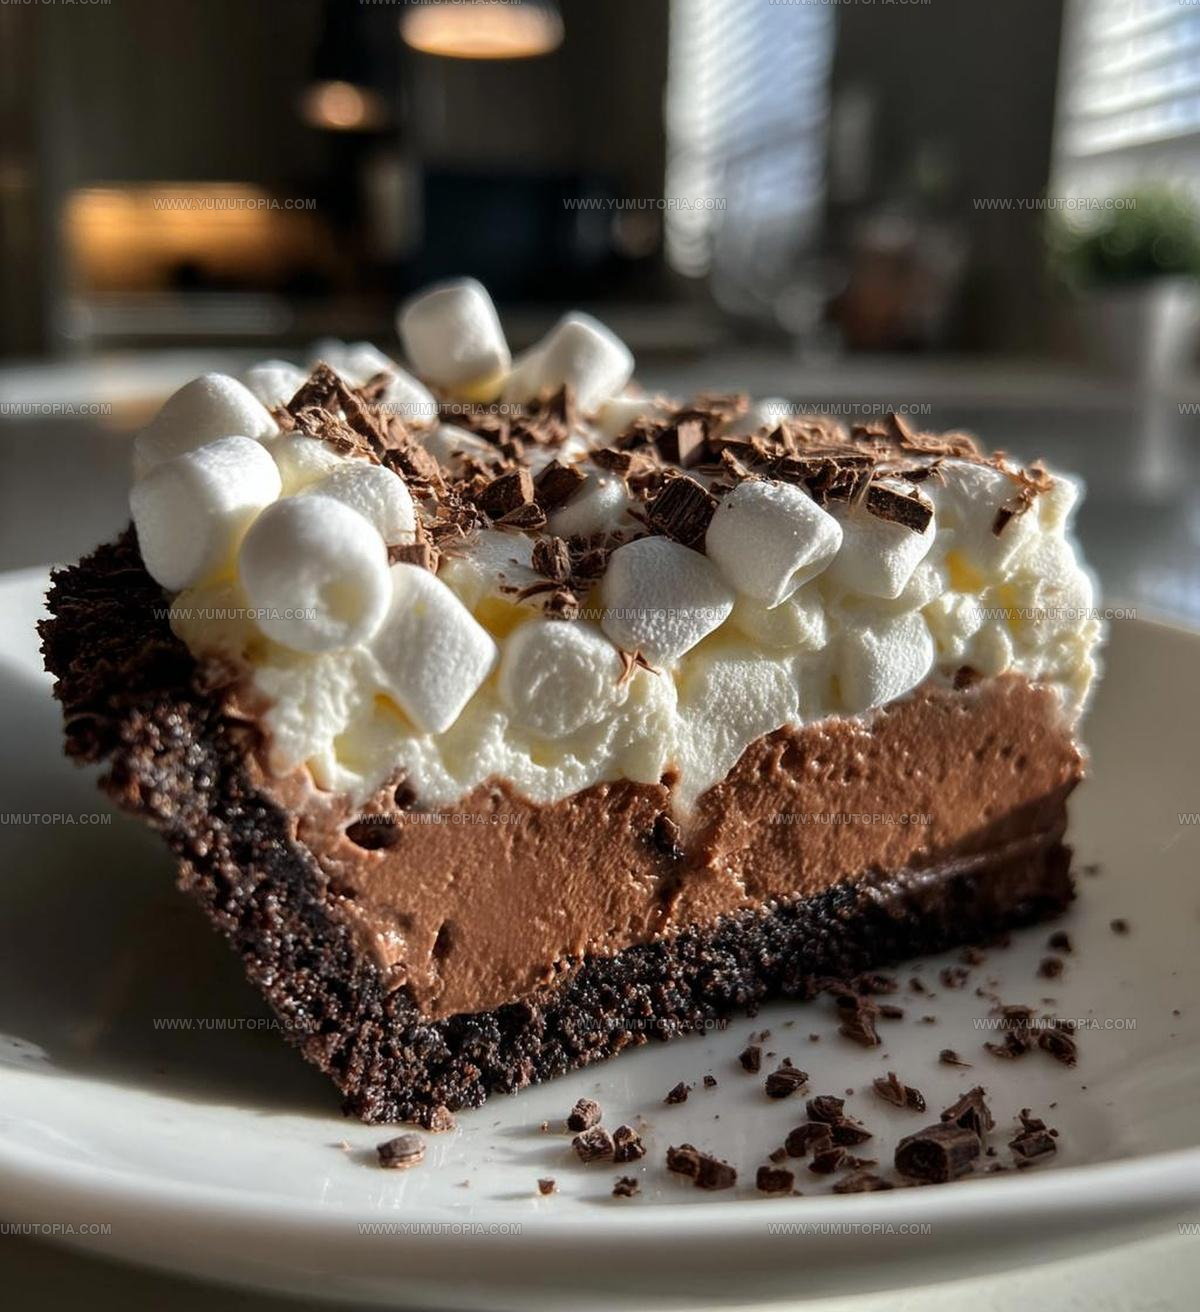
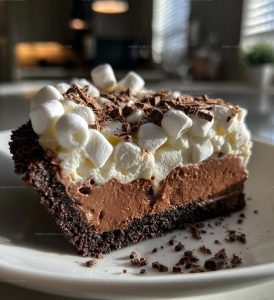
Before serving, sprinkle some chocolate shavings across the top of your pie. This adds a beautiful finishing touch that makes the dessert look super tempting.
Best Cooking Tips For Hot Chocolate Icebox Pie
Hot Chocolate Icebox Pie With Chocolate Layer Options
Best Ways To Serve Hot Chocolate Icebox Pie
Hot Chocolate Ice Box Pie Storage Guidance
Hot Chocolate Icebox Pie Common Queries
Can I use homemade whipped cream?
Absolutely! Homemade whipped cream works perfectly and gives the pie a fresher taste than store-bought whipped topping.
Do the marshmallows melt into the pie?
The marshmallows stay intact and create delightful pockets of sweetness throughout the pie’s creamy texture.
What type of hot chocolate mix works best?
Milk chocolate or classic hot cocoa mixes deliver the most consistent flavor. Avoid sugar-free or dark chocolate varieties that might alter the taste.
How long will this pie keep in the refrigerator?
The pie stays fresh for 3-4 days when stored in an airtight container in the refrigerator.
Can this pie be frozen?
Yes, wrap the pie tightly in plastic wrap and freeze for up to two weeks. Thaw in the refrigerator before serving.
Is a chocolate crust necessary?
While a chocolate crust enhances the flavor, a graham cracker or vanilla wafer crust can work as a delicious alternative.
Hot Chocolate Ice Box Pie Recipe
- Total Time: 15 minutes
- Yield: 8 1x
Description
Whipping up Hot Chocolate Ice Box Pie brings pure comfort straight to your dessert table. Creamy chocolate layers and a graham cracker crust make this sweet treat perfect for chilling out on lazy afternoons.
Ingredients
Primary Ingredients:
- 1 pre-made chocolate pie crust
- 1 cup heavy whipping cream
- 1 cup sweetened condensed milk
Supporting Ingredients:
- ½ cup hot chocolate mix
- 1 teaspoon vanilla extract
Garnish:
- ½ cup mini marshmallows
- Chocolate shavings
Instructions
- Grab your electric mixer and whip 1 cup heavy whipping cream until stiff peaks develop about 3-4 minutes on medium-high speed.
- In a separate mixing bowl, blend 1 cup sweetened condensed milk, ½ cup hot chocolate mix, and 1 teaspoon vanilla extract until completely smooth.
- Carefully fold the whipped cream into the chocolate mixture using a rubber spatula, ensuring no streaks remain.
- Gently incorporate ½ cup mini marshmallows throughout the creamy mixture.
- Transfer the entire filling into your pre-made chocolate pie crust, smoothing the top with a spatula.
- Cover the pie with plastic wrap and refrigerate for exactly 4 hours at 40°F to allow the filling to set completely.
- Before serving, sprinkle chocolate shavings across the surface for a decorative finish.
Notes
- Whip the cream until it forms stiff, sturdy peaks to ensure a light and fluffy texture in your pie.
- For extra richness, select a high-quality hot chocolate mix with deep chocolate flavor.
- Folding the whipped cream carefully prevents deflating the mixture and maintains a smooth, airy consistency.
- Refrigerate the pie for a minimum of 4 hours to allow the filling to set completely and develop a perfect, creamy texture.
- Prep Time: 15 minutes
- Cook Time: 0 minutes
- Category: Pies
- Method: Chilling
- Cuisine: American
Nutrition
- Serving Size: 8
- Calories: 304 kcal
- Sugar: 29 g
- Sodium: 105 mg
- Fat: 18 g
- Saturated Fat: 11 g
- Unsaturated Fat: 6 g
- Trans Fat: 0.5 g
- Carbohydrates: 34 g
- Fiber: 1 g
- Protein: 4 g
- Cholesterol: 62 mg
Madison Wyman
Recipe Developer & Food Storyteller
Expertise
Recipe Research and Adaptation, Food Writing and Cultural Storytelling, Sustainable and Ethical Sourcing, Dietary Adaptations (e.g., gluten-free, plant-based)
Education
Oregon Health & Science University
Portland Community College
Madison’s passion for flavor and culture ignited amidst the rich Southern cooking traditions of her upbringing, where cherished family recipes told delicious tales.
Armed with a Master’s in Food Systems and Society from Oregon Health & Science University and a Culinary Arts Certificate from Portland Community College, Madison truly excels at transforming rich, intricate flavors into dishes that are both approachable and heartfelt.
For her, cooking is a vibrant blend of science, art, and heritage – a powerful way to connect us to our roots and each other. Her recipes invite you to delve deeper, uncovering the fascinating stories woven into every ingredient.