
Chilled Icebox Cake Recipe for Summer Gatherings
Icebox cake has been winning over dessert lovers for generations with its no-bake simplicity and crowd-pleasing results.
On warm days when turning on the oven feels impossible, desserts that chill in the refrigerator become absolute lifesavers.
What makes it so appealing is how effortlessly it comes together while still delivering that impressive, layered presentation everyone loves at potlucks and family gatherings.
If you need something sweet but don’t have hours to spend in the kitchen, few options deliver quite as reliably.
Cool, creamy layers meld together into something truly satisfying that works beautifully for both casual weeknight treats and special celebrations.
Go make one tonight and wake up tomorrow to dessert perfection waiting in the fridge.
Reasons Icebox Cake Recipe Keeps Desserts Easy
Ingredient Essentials for Icebox Cake
Main Ingredients:Sweetening Ingredients:Garnish Ingredients:No Bake Tools for Icebox Cake
Icebox Cake Assembly Instructions
Whip the Cream
Grab your mixer and pour in 2 cups of heavy cream. Whip it on medium-high speed until soft, billowy peaks start to form – about 2-3 minutes.
Sweeten the Cream
Time to make this cream dreamy. Add 1 cup of powdered sugar and 1 teaspoon of vanilla extract. Keep whipping until the cream stands up in firm, sturdy peaks – roughly another 1-2 minutes.
Create First Cookie Layer
Take a rectangular dish and line the bottom with chocolate wafer cookies. These 24 crisp little cookies will create the foundation of your dessert.
Add First Cream Layer
Spread a generous layer of your whipped cream over the cookies. Make sure each cookie gets a nice coating.
Sprinkle Berries
Scatter some fresh berries across the cream layer. About 1 cup of berries will give your cake a burst of color and fresh flavor.
Repeat Layers
Keep building your cake by adding another layer of cookies, then cream, then berries. Repeat until you’ve used up all your ingredients.
Chill and Set
Cover the dish with plastic wrap and slide it into the refrigerator. Let it rest for at least 4 hours, though overnight is even better. The cookies will soften and absorb the cream, creating a delicious texture.
Serve and Enjoy
When ready to serve, slice your cake into neat portions. This chilled dessert is perfect for a cool treat on a warm day.
Which Tips Improve Icebox Cake
What Icebox Cake Variations to Try
Serving Ideas for Icebox Cake
Reliable Storage for Icebox Cake
Icebox Cake Common Questions
What makes the whipped cream so perfect?
Whip the heavy cream slowly at first, then increase speed to create those dreamy soft peaks that hold their shape beautifully in your dessert.
Can different cookies work in this recipe?
Absolutely – chocolate wafers, graham crackers, or shortbread cookies create delicious variations that match your flavor preferences.
How thick should the cream layers be?
Spread cream about 1/4 inch thick between each cookie layer to ensure a balanced texture and enough moisture for softening the cookies.
Are fresh or frozen berries better?
Fresh berries provide the brightest flavor and prettiest presentation, though frozen berries can work when drained thoroughly.
How do I know when the whipped cream is ready?
When your beaters create stiff peaks that stand straight up and don’t droop, your cream is perfectly whipped and ready to layer.
What’s the best way to slice this dessert?
Use a sharp knife dipped in hot water and wiped clean between each slice for smooth, clean cuts that show off the beautiful layers.
Icebox Cake Recipe
- Total Time: 15 minutes
- Yield: 6 to 8 1x
Description
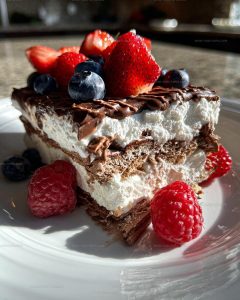
Icebox cake layers chocolate wafers and whipped cream, then chills into soft, cake-like perfection overnight. It’s no-bake magic with big wow factor.
Ingredients
Main Ingredients:
- 24 chocolate wafer cookies
- 2 cups heavy cream
- 1 cup fresh berries
Supporting Ingredients:
- 1 cup powdered sugar
- 1 teaspoon vanilla extract
Instructions
- Grab your electric mixer and whip 2 cups heavy cream in a large bowl until soft, billowy peaks develop.
- Sprinkle in 1 cup powdered sugar and 1 teaspoon vanilla extract. Continue whipping until cream stands in sturdy, tall peaks.
- Select a rectangular serving dish and create the first foundation layer using 6 chocolate wafer cookies, placing them side by side.
- Generously spread ½ cup whipped cream over the cookie layer, ensuring complete cookie coverage.
- Scatter ¼ cup fresh berries across the cream surface for bright, fruity pops of color.
- Repeat cookie, cream, and berry layering process until your 24 cookies and remaining cream are fully incorporated.
- Seal the dish with plastic wrap and nestle into the refrigerator for a minimum of 4 hours, allowing cookies to soften and flavors to meld.
- After chilling, remove from refrigerator and slice into clean, even portions using a sharp knife.
- Serve directly from the refrigerator to maintain the cake’s cool, creamy texture.
Notes
- Use cold heavy cream straight from the refrigerator for the best whipped cream texture.
- Gently fold berries into the layers to prevent them from breaking and releasing too much juice.
- Select crisp cookies like chocolate wafers or graham crackers that will soften nicely when chilled.
- For a gluten-free version, swap regular cookies with gluten-free alternatives like almond or rice flour cookies.
- Prep Time: 15 minutes
- Cook Time: 0 minutes
- Category: Cakes
- Method: Chilling
- Cuisine: American
Nutrition
- Serving Size: 6 to 8
- Calories: 310 kcal
- Sugar: 25 g
- Sodium: 50 mg
- Fat: 22 g
- Saturated Fat: 14 g
- Unsaturated Fat: 7 g
- Trans Fat: 0.5 g
- Carbohydrates: 24 g
- Fiber: 2 g
- Protein: 3 g
- Cholesterol: 75 mg
Madison Wyman
Recipe Developer & Food Storyteller
Expertise
Recipe Research and Adaptation, Food Writing and Cultural Storytelling, Sustainable and Ethical Sourcing, Dietary Adaptations (e.g., gluten-free, plant-based)
Education
Oregon Health & Science University
Portland Community College
Madison’s passion for flavor and culture ignited amidst the rich Southern cooking traditions of her upbringing, where cherished family recipes told delicious tales.
Armed with a Master’s in Food Systems and Society from Oregon Health & Science University and a Culinary Arts Certificate from Portland Community College, Madison truly excels at transforming rich, intricate flavors into dishes that are both approachable and heartfelt.
For her, cooking is a vibrant blend of science, art, and heritage – a powerful way to connect us to our roots and each other. Her recipes invite you to delve deeper, uncovering the fascinating stories woven into every ingredient.