Red Velvet Cheesecake Recipe That Combines Two Beloved Desserts
Red velvet cheesecake recipe lovers know there’s something special about combining two beloved desserts into one showstopping creation.
Rich cocoa notes meet smooth, creamy layers in a dessert that feels both luxurious and comforting at the same time.
The striking color alone makes any occasion feel more festive and memorable, while the flavor profile satisfies cravings in ways that single-layer desserts simply can’t match.
Perfect for celebrations, holiday gatherings, or whenever you want to serve something truly impressive, it never fails to draw compliments and recipe requests.
Home bakers find it surprisingly approachable despite its elegant appearance, making it an excellent choice when you need a reliable crowd-pleaser.
The combination works beautifully because contrasting textures and complementary flavors create harmony in every bite.
Serve it at your next gathering and watch it become the centerpiece everyone remembers long after the plates are cleared.
What Makes Red Velvet Cheesecake So Special
Red Velvet Cheesecake Ingredient Breakdown
What Tools Are Used for Red Velvet Cheesecake
Red Velvet Cheesecake Baking Steps
Prepare Cheesecake Base
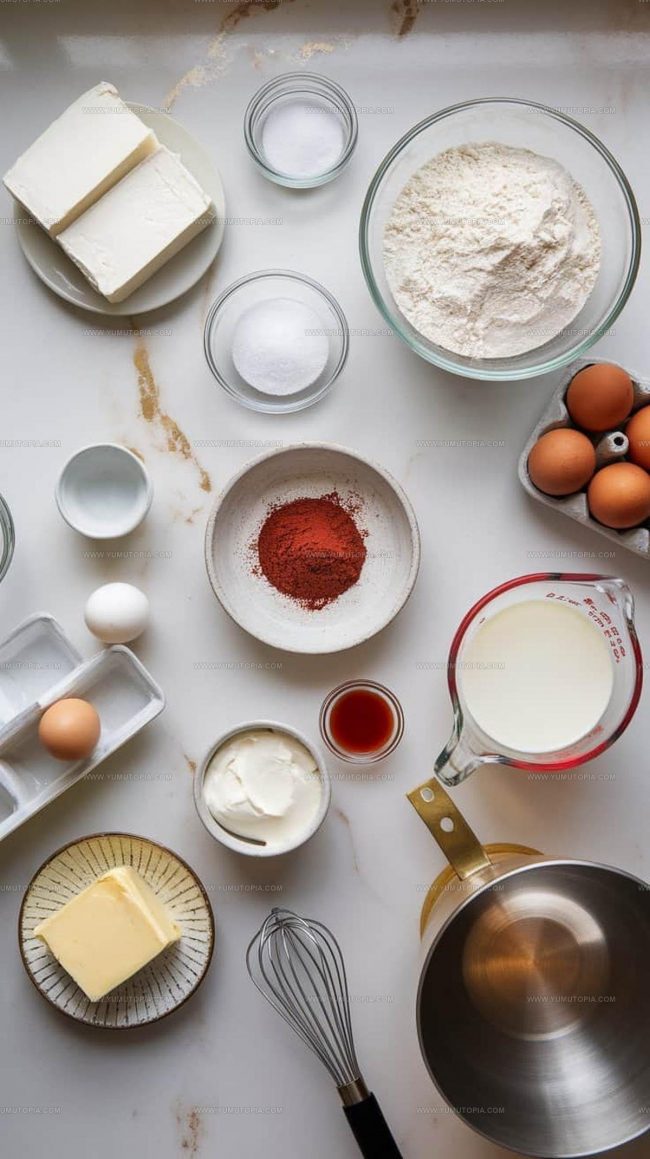
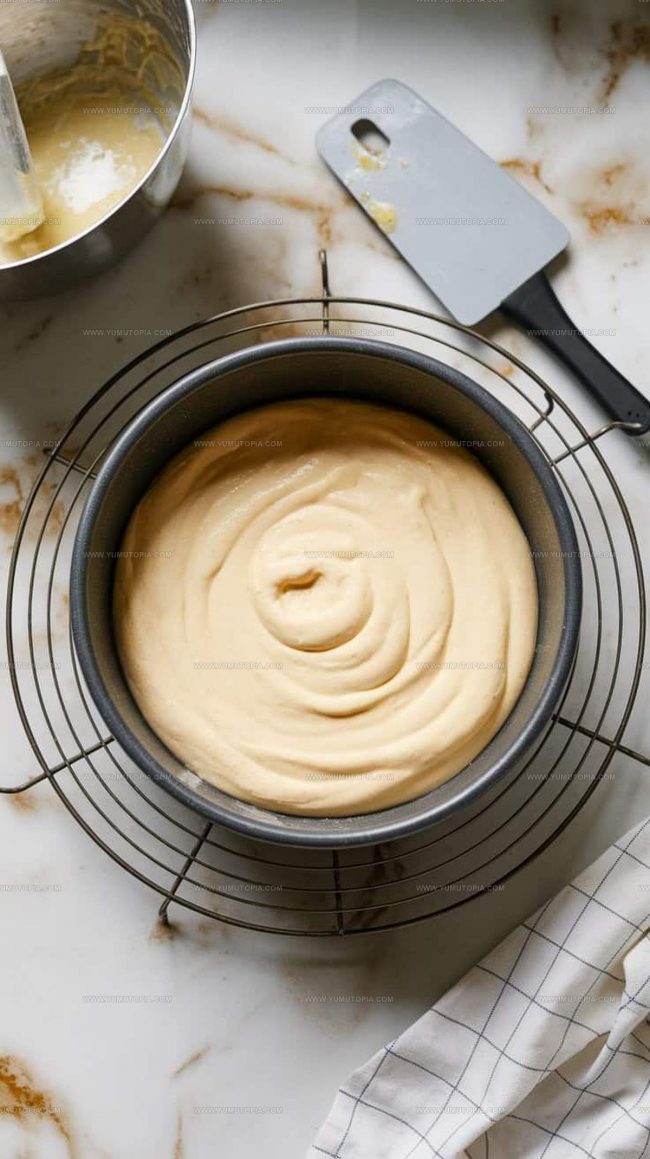
Set your oven to 325°F. Grab a 9-inch springform pan and line the bottom with parchment paper. In a large mixing bowl, beat 16 oz cream cheese with 1 cup sugar until super smooth. Add 3 eggs one at a time, mixing well after each. Stir in 1 tsp vanilla extract and 1/2 cup sour cream. Pour this creamy mixture into the prepared pan. Bake for 40-45 minutes until the center looks just slightly wobbly. Let it cool completely at room temperature.
Mix Red Velvet Cake Dry Ingredients
Grab a medium bowl and sift together 2 cups all-purpose flour, 1/4 cup cocoa powder, 1 tsp baking soda, and 1/2 tsp salt. Make sure these ingredients are well combined and lump-free.
Create Red Velvet Cake Batter
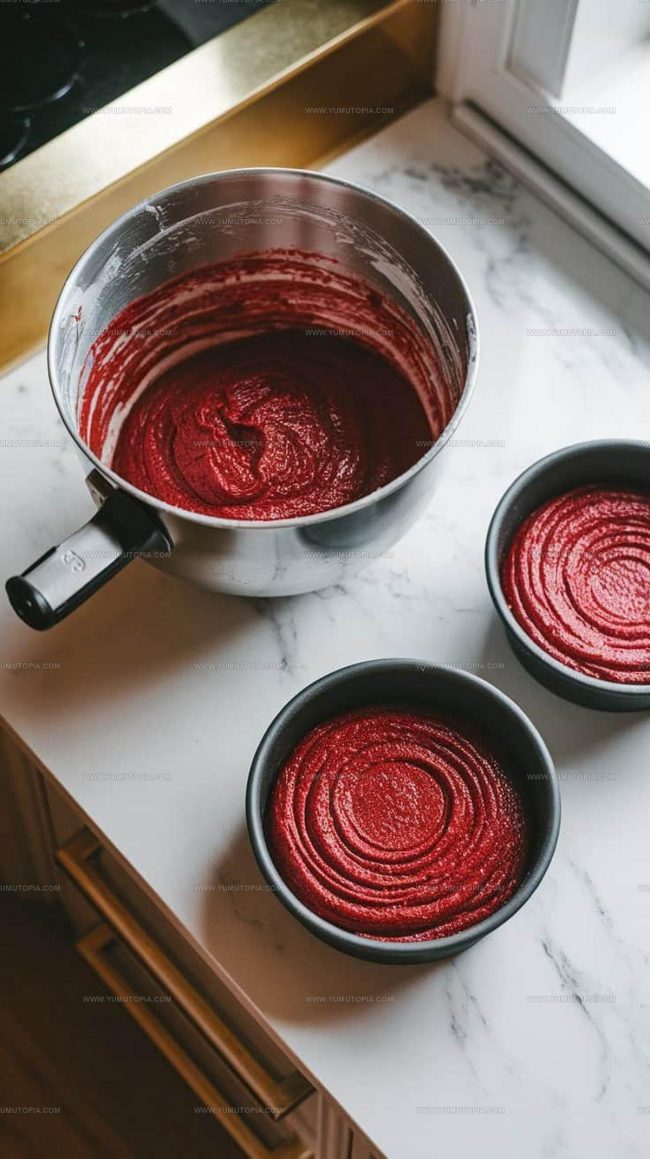
Preheat the oven to 350°F. Grease two 9-inch round cake pans. In a separate large bowl, cream 1/2 cup unsalted butter with 1 1/2 cups sugar until fluffy. Add 2 eggs one at a time. Pour in 1 cup buttermilk, 2 tsp vanilla extract, 2 tbsp red food coloring, and 1 tsp white vinegar. Mix thoroughly. Gradually fold in the dry ingredient mixture until just combined.
Bake Red Velvet Cake Layers
Divide the red batter evenly between the prepared pans. Bake for 25-30 minutes until a toothpick comes out clean. Allow the cakes to cool completely. Trim the tops if needed to create flat layers.
Assemble the Cake
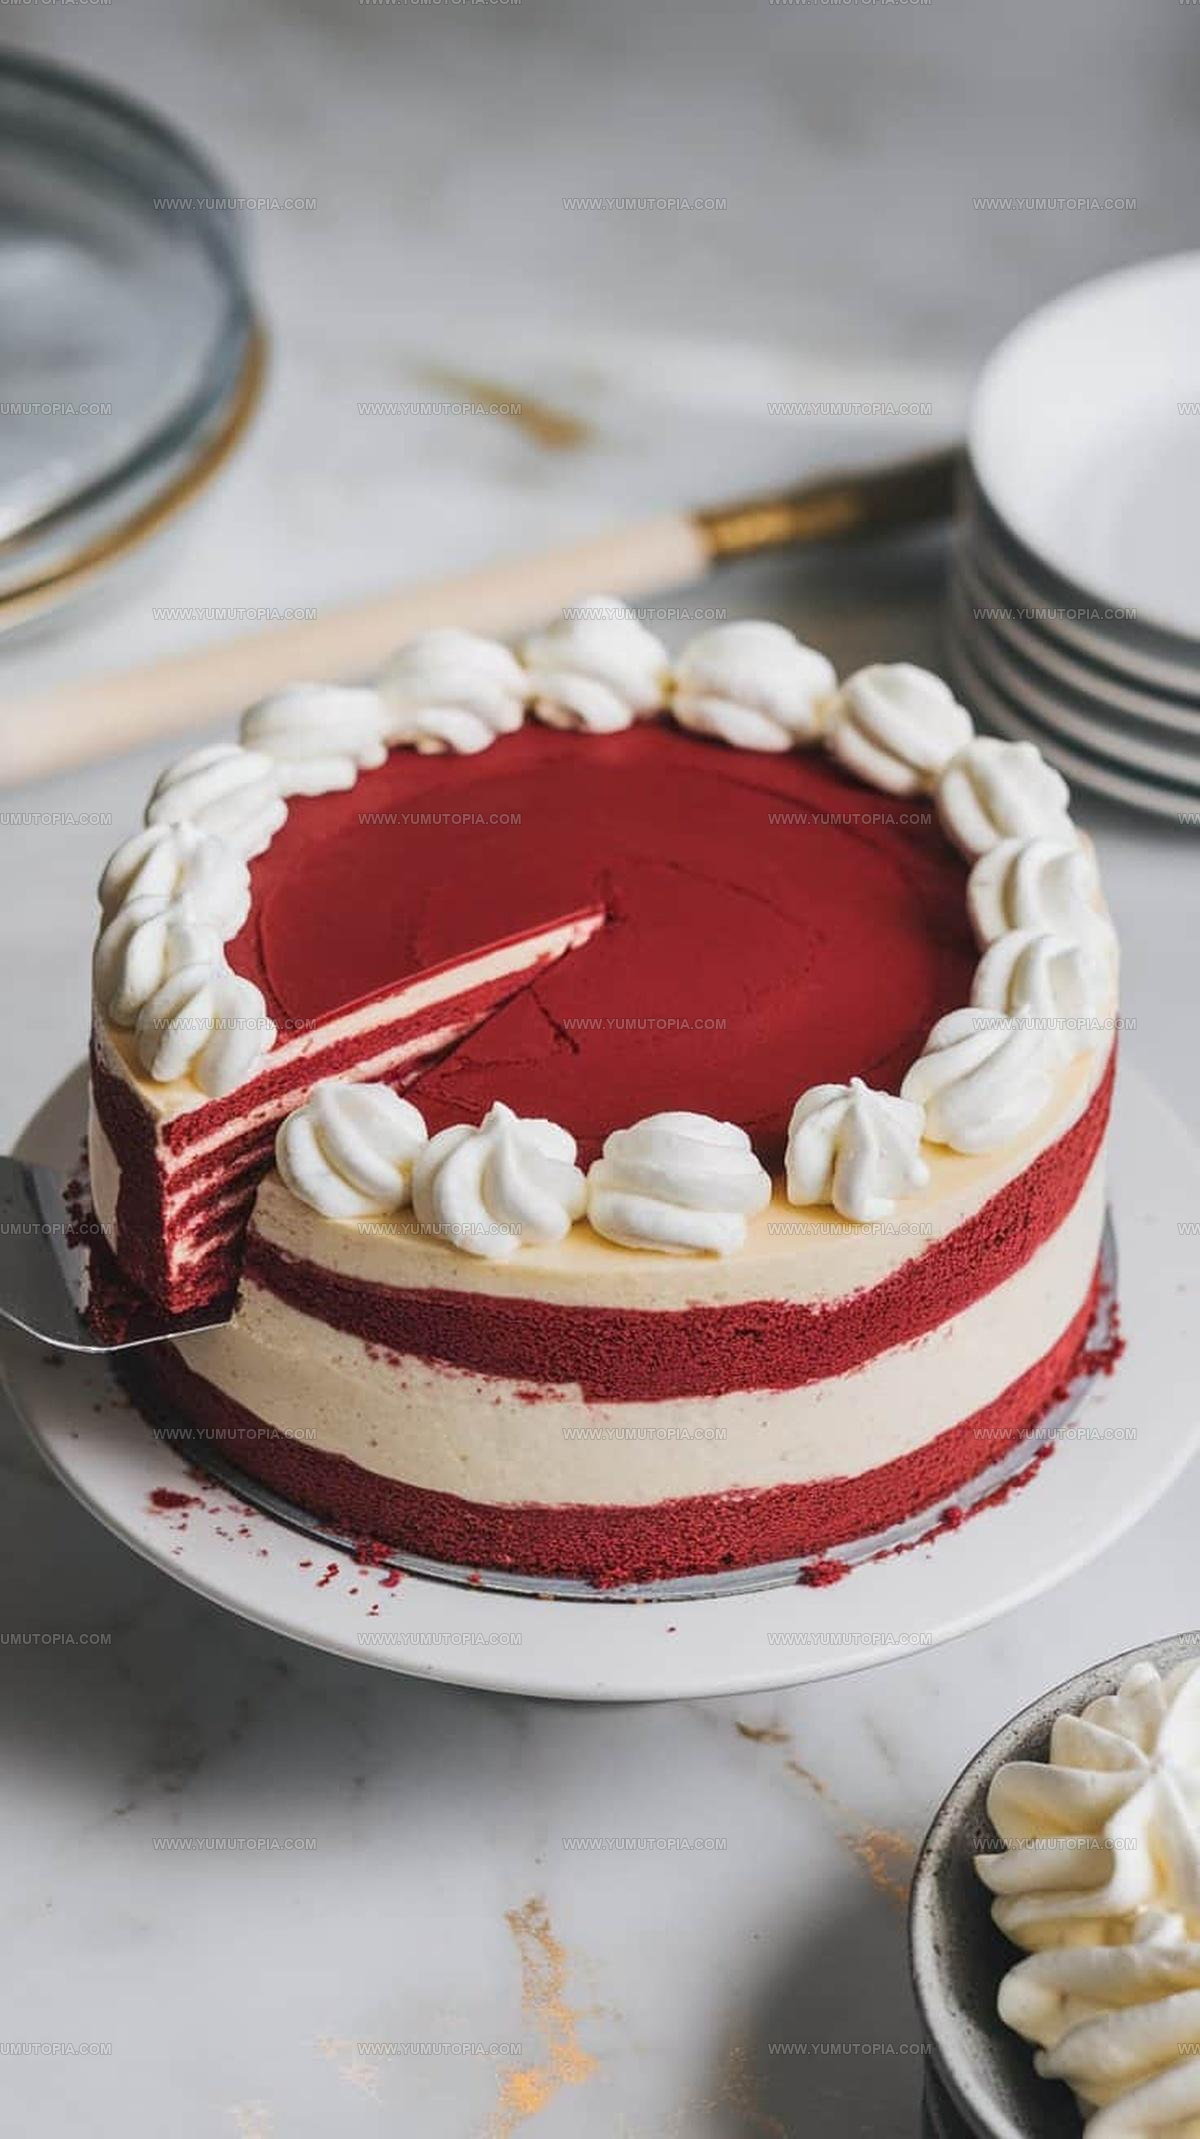
Place one red velvet cake layer on your serving plate. Carefully set the cheesecake layer on top. Add the second red velvet cake layer.
Decorate and Finish
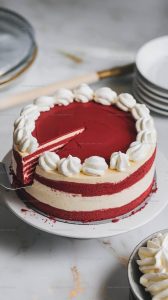
Whip 2 cups heavy whipping cream until it forms soft peaks. Spread the cream over the entire cake. Sprinkle some crumbled red velvet cake pieces on top for a decorative touch.
Store and Serve
Keep the cake refrigerated. It’ll stay fresh for 4 days when stored in an airtight container. If you want to save it longer, wrap individual slices in plastic wrap and freeze for up to 2 months. Thaw overnight in the refrigerator before serving.
Technique Notes for Red Velvet Cheesecake
Creative Variations for Red Velvet Cheesecake
Best Serving Options for Red Velvet Cheesecake

How To Store Red Velvet Cheesecake
Frequently Asked Questions for Red Velvet Cheesecake
What gives red velvet cake its signature color?
The deep red color comes from food coloring, which transforms the chocolate-based cake batter into a vibrant crimson dessert that catches everyone’s eye.
Can I reduce the amount of food coloring?
Absolutely! You can use less food coloring for a lighter shade, or even natural alternatives like beetroot powder, though this might slightly change the taste.
Does this cheesecake require any special baking techniques?
Creating a water bath helps prevent cracks in your cheesecake. Simply place your springform pan in a larger pan filled with hot water while baking.
How do I know when the cheesecake is perfectly baked?
The center should have a slight jiggle when gently shaken – it will continue setting as it cools down, creating that perfect creamy texture.
Can I make this recipe without a springform pan?
A regular cake pan works, but removing slices might be trickier. Consider lining the pan with parchment paper for easier removal.
What makes the cheesecake layer so smooth?
Beating the cream cheese until completely smooth and adding eggs one at a time helps create that silky, luxurious texture.
Layered Red Velvet Cheesecake Recipe
- Total Time: 1 hour 35 minutes to 1 hour 45 minutes
- Yield: 12 1x
Description
Red Velvet Cheesecake brings pure dessert delight straight to your table with classic Southern charm and creamy indulgence. Smooth cream cheese meets rich cocoa in a dessert that’ll make your taste buds dance with pure happiness.
Ingredients
Main Ingredients:
- 16 oz cream cheese
- 2 cups all-purpose flour
- 1 ½ cups sugar
- 1 cup sugar
- 1 cup buttermilk
- 2 cups heavy whipping cream
Supporting Ingredients:
- ½ cup unsalted butter
- ½ cup sour cream
- ¼ cup cocoa powder
Finishing Ingredients:
- 3 eggs
- 2 eggs
- 2 tablespoons red food coloring
- 1 teaspoon vanilla extract
- 1 teaspoon vanilla extract
- 1 teaspoon baking soda
- ½ teaspoon salt
- 1 teaspoon white vinegar
Instructions
- Prepare your springform pan by lining the bottom with parchment paper and heating the oven to 325°F.
- Using an electric mixer, blend 16 oz cream cheese and 1 cup sugar until completely smooth.
- Incorporate 3 eggs into the mixture one at a time, ensuring each is fully integrated before adding the next.
- Mix in 1 tsp vanilla extract and ½ cup sour cream until the cheesecake batter is uniform.
- Pour the batter into the prepared pan and bake for 40-45 minutes, watching for a set edge with a slight jiggle in the center.
- Remove the cheesecake from the oven and allow it to cool completely at room temperature.
- Preheat your oven to 350°F and prepare two 9-inch cake pans with grease and parchment.
- Sift together 2 cups flour, ¼ cup cocoa powder, 1 tsp baking soda, and ½ tsp salt in a medium bowl.
- In a separate large bowl, cream ½ cup unsalted butter and 1 ½ cups sugar until light and fluffy.
- Add 2 eggs to the butter mixture, then incorporate 1 cup buttermilk, 2 tsp vanilla extract, 2 tbsp red food coloring, and 1 tsp white vinegar.
- Gradually fold dry ingredients into the wet mixture, mixing until just combined.
- Divide the red velvet batter evenly between the two prepared pans and bake for 25-30 minutes.
- Let the cake layers cool completely, then trim the tops if needed to create even layers.
- Place one red velvet layer on your serving plate as the base.
- Carefully position the cooled cheesecake layer on top of the first cake layer.
- Add the second red velvet layer to complete the cake stack.
- Whip 2 cups heavy cream until stiff peaks form and spread evenly over the entire cake.
- Crumble any remaining red velvet cake trimmings and sprinkle on top for decoration.
- Refrigerate the assembled cake for at least 2 hours before serving to allow layers to set.
- Store your cake in the refrigerator, covered, for up to 4 days.
Notes
- Cream cheese should be at room temperature to ensure a smooth, lump-free cheesecake filling that blends perfectly.
- When adding eggs to the cheesecake batter, mix each one gently to prevent overbeating, which can cause cracks in the final dessert.
- For a gluten-free version, swap regular flour with a 1:1 gluten-free baking blend and use gluten-free cocoa powder.
- Avoid opening the oven during baking to prevent temperature fluctuations that can cause the cheesecake to sink or crack.
- Prep Time: 30 minutes
- Cook Time: 1 hour 5 minutes-1 hour 15 minutes
- Category: Cheesecakes
- Method: Baking
- Cuisine: American
Nutrition
- Serving Size: 12
- Calories: 425 kcal
- Sugar: 41 g
- Sodium: 270 mg
- Fat: 28 g
- Saturated Fat: 17 g
- Unsaturated Fat: 10 g
- Trans Fat: 0.5 g
- Carbohydrates: 36 g
- Fiber: 1 g
- Protein: 7 g
- Cholesterol: 110 mg
Madison Wyman
Recipe Developer & Food Storyteller
Expertise
Recipe Research and Adaptation, Food Writing and Cultural Storytelling, Sustainable and Ethical Sourcing, Dietary Adaptations (e.g., gluten-free, plant-based)
Education
Oregon Health & Science University
Portland Community College
Madison’s passion for flavor and culture ignited amidst the rich Southern cooking traditions of her upbringing, where cherished family recipes told delicious tales.
Armed with a Master’s in Food Systems and Society from Oregon Health & Science University and a Culinary Arts Certificate from Portland Community College, Madison truly excels at transforming rich, intricate flavors into dishes that are both approachable and heartfelt.
For her, cooking is a vibrant blend of science, art, and heritage – a powerful way to connect us to our roots and each other. Her recipes invite you to delve deeper, uncovering the fascinating stories woven into every ingredient.