
Tangy Lemon Cheesecake Squares Recipe for Dessert Lovers
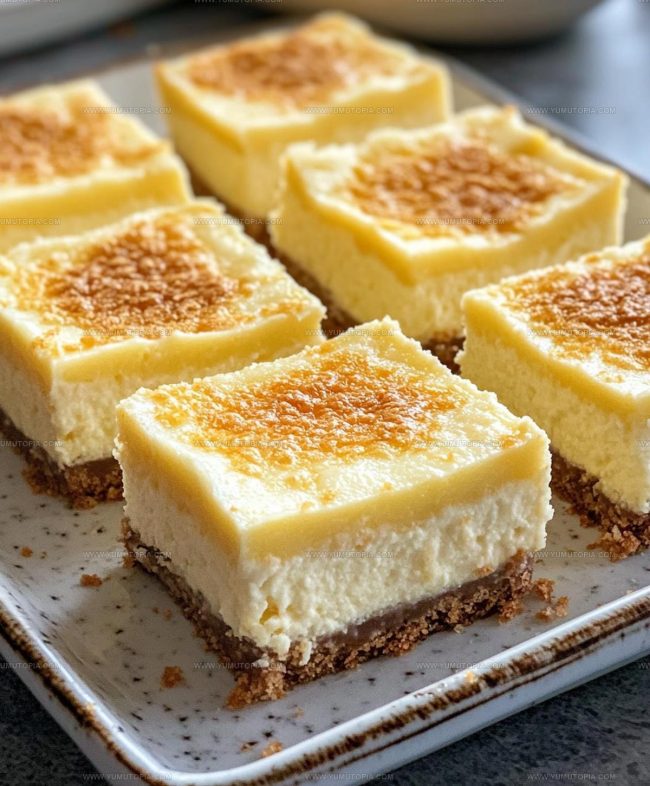
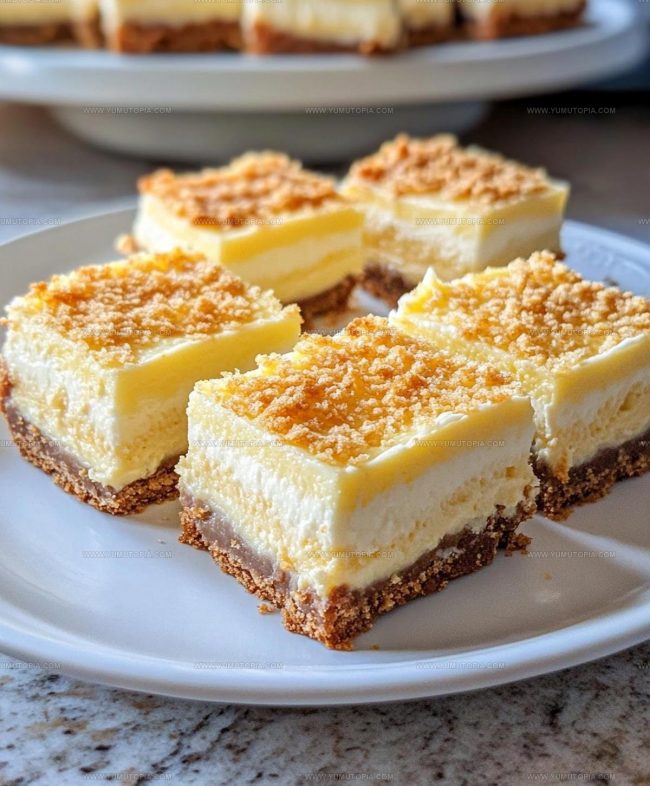
Lemon cheesecake squares deliver all the creamy, dreamy satisfaction of classic cheesecake in a convenient handheld form.
Smooth and luscious with a buttery base, they’re ideal for potlucks, bake sales, or simply treating yourself on a lazy afternoon.
The bright citrus flavor makes them feel refreshing yet indulgent at the same time.
Preparation is straightforward enough for beginners but impressive enough to earn compliments from everyone who takes a bite.
They slice cleanly into perfect portions, making serving a breeze when you need dessert for a crowd.
Room temperature or chilled, they maintain their silky texture and balanced sweetness.
Come see just how simple it is to bake up a pan of pure dessert perfection.
Standout Features Of Lemon Cheesecake Squares
Core Ingredients for Lemon Cheesecake Squares
Bottom Layer:Middle Layer:Top Layer:Prep Tools For Lemon Cheesecake Squares
Steps for Making Lemon Cheesecake Squares
Prepare the Baking Station
Crank up your oven to 350°F. Grab a 9×9-inch baking pan and give it a generous butter massage. Lay down a sheet of parchment paper to make your life easier later. This prep work is your foundation for delicious squares.
Create the Crumbly Crust
Let’s build that base layer with some serious flavor. Grab your mixing bowl and toss in:
Mix these until the mixture looks like sandy beach crumbs. Press this mixture firmly into your prepared pan. Slide it into the hot oven and bake for 15 minutes until it turns a soft golden color.
Craft the Creamy Middle Layer
Grab your mixer and beat the cream cheese until it’s smooth and dreamy. You’ll need:
Whip these together for about 3-4 minutes until super fluffy. Pour this creamy mixture over your warm crust.
Partial Baking Interlude
Return the pan to the 350°F oven for 10-15 minutes. You’re looking for a slight set on top – just enough to create a stable base for the next layer.
Create the Tangy Lemon Layer
Time to mix up some serious citrus magic. Whisk together:
Pour this bright mixture gently over the cream cheese layer. Try to keep things smooth and undisturbed.
Final Baking
Slide the pan back into the 350°F oven for 25-30 minutes. Watch for the center to set without any wobbling around.
Cooling and Chilling
Let the pan cool completely at room temperature. Then park it in the refrigerator for at least 3 hours – overnight works even better for developing those deep flavors.
Serve with Flair
When you’re ready to serve, slice into perfect squares. A light dusting of powdered sugar makes these look bakery-perfect. Each bite delivers a perfect balance of buttery crust, creamy middle, and zingy lemon top.
Kitchen Notes For Lemon Cheesecake Squares
Creamy Variations for Lemon Cheesecake Squares
Serving Notes For Lemon Cheesecake Squares
Best Storage Practices For Lemon Cheesecake Squares
Lemon Cheesecake Squares Helpful FAQs
Can I use bottled lemon juice instead of fresh?
Fresh lemon juice delivers the brightest flavor. Bottled works in a pinch, but your cheesecake will taste more vibrant with freshly squeezed juice.
How do I know when the layers are properly baked?
Each layer should look set but slightly soft. The cream cheese layer should look firm around edges but have a gentle jiggle in center. The lemon layer should not be liquid or overly wavy.
What if my cream cheese isn’t room temperature?
Cold cream cheese creates lumpy batter. Let cream cheese sit out for 30-45 minutes before starting to ensure smooth, creamy texture.
Can this recipe be made gluten-free?
Absolutely swap regular flour with gluten-free flour blend. The texture might change slightly, but the flavor remains delicious.
Why do I need cornstarch in the crust?
Cornstarch helps create a tender, crumbly crust that won’t get too hard or dense. It adds a delicate texture that complements the creamy filling.
How thin should the layers be?
Each layer should be relatively thin – about 1/4 to 1/2 inch thick. This ensures balanced flavor and perfect texture in every bite.
Lemon Cheesecake Squares Recipe
- Total Time: 3 hours 50 minutes to 4 hours 15 minutes
- Yield: 9 1x
Description
Fresh Lemon Cheesecake Squares bring zesty sunshine right to your dessert plate. Creamy, tangy slices deliver pure happiness with minimal effort and maximum flavor.
Ingredients
Base Layer:
- ½ cup salted butter
- 1 cup all-purpose flour
- ¼ cup cornstarch
- ¼ cup white sugar
- 2 tablespoons lemon zest
Cream Cheese Layer:
- 1 package (8 ounces) cream cheese
- ½ cup white sugar
- 1 egg
Lemon Layer:
- 4 extra-large eggs
- 1 ⅔ cups white sugar
- ⅔ cup all-purpose flour
- ⅔ cup lemon juice
Instructions
- Preheat the oven to 350°F. Coat a 9×9-inch baking pan with cooking spray and line the bottom with parchment paper, allowing excess to hang over the sides.
- Combine 1 cup flour, ¼ cup cornstarch, ¼ cup sugar, ½ cup butter, and 2 tablespoons lemon zest in a mixing bowl. Blend until the mixture resembles coarse crumbs.
- Press the crumbly mixture firmly into the prepared pan, creating an even bottom layer. Bake for exactly 15 minutes until the edges turn light golden.
- Remove the crust from the oven, but keep the oven temperature constant. Let the crust cool slightly while preparing the next layer.
- In a separate bowl, beat 8 ounces of softened cream cheese with ½ cup sugar for 3-4 minutes until completely smooth.
- Add 1 egg to the cream cheese mixture and blend until fully incorporated. Spread this layer gently over the warm crust.
- Return the pan to the oven and bake for 10-15 minutes until the cream cheese layer slightly sets.
- Whisk 4 extra-large eggs with 1⅔ cups sugar, ⅔ cup flour, and ⅔ cup fresh lemon juice until thoroughly combined.
- Carefully pour the lemon mixture over the cream cheese layer, trying not to disturb the previous layer.
- Bake for 25-30 minutes, watching for a set center that doesn’t jiggle when gently shaken.
- Allow the bars to cool completely at room temperature for approximately 1 hour.
- Refrigerate the pan for at least 3 hours or overnight to help the layers firm up completely.
- Use the parchment paper overhang to lift the entire dessert from the pan. Slice into 16 precise squares using a sharp knife.
- Optional: Dust the top with powdered sugar just before serving for a delicate finishing touch.
Notes
- Always use room temperature cream cheese to ensure a smooth, lump-free filling that blends perfectly.
- Zest your lemons before juicing them to capture maximum citrus flavor and brighten the entire dessert.
- Line your pan with parchment paper that hangs over the sides, making it super easy to lift and slice the squares cleanly.
- For a gluten-free version, swap regular flour with almond flour or a certified gluten-free baking blend to keep the same delicate texture.
- Prep Time: 10-15 minutes
- Cook Time: 50 minutes – 1 hour
- Category: Cheesecakes
- Method: Baking
- Cuisine: American
Nutrition
- Serving Size: 9
- Calories: 258
- Sugar: 23 g
- Sodium: 74 mg
- Fat: 13 g
- Saturated Fat: 7 g
- Unsaturated Fat: 6 g
- Trans Fat: 0.3 g
- Carbohydrates: 28 g
- Fiber: 0.5 g
- Protein: 5 g
- Cholesterol: 96 mg
Madison Wyman
Recipe Developer & Food Storyteller
Expertise
Recipe Research and Adaptation, Food Writing and Cultural Storytelling, Sustainable and Ethical Sourcing, Dietary Adaptations (e.g., gluten-free, plant-based)
Education
Oregon Health & Science University
Portland Community College
Madison’s passion for flavor and culture ignited amidst the rich Southern cooking traditions of her upbringing, where cherished family recipes told delicious tales.
Armed with a Master’s in Food Systems and Society from Oregon Health & Science University and a Culinary Arts Certificate from Portland Community College, Madison truly excels at transforming rich, intricate flavors into dishes that are both approachable and heartfelt.
For her, cooking is a vibrant blend of science, art, and heritage – a powerful way to connect us to our roots and each other. Her recipes invite you to delve deeper, uncovering the fascinating stories woven into every ingredient.