
Tangy Lemon Pie Bars Recipe For Summer Gatherings
Succulent lemon pie bars promise pure sunshine on a plate.
Bright, tangy flavors dance across a buttery crust that melts in your mouth.
Creamy dessert enthusiasts will adore this delightful sweet treat that balances tartness with rich smoothness.
Perfectly portable and impressive, these bars work magic for potlucks, picnics, or quiet afternoon indulgences.
Dessert lovers understand the magic of a dessert that feels simultaneously sophisticated and comforting.
Southern kitchens have long celebrated such simple yet spectacular sweets that spark joy with every single bite.
Serve these bars and watch smiles spread faster than summer sunshine.
Top Reasons To Try Lemon Pie Bars
Essential Ingredients For Lemon Pie Bars
Crust Ingredients:Filling Ingredients:Finishing Ingredient:Tools Used for Lemon Pie Bars
Preparation Steps for Lemon Pie Bars
Prepare the Oven and Pan
Set your oven to 350°F. Grab a 9×13-inch baking pan and give it a quick spray with cooking oil or line it with parchment paper. This will make sure your bars come out easily later.
Create the Crust Base
Grab a mixing bowl and toss in these ingredients:
Mix everything until the texture looks like chunky sand. Press this mixture firmly and evenly into your prepared pan. Slide the pan into the oven and bake for 15-20 minutes, watching for a golden-brown color.
Mix the Lemon Filling
While the crust bakes, whip up the filling in a separate bowl:
Whisk these ingredients until they’re super smooth and have a light, frothy texture.
Combine and Finish Baking
Once the crust looks golden, pull it out of the oven. Pour the lemony mixture evenly over the warm crust. Return the pan to the oven and bake for another 20 minutes. The filling should look set but still have a slight jiggle.
Cool and Serve
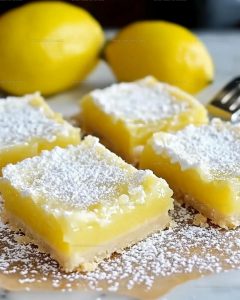
Let the bars cool completely in the pan. When they’re cool, dust the top with a sprinkle of confectioners’ sugar. Cut into squares or rectangles and serve. These bars are perfect for a sunny afternoon treat!
Key Notes For Lemon Pie Bars
Flavorful Options for Lemon Pie Bars
Simple Serving Ideas for Lemon Pie Bars
How To Store Lemon Pie Bars
Popular Questions On Lemon Pie Bars
Can I use bottled lemon juice instead of fresh lemons?
Fresh lemons provide the best flavor and zest, but bottled lemon juice will work in a pinch. Just avoid the concentrate versions, which can taste bitter.
How tart will these bars be?
The recipe balances sweet and tangy perfectly. If you prefer extra zesty bars, add an extra tablespoon of lemon juice or more zest.
What if my crust seems crumbly when pressing into the pan?
Warm your butter slightly and mix thoroughly. Press firmly and evenly with the back of a spoon to create a solid base.
Do I need a stand mixer for this recipe?
No! A regular whisk and mixing bowl work perfectly for combining ingredients smoothly.
Can these bars be frozen?
Absolutely – wrap tightly in plastic wrap and freeze for up to 3 weeks. Thaw overnight in the refrigerator before serving.
How do I know when the filling is set?
The edges will look slightly firm, and the center will have a gentle jiggle but not be liquidy when you gently shake the pan.
Lemon Pie Bars Recipe
- Total Time: 45-50 minutes
- Yield: 9 1x
Description
Lemon pie bars bring sunshine right to your dessert plate with a zesty, tangy twist that makes your taste buds dance. Buttery graham cracker crust and silky smooth lemon filling create a perfect balance of sweet and tart that disappears faster than you can slice them.
Ingredients
Main Ingredients:
- 4 eggs
- 1 ½ cups white sugar
- ½ cup lemon juice
- 1 cup butter (softened)
Supporting Ingredients:
- 2 ½ cups all-purpose flour
- 4 tablespoons all-purpose flour
- ½ cup confectioners’ sugar
Garnish/Flavor Enhancers:
- 1 tablespoon lemon zest
Instructions
- Prepare your workspace by preheating the oven to 350°F and positioning the rack in the center. Coat a 9×13-inch baking pan with non-stick spray or parchment paper.
- Combine 2 ½ cups flour and ½ cup confectioners’ sugar in a mixing bowl. Cut 1 cup softened butter into the dry ingredients until the texture resembles coarse breadcrumbs.
- Transfer the crumbly mixture into the prepared pan. Press firmly and evenly across the bottom to create a compact crust layer.
- Slide the crust into the 350°F oven and bake for 15-20 minutes until the edges turn a light golden brown. Remove and allow to cool for 5 minutes.
- Whisk 4 eggs in a separate large bowl until they become slightly frothy. Add 1 ½ cups white sugar, 4 tablespoons flour, ½ cup lemon juice, and 1 tablespoon lemon zest.
- Blend the lemon filling ingredients thoroughly until the mixture looks smooth and uniform in color.
- Carefully pour the lemon filling over the pre-baked crust, ensuring an even distribution across the surface.
- Return the pan to the 350°F oven and bake for an additional 20 minutes until the filling sets and appears slightly firm.
- Remove from the oven and let the bars cool completely at room temperature for approximately 1 hour.
- Dust the cooled bars generously with confectioners’ sugar using a fine mesh strainer. Cut into squares or rectangles before serving.
Notes
- Cold butter works best for creating a crumbly, flaky crust that holds together perfectly.
- Zest the lemons before juicing to capture maximum citrus flavor and brightness.
- Ensure the crust is completely cooled before adding the lemon filling to prevent sogginess and maintain a crisp texture.
- Store leftover bars in an airtight container in the refrigerator for up to 3 days, and the flavors will continue to develop deliciously.
- Prep Time: 10 minutes
- Cook Time: 35-40 minutes
- Category: Dessert Bars
- Method: Baking
- Cuisine: American
Nutrition
- Serving Size: 9
- Calories: 283 kcal
- Sugar: 26 g
- Sodium: 44 mg
- Fat: 14 g
- Saturated Fat: 8 g
- Unsaturated Fat: 5 g
- Trans Fat: 0.3 g
- Carbohydrates: 37 g
- Fiber: 0.4 g
- Protein: 3 g
- Cholesterol: 55 mg
Logan Lemaster
Founder & Culinary Innovator
Expertise
Recipe Development and Innovation, Menu Design and Optimization, Fine Dining Techniques, Ingredient Pairing and Flavor Science
Education
Metropolitan Culinary Arts Institute
Logan’s culinary journey kicked off in his vibrant Chicago family kitchen, where fresh, seasonal ingredients and bold flavors were always front and center.
After graduating from the Metropolitan Culinary Arts Institute in Arlington, Virginia, and honing his skills in renowned restaurants, Logan mastered the art of blending classic techniques with exciting, modern twists.
His kitchen is a dynamic lab for flavor exploration. Through Yum Utopia, Logan aims to empower you to cook with both confidence and creativity, turning simple ingredients into spectacular meals.