
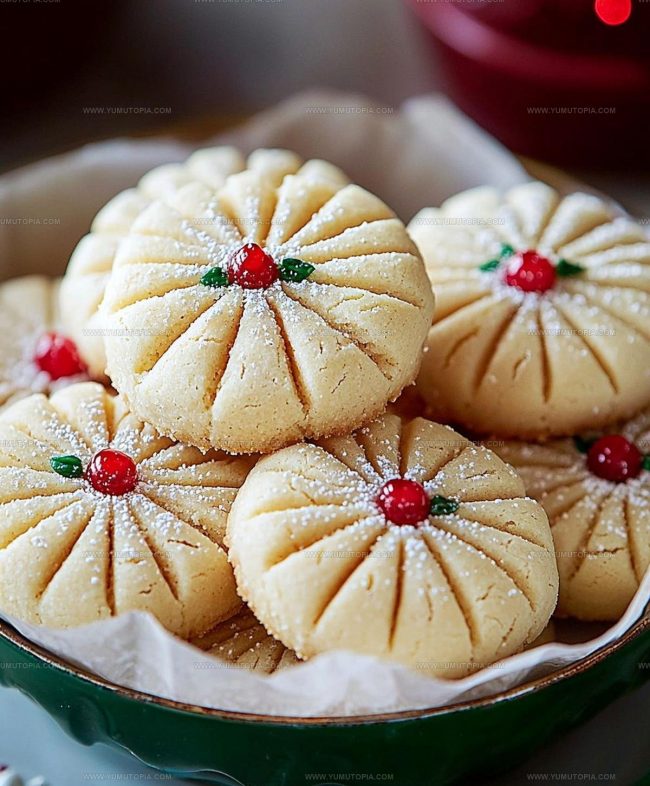
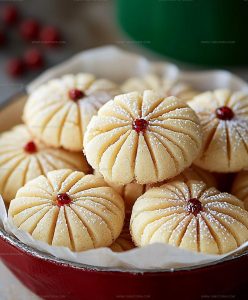
Buttery Whipped Shortbread Cookies Recipe for Teatime
Whipped shortbread cookies recipe offers pure joy to any gathering with its melt-in-your-mouth texture that feels like a celebration in every bite.
Buttery richness meets delicate crumbs in what many consider the ultimate treat for holiday tables, afternoon tea breaks, or casual weeknight desserts.
The light, airy quality sets them apart from ordinary baked goods and makes them surprisingly easy to enjoy by the handful.
Whether sharing with loved ones or keeping a tin stocked for yourself, there’s something special about how quickly they disappear from the plate.
They work beautifully for gift-giving when packed in decorative boxes, yet feel equally at home alongside a simple cup of coffee.
Simple enough for weeknight baking but impressive enough for special occasions, they strike that perfect balance.
Why Whipped Shortbread Cookies Never Go Out of Style
Ingredient Breakdown for Whipped Shortbread Cookies
What Tools Shape Whipped Shortbread Cookies
How to Whip Light Shortbread Cookies
Soften the Butter
Grab a large mixing bowl and toss in 1 cup (2 sticks) of unsalted butter. Let this creamy goodness get super soft and fluffy by beating it for 3-5 minutes on medium speed. Aim for a color that’s almost white and cloud-like. Don’t forget to scrape down the bowl’s sides to make sure everything mixes perfectly.
Sweeten the Butter
Slowly sprinkle in 1/2 cup of powdered sugar while mixing on low speed. Add it gently to avoid a powdery explosion in your kitchen. Keep mixing until the sugar blends smoothly into the butter.
Add Cornstarch Magic
Pour in 1/4 cup of cornstarch and mix on low speed. This secret ingredient helps create that melt-in-your-mouth texture that makes these cookies so special.
Prepare Dry Ingredients
In a separate bowl, whisk together:
Mix these dry ingredients until they’re perfectly combined.
Combine Wet and Dry
Gradually add your flour mixture to the butter mixture, about 1/2 cup at a time. Mix on low speed until everything just comes together. The dough will look crumbly at first, but don’t worry – it’ll start to form a cohesive mixture.
Optional Flavor Boost
If you’re feeling fancy, stir in 1 teaspoon of vanilla extract for an extra flavor kick.
Shape the Dough
Gently gather the dough and form it into a soft ball. The mixture will feel delicate, so handle it with care.
Chill Out
Wrap the dough in plastic wrap and let it hang out in the refrigerator for 30 minutes to 2 hours. This helps prevent spreading and makes the dough easier to work with.
Prep for Baking
Heat your oven to 325°F. Line a baking sheet with parchment paper to keep things clean and prevent sticking.
Shape Your Cookies
Roll out the chilled dough to 1/4-inch thickness, or pinch off small tablespoon-sized pieces and roll into balls. Place them about 1 inch apart on the baking sheet.
Optional Fork Design
Gently prick the tops of the cookies with a fork if you want that classic shortbread look.
Bake to Perfection
Slide the baking sheet into the oven and bake for 12-15 minutes. Look for lightly golden edges while keeping the centers pale.
Cool and Dust
Let the cookies cool on the baking sheet for a few minutes, then transfer to a wire rack. Once completely cool, dust generously with powdered sugar.
Serve and Savor
Plate up these delicate treats and enjoy with your favorite beverage. They’ll stay fresh in an airtight container for up to a week – if they last that long!
Helpful Tips for Whipped Shortbread Cookies
Classic Whipped Shortbread Cookie Variations
How Do You Serve Whipped Shortbread Cookies
How to Store Whipped Shortbread Cookies Light?
Whipped Shortbread Cookies Recipe FAQs
Why does my dough look crumbly when mixing?
Crumbly dough is totally normal! As you mix, the ingredients will gradually come together. Keep mixing gently, and the dough will form a cohesive ball.
Can I skip chilling the dough?
Chilling is crucial for preventing cookies from spreading too much. Cold dough helps the cookies maintain their shape and creates a better texture.
What if I dont have a stand mixer?
A hand mixer works perfectly fine. The key is to cream the butter until it’s light and fluffy, which takes about 3-5 minutes of mixing.
How do I know when the cookies are done baking?
Look for lightly golden brown edges while the center remains pale. The cookies should look set but not dark brown.
Can I add chocolate chips or nuts?
While traditional shortbread is simple, feel free to experiment with mix-ins. Just fold them in gently at the end of mixing to keep the delicate texture.
Why are my cookies hard instead of melt-in-your-mouth?
Overmixing the flour can make cookies tough. Mix just until the ingredients are combined, and be careful not to overwork the dough.
Melt-In-Your-Mouth Whipped Shortbread Cookies Recipe
- Total Time: 52-65 minutes
- Yield: 24 1x
Description
Whipped shortbread cookies melt into pure buttery bliss the moment they touch your tongue. Crumbly, delicate treats that disappear faster than you can bake them become the star of any holiday gathering.
Ingredients
Primary Ingredients:
- 2 cups all-purpose flour
- 1 cup unsalted butter
- ½ cup powdered sugar
Supporting Ingredients:
- ¼ cup cornstarch
- ¼ teaspoon salt
Flavor Enhancers:
- 1 teaspoon vanilla extract
Instructions
- Whip 1 cup softened unsalted butter in a large mixer bowl at medium speed for 3-5 minutes until the texture becomes light, airy, and almost white. Scrape your mixer’s bowl sides periodically to ensure even mixing.
- Gradually incorporate ½ cup powdered sugar into the whipped butter at low speed. Mix until the ingredients blend smoothly without creating a powdered sugar cloud.
- Add ¼ cup cornstarch to the butter mixture, blending on low speed until just combined. This ingredient helps create the signature melt-in-your-mouth shortbread texture.
- Separately whisk 2 cups all-purpose flour with ¼ teaspoon salt to distribute the salt evenly throughout the dry ingredients.
- Slowly introduce the flour mixture into the butter blend, adding about ½ cup at a time. Mix on low speed until ingredients barely combine. Your dough will look crumbly initially.
- Optional: Stir in 1 teaspoon vanilla extract if desired, mixing until just incorporated.
- Gently shape the delicate dough into a cohesive ball using your hands.
- Wrap the dough tightly in plastic wrap and refrigerate for 30-120 minutes. Chilling prevents excessive spreading during baking.
- Preheat your oven to 325F and line a baking sheet with parchment paper.
- Roll out the chilled dough to ¼-inch thickness on a lightly floured surface. Alternatively, pinch off 1-tablespoon portions and roll into balls.
- Place cookie shapes 1 inch apart on the prepared baking sheet. Consider using a fork to create gentle surface pricks for traditional appearance.
- Bake for 12-15 minutes at 325F, watching for lightly golden edges while maintaining a pale center.
- Allow cookies to rest on the baking sheet for several minutes before transferring to a wire rack for complete cooling.
- Once fully cooled, dust generously with additional powdered sugar using a sifter or small strainer.
- Store your shortbread in an airtight container at room temperature for up to one week.
Notes
- Cream butter thoroughly for the lightest, airiest texture possible, which takes patience and a solid 3-5 minutes of mixing.
- Chilling the dough is crucial for preventing spread and ensuring perfectly shaped cookies that hold their form during baking.
- Handle the delicate dough gently to maintain its soft, crumbly consistency without developing tough gluten.
- Customize the recipe by adding different extracts like almond or adding finely chopped nuts for extra flavor and texture variation.
- Prep Time: 40-50 minutes
- Cook Time: 12-15 minutes
- Category: Cookies
- Method: Baking
- Cuisine: Scottish
Nutrition
- Serving Size: 24
- Calories: 117
- Sugar: 3 g
- Sodium: 17 mg
- Fat: 8 g
- Saturated Fat: 5 g
- Unsaturated Fat: 3 g
- Trans Fat: 0 g
- Carbohydrates: 12 g
- Fiber: 0 g
- Protein: 1 g
- Cholesterol: 20 mg
Logan Lemaster
Founder & Culinary Innovator
Expertise
Recipe Development and Innovation, Menu Design and Optimization, Fine Dining Techniques, Ingredient Pairing and Flavor Science
Education
Metropolitan Culinary Arts Institute
Logan’s culinary journey kicked off in his vibrant Chicago family kitchen, where fresh, seasonal ingredients and bold flavors were always front and center.
After graduating from the Metropolitan Culinary Arts Institute in Arlington, Virginia, and honing his skills in renowned restaurants, Logan mastered the art of blending classic techniques with exciting, modern twists.
His kitchen is a dynamic lab for flavor exploration. Through Yum Utopia, Logan aims to empower you to cook with both confidence and creativity, turning simple ingredients into spectacular meals.