Recipe for Layered Mille Crepe Cake with Silky Cream
Mille crepe cake recipe provides the elegance of French patisserie right into any home kitchen with layers upon layers of delicate perfection.
This stunning dessert has won hearts across the world for its beautiful presentation and melt-in-mouth texture that feels luxurious yet surprisingly approachable.
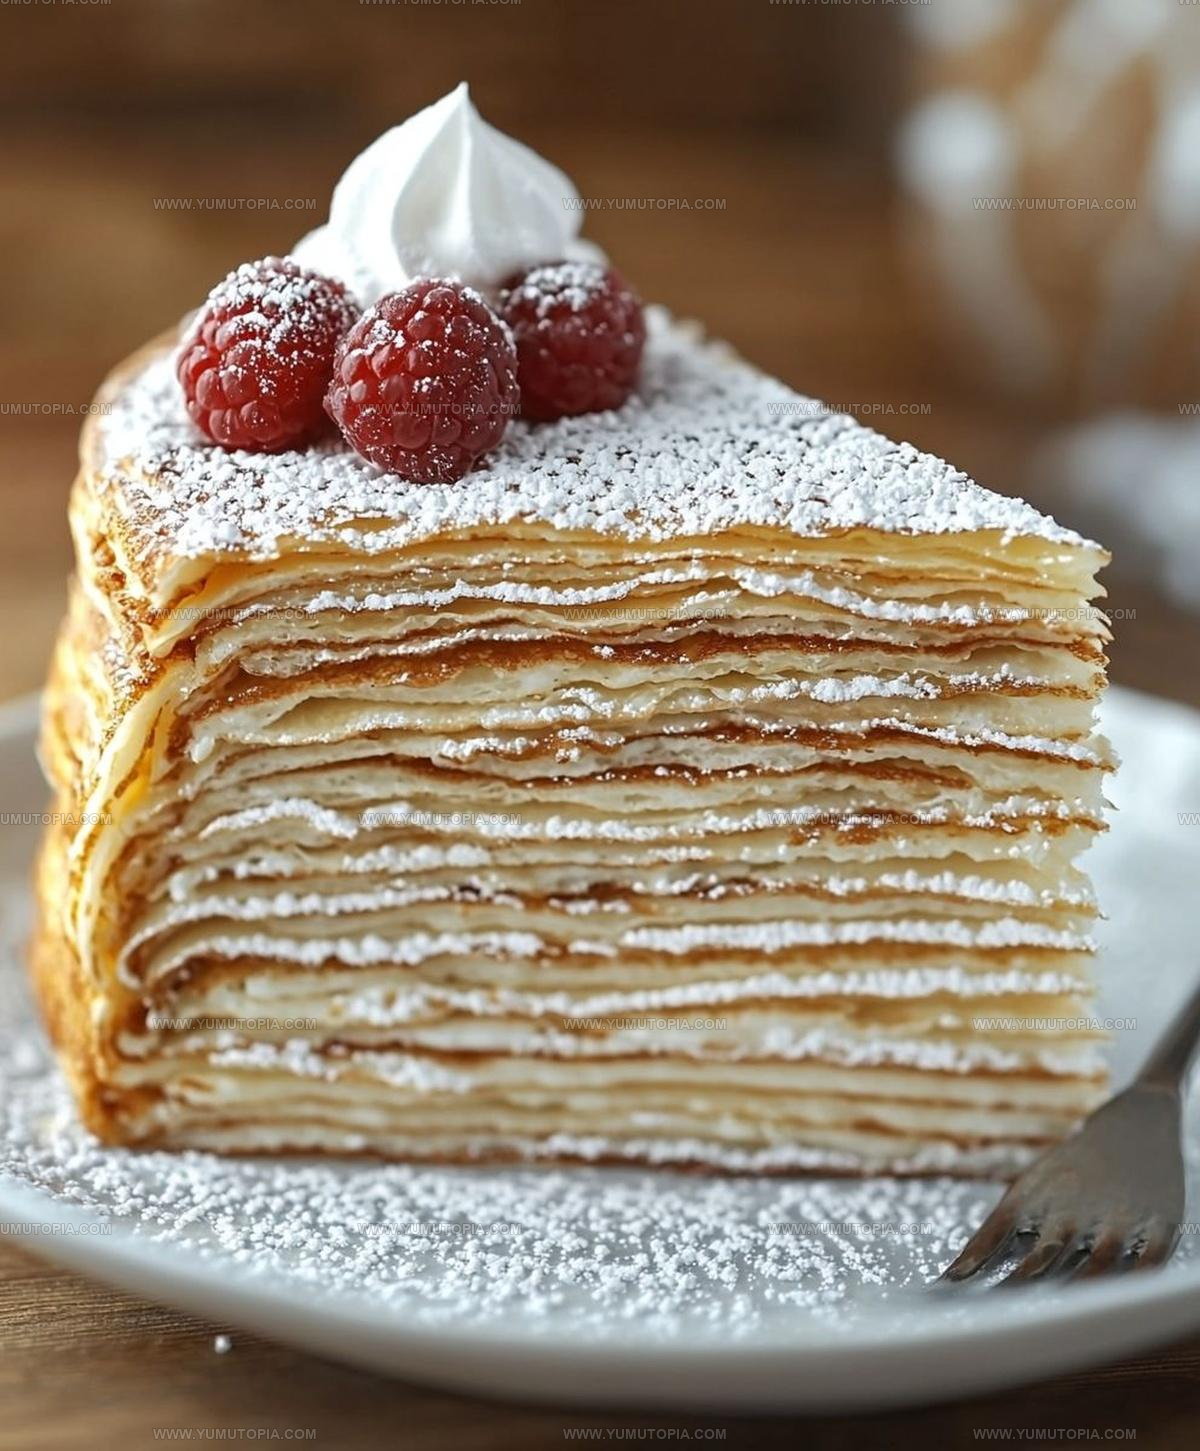
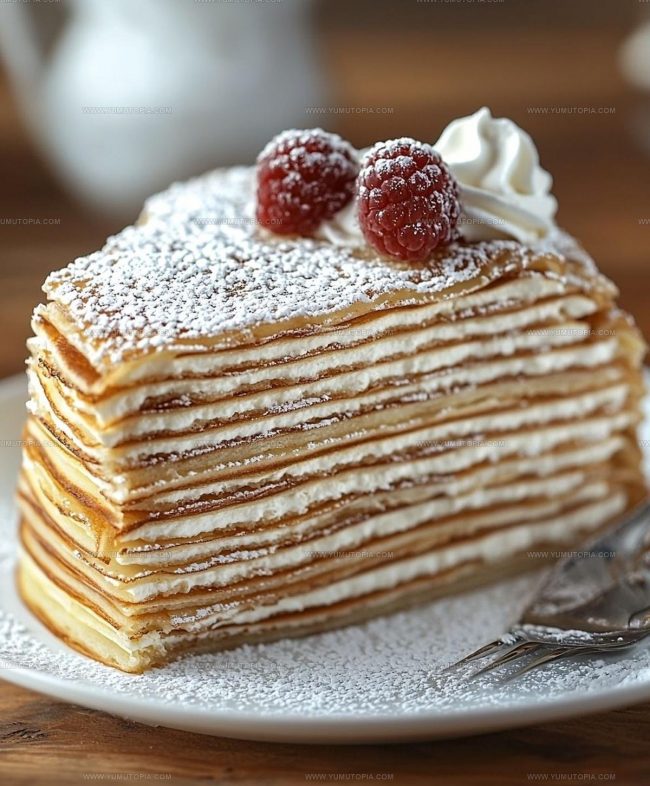
Every slice reveals dozens of paper-thin layers stacked with silky cream, creating a visual masterpiece that impresses at celebrations or quiet afternoons alike.
What makes it special is the way each forkful delivers a harmonious bite where soft, tender layers meet smooth filling in perfect balance.
Whether for birthdays, holidays, or simply treating loved ones to something extraordinary, few desserts command attention quite like this one.
This is one of those recipes that turns a regular gathering into a memorable occasion worth savoring.
Celebration-Worthy Reasons to Try Mille Crepe Cake
Ingredient Breakdown for Mille Crepe Cake
Crepe Ingredients:Pastry Cream Ingredients:Finishing Ingredients:Tools Needed to Layer Mille Crepe Cake
Step by Step Instructions for Making Mille Crepe Cake
Mix Dry Base
Grab a big mixing bowl and toss in 2 cups of all-purpose flour, 1/4 cup granulated sugar, and 1/4 teaspoon salt. Whisk these together until they’re completely blended and look like a smooth, pale mixture.
Create Batter Liquid
In another bowl, crack 6 large eggs and pour in 3 cups whole milk. Add 6 tablespoons melted butter that’s cooled down and 1 teaspoon vanilla extract. Whisk everything until it looks smooth and well combined.
Combine Crepe Mix
Slowly pour the liquid ingredients into the dry ingredients. Whisk gently but steadily, making sure you don’t beat too hard. Your goal is a smooth batter without any lumps.
Rest Batter
Cover your crepe batter with plastic wrap and slide it into the refrigerator. Let it chill for 30 minutes to 2 hours. This helps the flour absorb the liquid and makes your crepes more tender.
Prepare Cooking Surface
Grab an 8-inch non-stick pan and lightly grease it with butter or cooking spray. Heat the pan over medium heat until it’s ready for cooking.
Cook First Crepe
Pour 1/4 cup of batter into the hot pan. Quickly tilt and swirl the pan so the batter spreads into a thin, even circle. Cook for 1-2 minutes until the edges look slightly lifted and the bottom turns golden brown.
Flip and Finish Crepe
Carefully flip the crepe with a thin spatula. Cook the second side for 30-60 seconds until it’s also lightly golden. Transfer to a plate lined with parchment paper.
Complete Crepe Stack
Keep making crepes until you’ve used all the batter. You should end up with 20-25 delicate crepes. Stack them between parchment paper sheets to prevent sticking.
Infuse Milk
In a saucepan, combine 2 cups whole milk and vanilla bean seeds. Heat to just simmering, then remove from heat and let sit for 30 minutes to develop rich flavor.
Prepare Cream Base
In a separate bowl, whisk together:
Beat until the mixture looks pale and thick.
Create Pastry Cream
Slowly pour 1/2 cup hot milk into the egg mixture, whisking constantly. Pour this back into the milk pan and cook over medium heat, stirring until it thickens and boils. Keep whisking for 1-2 minutes.
Finish Cream
Remove from heat and stir in:
Pour into a clean bowl and cover surface with plastic wrap. Refrigerate for at least 2 hours.
Optional Cream Boost
If you want richer cream, whip 1/4 cup heavy cream to soft peaks and fold gently into the cooled pastry cream.
Build Cake Layers
Place a crepe on your serving plate and spread a thin, even layer of pastry cream over the surface.
Top with another crepe and repeat the process, alternating crepes and cream, until all layers are stacked.
Chill the Crepe Cake
Cover the assembled cake tightly with plastic wrap and refrigerate for 4–12 hours. This resting time allows the layers to set and makes slicing clean and easy.
Finish and Serve
Just before serving, dust the top generously with powdered sugar. Slice into wedges using a sharp knife and serve immediately.
Baking Notes That Matter for Mille Crepe Cake
Mille Crepe Cake Variations to Stack
Elegant Slices of Mille Crepe Cake
How to Store Mille Crepe Cake Without Drying?
Frequently Asked Questions for Mille Crepe Cake
What makes this crepe cake different from regular crepes?
This French-style cake layers dozens of delicate, paper-thin crepes with smooth pastry cream, creating an elegant dessert that’s far more sophisticated than a traditional crepe.
Do I need special equipment to make this cake?
A non-stick crepe pan helps, but a regular skillet works fine. The key is having a pan that allows you to create thin, even crepes without sticking.
How difficult is it to master crepe-making technique?
With practice, your crepe-flipping skills will improve. Start by using a gentle wrist motion to swirl batter and a thin spatula to flip. Don’t worry if your first few aren’t perfect.
Can I prepare components ahead of time?
Absolutely! Make the crepe batter and pastry cream a day in advance. This actually helps the flavors develop and makes assembly easier.
What’s the trick to getting ultra-thin crepes?
Keep your batter cold, use a light touch when pouring, and immediately swirl the pan to spread batter evenly. A thin, consistent layer is the secret to beautiful crepes.
How far in advance can I make this cake?
Assemble the cake up to two days before serving. Keep it refrigerated and dust with powdered sugar just before presenting.

Mille Crepe Cake Recipe
- Total Time: 4 hours 30 minutes
- Yield: 8 1x
Description
Marie’s classic French Mille Crepe Cake weaves delicate layers of thin crepes into a dreamy dessert that melts smoothly across your palate. Silky pastry cream nestled between golden crepes creates an elegant treat perfect for special celebrations.
Ingredients
Main Ingredients:
- 6 large eggs
- 3 cups whole milk
- 2 cups whole milk
- 2 cups all-purpose flour
- 6 large egg yolks
Supporting Ingredients:
- 1 cup granulated sugar
- 6 tablespoons unsalted butter, melted and cooled
- 2 tablespoons unsalted butter
- 1 teaspoon vanilla extract
- 1 vanilla bean, split lengthwise and seeds scraped
Finishing Ingredients:
- ¼ teaspoon salt
- ¼ cup cornstarch
- ¼ cup heavy cream
- Powdered sugar
Instructions
- Sift the flour, sugar, and salt into a spacious mixing bowl, ensuring a uniform blend without any lumpy sections.
- Whisk milk, eggs, melted butter, and vanilla extract in a separate container until the mixture appears smooth and fully integrated.
- Gradually stream the liquid ingredients into the dry mixture, stirring constantly to create a silky, lump-free batter.
- Refrigerate the batter for 30-120 minutes, allowing the gluten to relax and the ingredients to meld.
- Heat an 8-inch non-stick skillet over medium temperature (around 350°F), lightly coating the surface with cooking spray.
- Pour exactly ¼ cup of batter into the heated pan, quickly rotating to spread a thin, even layer that covers the entire surface.
- Cook each crepe for 1-2 minutes until the edges lift slightly and the bottom turns golden brown.
- Flip the crepe carefully and cook an additional 30-60 seconds on the reverse side.
- Transfer each finished crepe to a parchment-lined plate, stacking with protective paper between layers.
- Combine milk and vanilla bean in a saucepan, heating until it reaches a gentle simmer.
- Remove the milk from heat, cover, and let the vanilla infuse for 30 minutes.
- Whisk 6 egg yolks with ¾ cup sugar until the mixture becomes pale and slightly thickened.
- Incorporate ¼ cup cornstarch into the egg mixture, mixing until completely smooth.
- Slowly stream ½ cup of hot milk into the egg mixture, whisking vigorously to prevent scrambling.
- Return the tempered mixture to the saucepan, cooking over medium heat and stirring constantly.
- Continue cooking for 1-2 minutes after the mixture reaches a boil, ensuring the cornstarch is fully cooked.
- Remove from heat and stir in 2 tablespoons of butter and additional vanilla extract.
- Transfer the pastry cream to a clean bowl, cover the surface with plastic wrap, and refrigerate for at least 2 hours.
- Optional: Whip ¼ cup heavy cream to soft peaks and fold gently into the cooled pastry cream.
- Place the first crepe on a serving plate and spread a thin layer of pastry cream.
- Continue layering crepes and cream, ensuring each layer is evenly distributed.
- Cover the cake with plastic wrap and refrigerate for 4-12 hours to set.
- Before serving, dust the top generously with powdered sugar.
- Slice into wedges using a sharp knife and serve immediately.
Notes
- Let the crepe batter rest in the refrigerator to help the gluten relax, ensuring tender and thin crepes that won’t tear easily.
- When cooking crepes, use a non-stick pan and control the heat to prevent burning, tilting the pan quickly to spread batter evenly.
- For a gluten-free version, substitute all-purpose flour with a gluten-free blend or almond flour, which adds a subtle nutty flavor.
- Whip the pastry cream carefully and avoid overbeating to maintain a smooth, silky texture that spreads beautifully between crepe layers.
- Prep Time: 3 hours 30 minutes
- Cook Time: 1 hour
- Category: Cakes
- Method: Sautéing
- Cuisine: French
Nutrition
- Serving Size: 8
- Calories: 337 kcal
- Sugar: 17 g
- Sodium: 95 mg
- Fat: 18 g
- Saturated Fat: 10 g
- Unsaturated Fat: 7 g
- Trans Fat: 0.3 g
- Carbohydrates: 32 g
- Fiber: 1 g
- Protein: 8 g
- Cholesterol: 170 mg
Logan Lemaster
Founder & Culinary Innovator
Expertise
Recipe Development and Innovation, Menu Design and Optimization, Fine Dining Techniques, Ingredient Pairing and Flavor Science
Education
Metropolitan Culinary Arts Institute
Logan’s culinary journey kicked off in his vibrant Chicago family kitchen, where fresh, seasonal ingredients and bold flavors were always front and center.
After graduating from the Metropolitan Culinary Arts Institute in Arlington, Virginia, and honing his skills in renowned restaurants, Logan mastered the art of blending classic techniques with exciting, modern twists.
His kitchen is a dynamic lab for flavor exploration. Through Yum Utopia, Logan aims to empower you to cook with both confidence and creativity, turning simple ingredients into spectacular meals.