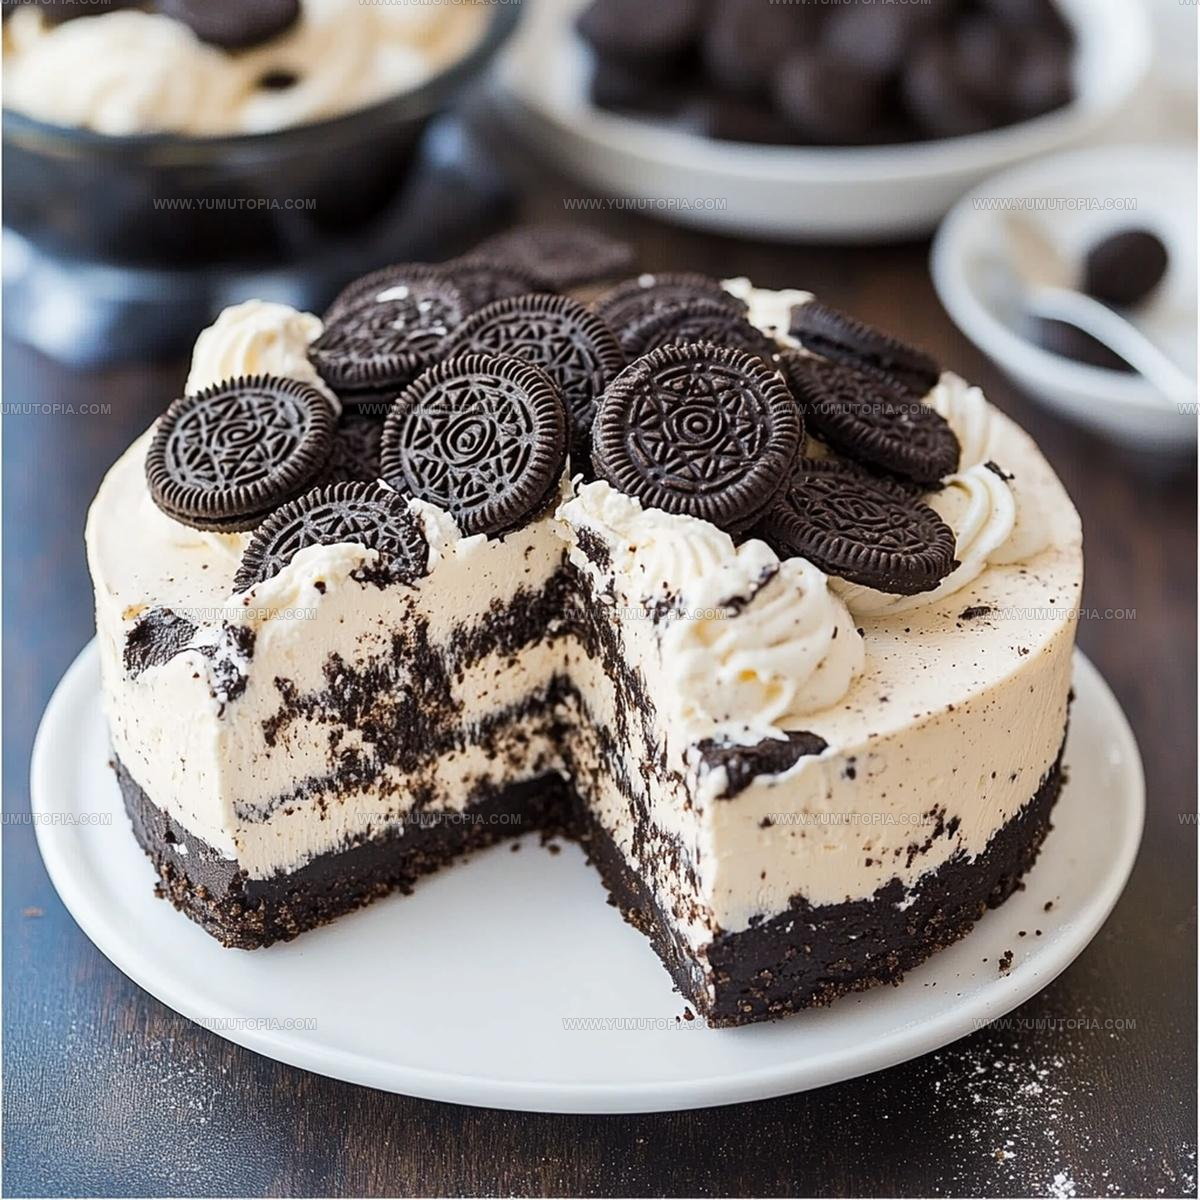
No Bake Oreo Cheesecake Recipe Everyone Adores
No Bake Oreo Cheesecake Recipe is one of those desserts that feels like pure comfort in every bite.
The combination of creamy filling and crunchy cookie crust creates a contrast that’s simply irresistible.
What makes it so appealing is how effortlessly elegant it looks while requiring minimal effort in the kitchen.
You can serve it at summer gatherings when turning on the oven seems unbearable, or save it for special celebrations when you want something impressive without the stress.
It’s rich enough to satisfy serious sweet cravings but light enough that you won’t feel weighed down.
Every slice delivers that perfect balance of sweetness and texture that keeps everyone coming back for seconds.
Why You Should Try No Bake Oreo Cheesecake
Full Ingredient Breakdown for No-Bake Oreo Cheesecake
Crust Ingredients:Filling Ingredients:Garnish Ingredients:Refrigeration Time: Chill for 5-6 hours or overnight to set the cheesecake perfectly.
Best Tools for No Bake Oreo Cheesecake
Easy Chilling Method for Oreo Cheesecake
Prepare Crust
Take 25 Oreo cookies and pulse them in a food processor until they become fine crumbs. Drizzle in 1/4 cup melted butter and pulse until the mixture clumps together. Press this chocolatey mixture firmly into the bottom of a 9-inch springform pan, making sure to create an even layer that slightly climbs up the sides.
Melt Chocolate
Grab a microwave-safe bowl and combine 1/2 cup white chocolate chips with 1/4 cup heavy cream. Zap in 20-second bursts, stirring between each interval, until the mixture becomes silky smooth. Set this gorgeous chocolate mixture aside to cool slightly.
Cream the Cheese
Grab your electric mixer and beat 24 oz of softened cream cheese until it’s completely smooth. Add 1 1/2 cups powdered sugar and the melted white chocolate mixture. Mix until everything blends together perfectly.
Whip the Cream
Pour in the remaining 1 cup of heavy cream and start mixing on low speed. Once combined, crank up the mixer to high and whip for 3-4 minutes until the mixture becomes light and fluffy.
Add Oreo Crunch
Take 20 Oreo cookies and crush them in a zip-top bag using a rolling pin. Gently fold these crumbled cookies into the creamy cheesecake mixture, creating delightful chocolate chunks throughout.
Fill and Chill
Spread the Oreo-studded filling evenly over the crust, making sure to create a smooth top. Cover the pan and park it in the refrigerator for 5-6 hours, or better yet, let it sit overnight to set completely.
Garnish and Serve
Before serving, crush the remaining 5 Oreo cookies and sprinkle them over the top of the cheesecake. Slice into this decadent dessert and watch everyone’s eyes light up with excitement.
What Helpful Cooking Notes Improve No-Bake Oreo Cheesecake
No-Bake Oreo Cheesecake Flavor Spins
Easy Ways to Serve No Bake Oreo Cheesecake
Best Storage Practices For No Bake Oreo Cheesecake
No Bake Oreo Cheesecake Common Questions Answered
Can I use reduced-fat Oreos for the crust and filling?
Absolutely! Reduced-fat Oreos work perfectly and won’t change the overall texture or taste of your cheesecake.
What if my white chocolate chips won’t melt smoothly?
Ensure your cream is room temperature and microwave in short bursts, stirring between each interval. If chunks remain, add a touch more cream and continue stirring.
Do I need a stand mixer for this recipe?
No, a standard hand mixer works great. Just make sure your cream cheese is fully softened before beating to avoid lumps.
Can this cheesecake be frozen?
Yes, wrap the cheesecake tightly in plastic wrap and aluminum foil. It will keep well in the freezer for up to one month. Thaw overnight in the refrigerator before serving.
How do I know when the filling is properly whipped?
The mixture should look thick and hold soft peaks when you lift the beaters. It should feel sturdy but not dry.
What happens if I don’t let the cheesecake set long enough?
The filling won’t be firm and will be too soft to slice cleanly. Always allow the minimum 5-6 hours of chilling time.

No Bake Oreo Cheesecake Recipe
- Total Time: 6 hours
- Yield: 12 1x
Description
No Bake Oreo Cheesecake brings pure creamy bliss right to your dessert table with minimal kitchen effort. Crushing cookies, blending cream cheese, and chilling this crowd-pleaser means delicious rewards without turning on your oven.
Ingredients
Main Ingredients:
- 24 oz cream cheese, softened
- 50 Oreo cookies
- 1 ½ cups powdered sugar
Supporting Ingredients:
- 1 ¼ cup heavy whipping cream
- ½ cup white chocolate chips
Binding/Preparation Ingredients:
- ¼ cup melted butter
Instructions
- Pulverize 25 Oreo cookies with ¼ cup melted butter in a food processor until the mixture becomes a cohesive, smooth texture.
- Transfer the cookie crumb mixture into a 9-inch springform pan, pressing firmly across the bottom and slightly up the sides to create an even, compact crust.
- Combine ½ cup white chocolate chips with ¼ cup heavy cream in a microwave-safe bowl, heating in 20-second bursts and stirring between each interval until completely melted and silky.
- Grab a large mixing bowl and beat 24 oz softened cream cheese using an electric mixer until achieving a smooth, creamy consistency.
- Add 1 ½ cups powdered sugar and the melted white chocolate mixture to the cream cheese, blending thoroughly until fully incorporated.
- Gradually pour the remaining 1 cup heavy cream into the mixture, starting on low speed and then increasing to high, whipping for 3-4 minutes until the mixture becomes thick and airy.
- Crush 20 Oreo cookies inside a large zip-top bag using a rolling pin, then gently fold the crumbled cookies into the cheesecake mixture.
- Spread the entire filling evenly across the prepared Oreo crust, ensuring a smooth surface.
- Cover the springform pan and refrigerate for 5-6 hours, preferably overnight, allowing the cheesecake to set completely.
- Before serving, sprinkle the reserved 5 crushed Oreo cookies on top as a decorative garnish.
Notes
- Crush Oreo cookies completely to ensure a smooth, even crust that holds together perfectly without crumbling.
- When melting white chocolate, stir frequently and avoid overheating to prevent seizing or burning the chocolate.
- For the creamiest texture, make sure cream cheese is fully softened at room temperature before mixing to eliminate lumps.
- If dairy is a concern, swap regular cream cheese for lactose-free versions and use dairy-free white chocolate chips to make this dessert accessible for those with dietary restrictions.
- Prep Time: 6 hours
- Cook Time: 0 minutes
- Category: Cheesecakes
- Method: Blending
- Cuisine: American
Nutrition
- Serving Size: 12
- Calories: 435 kcal
- Sugar: 36 g
- Sodium: 150 mg
- Fat: 29 g
- Saturated Fat: 17 g
- Unsaturated Fat: 10 g
- Trans Fat: 0.5 g
- Carbohydrates: 34 g
- Fiber: 1 g
- Protein: 6 g
- Cholesterol: 80 mg
Logan Lemaster
Founder & Culinary Innovator
Expertise
Recipe Development and Innovation, Menu Design and Optimization, Fine Dining Techniques, Ingredient Pairing and Flavor Science
Education
Metropolitan Culinary Arts Institute
Logan’s culinary journey kicked off in his vibrant Chicago family kitchen, where fresh, seasonal ingredients and bold flavors were always front and center.
After graduating from the Metropolitan Culinary Arts Institute in Arlington, Virginia, and honing his skills in renowned restaurants, Logan mastered the art of blending classic techniques with exciting, modern twists.
His kitchen is a dynamic lab for flavor exploration. Through Yum Utopia, Logan aims to empower you to cook with both confidence and creativity, turning simple ingredients into spectacular meals.