
No Oven Stovetop Bread Recipe Made at Home
No Oven Stovetop Bread recipe provides homemade baking within reach when ovens aren’t available or summer heat makes them impractical.
Soft, warm bread can emerge from a simple skillet on any cooktop, making fresh loaves accessible in apartments, RVs, or during power outages.
The process feels approachable and rewarding, filling kitchens with comforting aromas while keeping temperatures manageable.
Flatbreads and risen doughs alike adapt beautifully to stovetop cooking, producing golden crusts and tender interiors that rival traditional baked goods.
Minimal equipment and straightforward techniques mean anyone can produce satisfying results without special tools or extensive experience.
The versatility suits busy weeknights, camping adventures, or moments when something freshly made would complete a meal perfectly.
Learning stovetop methods opens doors to consistent bread-making year-round, regardless of kitchen setup.
What Makes No-Oven Stovetop Bread So Handy
Essential Ingredients for No Oven Stovetop Bread
Dry Ingredients:Liquid Ingredient:Kitchen Tools for Stovetop Bread
Simple Steps For Stovetop Bread
Mix Dry Ingredients
Grab a large mixing bowl and toss in 2 cups all-purpose flour. Sprinkle in 1 teaspoon salt, 1 tablespoon sugar, and 1 tablespoon baking powder. Give everything a good stir so the dry ingredients are evenly distributed.
Create Dough
Pour 1 cup water into the flour mixture. Start mixing with your hands until a soft dough forms. Keep kneading until the texture feels smooth and everything comes together nicely.
Shape Dough Balls
Pinch off small sections of dough and roll them into cute little balls. Aim for about 6-8 small rounds that are roughly the same size.
Flatten Dough
Place each dough ball on your clean countertop. Use your palm or a rolling pin to gently press and flatten each ball into a thin disc, about 1/4 inch thick.
Prepare Skillet
Set a skillet on the stovetop and turn the heat to medium (around 350°F). Let the pan warm up for a minute or two before cooking.
Cook Bread Discs
Carefully place the flattened dough discs into the heated skillet. Cook for 5 minutes on the first side until you see light golden spots appearing. Flip and cook the other side for another 5 minutes until both sides are nicely browned.
Serve and Enjoy
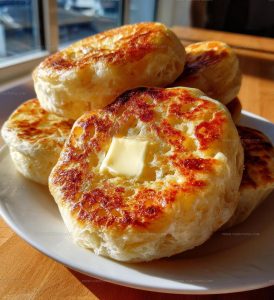
Transfer your freshly cooked bread discs to a plate. These are best served warm and can be enjoyed with butter, jam, or just as they are.
Smart Cooking Tips For Stovetop Bread
Stovetop Bread Without An Oven With Texture Tweaks
How To Serve No-Oven Stovetop Bread Warm
No Oven Stovetop Bread Storage Tips
No-Oven Stovetop Bread Questions Answered
What if the dough feels too dry?
Add water one tablespoon at a time and keep kneading until the texture becomes smooth and elastic.
Can I make this bread without sugar?
Yes, the sugar helps with browning, but you can skip it without affecting the bread’s basic structure.
How thick should I roll out the dough discs?
Aim for about 1/4 inch thick – thin enough to cook quickly but not so thin that they become crispy.
Do I need any special equipment to make this bread?
A standard skillet and mixing bowl are all you need – no fancy tools required.
What if my bread turns out too dense?
Make sure to knead the dough thoroughly and let it rest for a few minutes before forming balls to help develop gluten.
Can I add herbs or spices to the dough?
Absolutely! Dried herbs like rosemary or oregano mix in perfectly during the initial dry ingredient stage.
No Oven Stovetop Bread Recipe
- Total Time: 20 minutes
- Yield: 4 1x
Description
Stovetop Bread whips up in just half an hour, giving your kitchen a delicious aroma without firing up the oven. Grab some basic ingredients and watch your skillet create a warm, crusty companion perfect for soaking up soups or enjoying with a pat of butter.
Ingredients
Main Ingredients:
- 2 cups all-purpose flour
- 1 cup water
Supporting Ingredients:
- 1 tablespoon sugar
- 1 tablespoon baking powder
- 1 teaspoon salt
Instructions
- Combine 2 cups flour, 1 teaspoon salt, 1 tablespoon sugar, and 1 tablespoon baking powder in a mixing bowl, creating a dry ingredient base for your quick bread.
- Pour 1 cup water into the flour mixture, stirring gradually to form a cohesive dough that pulls away from the bowl’s sides.
- Knead the dough gently on a clean surface for 2-3 minutes until smooth and elastic.
- Separate the dough into 6-8 equal portions, rolling each into a compact ball.
- Using your palm, press each ball into a flat disc about ¼ inch thick.
- Warm a skillet over medium heat (350°F) for 2-3 minutes, ensuring an even cooking surface.
- Place a dough disc into the heated skillet, cooking for 3-4 minutes until the bottom develops golden-brown spots.
- Flip the bread and cook the opposite side for an additional 3-4 minutes, watching for similar golden coloration.
- Transfer the cooked bread to a cooling rack, allowing excess heat to dissipate before serving.
Notes
- Knead the dough thoroughly to develop gluten and create a soft, stretchy texture for your bread.
- Let the dough rest for 10 minutes after mixing to help it become more elastic and easier to shape.
- Use a well-seasoned cast-iron skillet or non-stick pan to prevent sticking and achieve an even golden-brown crust.
- Experiment with adding herbs like rosemary or garlic powder to the dough for extra flavor and variety in your quick stovetop bread.
- Prep Time: 10 minutes
- Cook Time: 10 minutes
- Category: Breads
- Method: Frying
- Cuisine: American
Nutrition
- Serving Size: 4
- Calories: 167 kcal
- Sugar: 2.5 g
- Sodium: 295 mg
- Fat: 0.4 g
- Saturated Fat: 0.1 g
- Unsaturated Fat: 0.3 g
- Trans Fat: 0 g
- Carbohydrates: 36 g
- Fiber: 1 g
- Protein: 4.5 g
- Cholesterol: 0 mg
Madison Wyman
Recipe Developer & Food Storyteller
Expertise
Recipe Research and Adaptation, Food Writing and Cultural Storytelling, Sustainable and Ethical Sourcing, Dietary Adaptations (e.g., gluten-free, plant-based)
Education
Oregon Health & Science University
Portland Community College
Madison’s passion for flavor and culture ignited amidst the rich Southern cooking traditions of her upbringing, where cherished family recipes told delicious tales.
Armed with a Master’s in Food Systems and Society from Oregon Health & Science University and a Culinary Arts Certificate from Portland Community College, Madison truly excels at transforming rich, intricate flavors into dishes that are both approachable and heartfelt.
For her, cooking is a vibrant blend of science, art, and heritage – a powerful way to connect us to our roots and each other. Her recipes invite you to delve deeper, uncovering the fascinating stories woven into every ingredient.