
No-Bake Orange Creamsicle Cheesecake Recipe for Summer Dessert Lovers
No-Bake Orange Creamsicle Cheesecake Recipe provides back those carefree summer memories of chasing down the ice cream truck on hot afternoons.
Sweet citrus paired with smooth creaminess creates a dessert that feels both refreshing and indulgent at the same time.
What makes it even better is how simple the process becomes when you skip the oven entirely.
The bright, sunny flavors work beautifully for birthday celebrations, backyard barbecues, or just because Tuesday needs something special.
Every bite delivers that nostalgic flavor combination that everyone seems to love, regardless of age or occasion.
The contrast between the creamy filling and the crunchy base creates an addictive texture profile that keeps forks coming back for more.
When you serve this at gatherings, expect empty plates and requests for seconds.
Go on and give yourself permission to make something fun, easy, and absolutely delicious.
Reasons Orange Creamsicle Cheesecake Is Nostalgic
What You’ll Need for Orange Creamsicle Cheesecake
Crust Ingredients:Cheesecake Filling Ingredients:Topping Ingredients:What Tools Are Used for No-Bake Orange Creamsicle Cheesecake
How to Make No Bake Orange Creamsicle Cheesecake

Crush the Cracker Base
Grab a medium bowl and mix together graham cracker crumbs for 1 ½ cups, melted unsalted butter at ½ cup, granulated sugar at ¼ cup, and vanilla extract at 1 teaspoon. Stir until the mixture looks like damp sand that would be perfect for a tiny beach.
Pack Down the Crust
Press the cracker mixture firmly into the bottom of a 9-inch springform pan. Use the back of a measuring cup to create a smooth, compact layer that will hold your cheesecake perfectly.
Chill the Crust
Slide the pan into the refrigerator while preparing the filling. This helps your crust set up nicely and stay solid.
Whip the Cream Cheese
Grab your electric mixer and beat the softened cream cheese for 2-3 minutes until it’s super smooth. Make sure no lumpy bits remain.
Sweeten the Mixture
Add powdered sugar and continue mixing until everything blends together beautifully.
Whip the Cream
In a separate bowl, whip the heavy cream until it forms stiff peaks. This usually takes about 3-5 minutes with an electric mixer.
Combine Cream and Cheese
Gently fold the whipped cream into the cream cheese mixture. Start with a small amount to lighten things up, then blend in the rest.
Prepare Gelatin (Optional)
Sprinkle the gelatin over cold water and let it sit for 5 minutes. Zap it in the microwave for 10-15 seconds until dissolved, then let it cool slightly.
Add Orange Flavor
Stir in the orange ingredients:
Fold everything together until smooth and creamy.
Fill the Crust
Pour the cheesecake filling over the chilled crust. Spread it evenly with a spatula and tap the pan to remove any air bubbles.
Refrigerate and Set
Cover the cheesecake and refrigerate for at least 4 hours or overnight. The longer it chills, the better the flavors develop.
Top and Serve
Prepare the topping by whipping 1 cup heavy cream with:
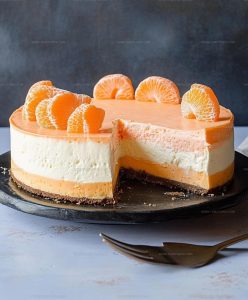
Remove the springform pan sides and spread the whipped cream on top. Garnish with orange slices or extra zest if you’re feeling fancy.
Which Tips Improve No Bake Orange Creamsicle Cheesecake
No-Bake Orange Creamsicle Cheesecake Flavor Options
How to Present No-Bake Orange Creamsicle Cheesecake
Storage Tips for No Bake Orange Creamsicle Cheesecake
No-Bake Orange Creamsicle Cheesecake FAQ
Can I use a different type of citrus for this recipe?
Orange zest and juice create the signature creamsicle flavor, but you could substitute tangerine or mandarin for a similar bright taste.
Do I really need gelatin for this cheesecake?
Gelatin helps stabilize the filling and create a firmer texture, but it’s optional. Without gelatin, your cheesecake might be slightly softer but still delicious.
What if my cream cheese isn’t completely smooth?
Ensure cream cheese is at room temperature and beat it thoroughly. If small lumps remain, gently warm the mixture or use a hand mixer to blend completely.
How can I tell if my whipped cream is at stiff peak stage?
When you lift the beater, the cream should stand up in firm, pointed peaks without flopping over. Stop mixing as soon as this happens to avoid grainy texture.
Can I make this cheesecake ahead of time?
Absolutely! This dessert actually tastes better when chilled overnight, allowing flavors to develop and firm up perfectly.
No-Bake Orange Creamsicle Cheesecake Recipe
- Total Time: 25 minutes
- Yield: 8 1x
Description
No Bake Orange Creamsicle Cheesecake brings summer memories right to your dessert table with zero oven time and maximum flavor. Creamy orange-infused goodness blends smoothly into a graham cracker crust that makes your taste buds dance with refreshing delight.
Ingredients
Main Ingredients:
- 16 oz cream cheese
- 1 cup orange juice
- 1 ½ cups graham cracker crumbs
- 1 cup heavy whipping cream
- 1 cup powdered sugar
- ½ cup unsalted butter
Supporting Ingredients:
- 1 zest of orange
- 1 teaspoon vanilla extract
- ¼ cup granulated sugar
Stabilizing Ingredients:
- 1 tablespoon unflavored gelatin
- 2 tablespoons cold water
- 1 cup whipped cream
- 1 orange slice or zest for garnish
Instructions
- Mix 1½ cups graham cracker crumbs, ½ cup melted unsalted butter, ¼ cup granulated sugar, and 1 teaspoon vanilla extract in a medium bowl until the mixture resembles wet sand.
- Press the crumb mixture firmly into the bottom of a 9-inch springform pan, creating a compact and even layer using the back of a measuring cup or your fingers.
- Refrigerate the crust for 15-20 minutes while preparing the filling to help it set firmly.
- Beat 16 oz softened cream cheese in a large bowl with an electric mixer at medium speed for 2-3 minutes until completely smooth and lump-free.
- Add 1 cup powdered sugar to the cream cheese and mix until fully incorporated, scraping down the bowl’s sides.
- Whip 1 cup heavy cream in a separate bowl for 3-5 minutes until stiff peaks form, being careful not to over-mix.
- Gently fold the whipped cream into the cream cheese mixture using a spatula, maintaining a light and airy texture.
- Sprinkle 1 tablespoon gelatin over 2 tablespoons cold water and let sit for 5 minutes. Microwave for 10-15 seconds until dissolved, then cool slightly.
- Incorporate 1 cup orange juice and zest of 1 orange into the cream cheese mixture, adding the dissolved gelatin and folding until smooth.
- Pour the filling over the chilled crust, spreading evenly and tapping the pan to remove air bubbles.
- Refrigerate the cheesecake for 4-6 hours or overnight, ensuring it sets completely and flavors develop.
- Before serving, top with 1 cup whipped cream, spreading it evenly across the surface.
- Garnish with fresh orange slices or additional orange zest for a decorative finish.
Notes
- Ensure cream cheese is completely softened at room temperature to avoid lumps and achieve a smooth, creamy texture.
- For a gluten-free version, swap graham cracker crumbs with crushed gluten-free cookies or almond flour.
- Zest the orange before juicing to maximize flavor and make the most of your citrus fruit.
- Refrigerate the cheesecake for at least 6 hours, as overnight chilling develops a deeper, more harmonious orange flavor.
- Prep Time: 20-25 minutes
- Cook Time: 0 minutes
- Category: Cheesecakes
- Method: Chilling
- Cuisine: American
Nutrition
- Serving Size: 8
- Calories: 359 kcal
- Sugar: 32 g
- Sodium: 210 mg
- Fat: 27 g
- Saturated Fat: 17 g
- Unsaturated Fat: 9 g
- Trans Fat: 0.5 g
- Carbohydrates: 22 g
- Fiber: 1 g
- Protein: 4 g
- Cholesterol: 75 mg
Logan Lemaster
Founder & Culinary Innovator
Expertise
Recipe Development and Innovation, Menu Design and Optimization, Fine Dining Techniques, Ingredient Pairing and Flavor Science
Education
Metropolitan Culinary Arts Institute
Logan’s culinary journey kicked off in his vibrant Chicago family kitchen, where fresh, seasonal ingredients and bold flavors were always front and center.
After graduating from the Metropolitan Culinary Arts Institute in Arlington, Virginia, and honing his skills in renowned restaurants, Logan mastered the art of blending classic techniques with exciting, modern twists.
His kitchen is a dynamic lab for flavor exploration. Through Yum Utopia, Logan aims to empower you to cook with both confidence and creativity, turning simple ingredients into spectacular meals.