
Creamy Oreo Icebox Cake Recipe to Make at Home
Oreo Icebox Cake recipe ties together convenience and impressive results in one no-bake dessert that feels almost too good to be true.
Layers of chocolate cookies soften into something resembling cake while cream turns into a luscious filling between each tier.
What makes this dessert so appealing is how little effort produces such a stunning finish, making it ideal for warm weather when turning on the oven sounds unbearable.
The contrast between creamy and chocolatey creates a balance that satisfies without overwhelming, and the flavor only improves as everything melds together in the refrigerator.
Everyone from chocolate lovers to casual dessert fans finds something to appreciate in its simplicity and taste.
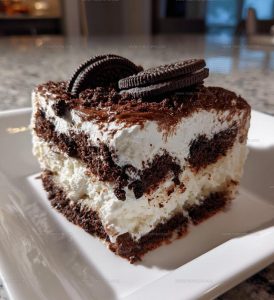
Serving a slice reveals beautiful horizontal lines that look bakery-made despite the minimal work involved.
When you need a crowd-pleasing dessert that won’t keep you in the kitchen for hours, this one serves up every time.
Why You’ll Love Oreo Icebox Cake Simplicity
All Ingredients Needed for Oreo Icebox Cake
Main Cookies:Dairy Components:Essential Tools for Oreo Icebox Cake
No Bake Instructions For Oreo Icebox Cake
Prep the Dish
Grab your 9×13 inch baking dish and have it ready to go. This is where the magic happens for your cool dessert.
Milk Dip
Pour the 1/2 cup of milk into a shallow bowl. Quickly dunk each Oreo cookie from your 2 packages into the milk – just a super fast splash to get them slightly soft. Don’t soak them or they’ll fall apart.
First Cookie Layer
Create the first base layer by placing the milk-dipped cookies across the bottom of the dish. Make sure they’re snug and cover the entire surface.
Whipped Cream Coverage
Time to add some creamy goodness! Spread 1 cup of whipped cream evenly over those cookies. Use a spatula to make a smooth, even layer.
Repeat the Layers
Keep building your dessert by repeating the process:
Continue this pattern until you’ve used all your cookies and most of the whipped cream.
Final Cream Topping
Finish with a generous layer of the remaining whipped cream across the top, making sure it looks smooth and even.
Chill and Wait
Pop the dish into the refrigerator for at least 4 hours, but overnight is even better. This lets the cookies soften and the flavors blend perfectly.
Useful Cooking Tips For Oreo Icebox Cake
Oreo Icebox Cake With Layer Variations
Best Ways To Serve Oreo Icebox Cake
Oreo Icebox Cake Storage Instructions
Oreo Icebox Cake Questions Answered
Can I use reduced-fat Oreos?
Yes, the recipe works great with any Oreo variety, so feel free to choose your favorite.
Do the cookies need to be completely covered in milk?
No, just a quick dip is perfect. Too much milk will make the cookies soggy and fall apart.
How long does this dessert last in the refrigerator?
After assembling, the icebox cake stays fresh for 2-3 days when stored in an airtight container.
Can children help make this dessert?
Absolutely! Kids can help dip cookies and spread whipped cream, making it a fun family activity.
What if I don’t have a 9×13 dish?
Any similar-sized rectangular or square baking dish will work just fine for this recipe.
Is whole milk better than low-fat milk for dipping?
Any milk works, so use what you have in your refrigerator.
Oreo Icebox Cake Recipe
- Total Time: 15 minutes
- Yield: 8 1x
Description
Smooth Oreo Icebox Cake becomes your ultimate summer cool-down treat, layering creamy goodness with chocolate cookie crunch. Refrigerate this simple dessert for a few hours, and watch pure deliciousness emerge when your friends dig into this cool classic.
Ingredients
Main Ingredients:
- 2 packages Oreo cookies
- 4 cups whipped cream
Supporting Ingredients:
- ½ cup milk
Instructions
- Grab a 9×13 inch baking dish and have it ready for layering your delicious icebox cake.
- Pour ½ cup of milk into a shallow bowl for dipping your cookies.
- Quickly dunk each Oreo cookie into the milk, ensuring a light coating without making them too soggy.
- Arrange the milk-dipped cookies in a single, tight layer across the bottom of the baking dish.
- Spread 1 cup of whipped cream evenly over the cookie layer, covering every inch to create a smooth surface.
- Repeat the dipping and layering process with another set of Oreo cookies, creating a second cookie layer.
- Continue alternating between cookie and whipped cream layers until you have used all 2 packages of Oreo cookies.
- Top the final layer with the remaining 1 cup of whipped cream, making sure to cover the entire surface.
- Cover the dish with plastic wrap and place in the refrigerator for exactly 4 hours or overnight to allow the cookies to soften.
- Remove from the refrigerator 10 minutes before serving to let the icebox cake slightly come to room temperature.
Notes
- Dip Oreos quickly in milk to prevent sogginess, aiming for a light coating that softens the cookie without falling apart.
- For a smoother texture, use an electric mixer to whip cream until stiff peaks form, ensuring a stable and fluffy layer between cookies.
- Crush a few extra Oreos to sprinkle on top for added crunch and visual appeal, creating a delightful textural contrast.
- To make this dessert gluten-free, swap regular Oreos for gluten-free chocolate sandwich cookies and ensure your whipped cream is dairy-free if needed.
- Prep Time: 15 minutes
- Cook Time: 0 minutes
- Category: Cakes
- Method: Chilling
- Cuisine: American
Nutrition
- Serving Size: 8
- Calories: 357
- Sugar: 33 g
- Sodium: 163 mg
- Fat: 20 g
- Saturated Fat: 13 g
- Unsaturated Fat: 6 g
- Trans Fat: 0.2 g
- Carbohydrates: 39 g
- Fiber: 1.5 g
- Protein: 3 g
- Cholesterol: 45 mg
Madison Wyman
Recipe Developer & Food Storyteller
Expertise
Recipe Research and Adaptation, Food Writing and Cultural Storytelling, Sustainable and Ethical Sourcing, Dietary Adaptations (e.g., gluten-free, plant-based)
Education
Oregon Health & Science University
Portland Community College
Madison’s passion for flavor and culture ignited amidst the rich Southern cooking traditions of her upbringing, where cherished family recipes told delicious tales.
Armed with a Master’s in Food Systems and Society from Oregon Health & Science University and a Culinary Arts Certificate from Portland Community College, Madison truly excels at transforming rich, intricate flavors into dishes that are both approachable and heartfelt.
For her, cooking is a vibrant blend of science, art, and heritage – a powerful way to connect us to our roots and each other. Her recipes invite you to delve deeper, uncovering the fascinating stories woven into every ingredient.