
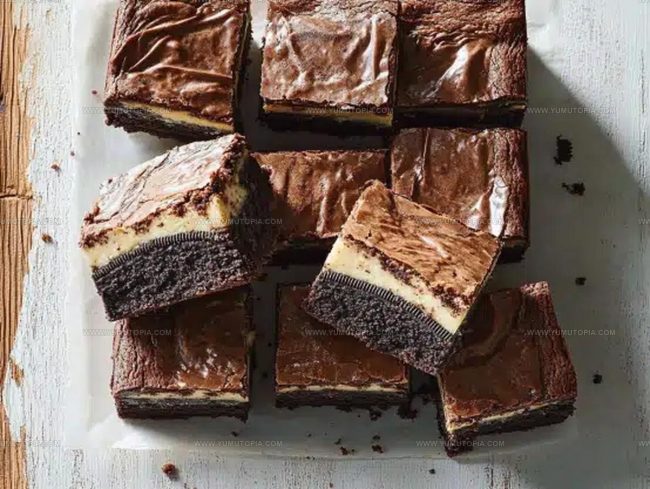
Cookie Dough Oreo Brownies Recipe That Combines Three Desserts
Cookie Dough Oreo Brownies are the dessert that makes every chocolate lover’s heart skip a beat.
Rich fudgy layers meet creamy indulgence in a treat so decadent it feels like pure celebration on a plate.
The combination creates something truly special – one of those desserts that disappears from the pan before you even realize what happened.
Everyone always asks for seconds, and honestly, who can blame them when each bite captures such an incredible experience?
Perfect for parties, potlucks, or whenever you need something impressive without spending hours in the kitchen, this recipe captures big on flavor and even bigger on satisfaction.
You won’t find a simpler way to create something so utterly crowd-pleasing.
How Cookie Dough Oreo Brownies Successfully Push the Boundaries of Dessert
Fudgy Brownie Batter Cookie Dough and Oreo Layers Combined
Bakeware and Tools for Building Oreo Brownies
Steps to Engineering the Perfect Cookie Dough Oreo Brownie Layers
Prepare the Baking Pan
Preheat your oven to 350°F (175°C). Grab an 8×8-inch baking pan and line it with parchment paper. Lightly grease the paper to make sure nothing sticks.
Mix Brownie Batter
Grab a mixing bowl and whisk together 1/2 cup (113g) melted butter and 1 cup (200g) granulated sugar until smooth.
Crack in 2 large eggs and add 1 teaspoon vanilla extract, mixing thoroughly. Stir in your dry ingredients:
Mix until everything is just combined.
Prepare Oreo Layer
Pour the brownie batter into your prepared pan, spreading it evenly. Arrange 16 Oreo cookies in a single layer across the top, gently pressing them down into the batter.
Bake the Brownies
Slide the pan into the preheated oven and bake for 20-25 minutes. Check doneness by inserting a toothpick – it should come out with a few moist crumbs.
Let the brownies cool completely before moving to the next step.
Treat the Flour
To make the cookie dough safe, heat-treat your flour. Spread 1 cup (125g) of flour on a baking sheet and bake at 350°F (175°C) for 5 minutes. Let it cool completely.
Make Cookie Dough Topping
In a clean bowl, beat together:
Beat until fluffy. Mix in 1 teaspoon vanilla extract, 1/4 teaspoon salt, and 2 tablespoons milk.
Stir in the cooled heat-treated flour. Fold in 1/2 cup (90g) mini chocolate chips.
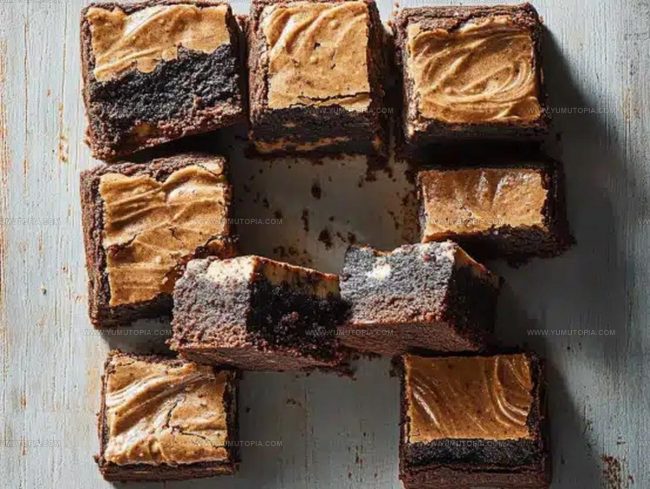
Add Cookie Dough Layer
Spread the cookie dough evenly over the cooled brownies and Oreo layer. Use a spatula to smooth the top.
Chill and Serve
Refrigerate the brownies for at least 30 minutes to firm up. Slice into squares and serve chilled.
Set Time Tips for Clean Layers and Chewy Centers
Decadent Hybrid Modifications For Oreo Brownies
Decadent Hybrid Dessert Layouts For Oreo Brownies
Decadent Dessert Square Longevity Protocols For Brownies
Everything You Need to Know for These Decadent Brownies
Can I use regular chocolate chips instead of mini chips?
Absolutely! Regular chocolate chips work perfectly fine. The mini chips just distribute more evenly across the cookie dough layer, but your brownies will still taste amazing with standard chips.
Do I really need to heat-treat the flour?
Yes, heating flour is crucial to eliminate potential bacteria and make the raw cookie dough layer safe to eat. Skipping this step could lead to foodborne illness.
What if I don’t have an 8×8-inch pan?
An equivalent 9-inch square pan works well, but your brownies might be slightly thinner. Just adjust baking time and watch carefully to prevent overcooking.
Can I freeze these brownies?
Definitely! Wrap them tightly in plastic wrap, then place in a freezer bag. They’ll stay delicious for up to 3 months. Thaw in the refrigerator overnight before serving.
How do I know when the brownies are perfectly baked?
Look for moist crumbs on a toothpick inserted into the center. The edges should be set, but the middle should still look slightly underbaked – that’s the secret to fudgy brownies.
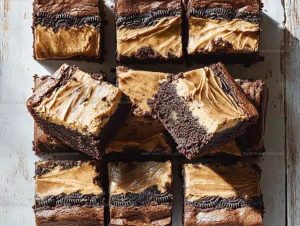
Oreo-Layered Cookie Dough Brownies Recipe
- Total Time: 50 minutes
- Yield: 9 1x
Description
Whipping up cookie dough Oreo brownies brings pure chocolate happiness right to your kitchen countertop. Rich brownie layers combined with creamy cookie dough create a delightful dessert that sparks pure joy for anyone craving something seriously sweet.
Ingredients
Main Ingredients:
- 2 large eggs
- 1 cup (200g) granulated sugar
- ½ cup (113g) unsalted butter, melted
- ½ cup (113g) unsalted butter, softened
- ½ cup (100g) brown sugar
- 1 cup (125g) all-purpose flour (heat-treated)
- 1 cup (125g) all-purpose flour
Supporting Ingredients:
- ½ cup (60g) all-purpose flour
- ½ cup (90g) mini chocolate chips
- 16 Oreo cookies
Seasonings and Flavor Enhancers:
- ¼ cup (50g) granulated sugar
- ⅓ cup (30g) unsweetened cocoa powder
- 2 tablespoons milk
- 1 teaspoon vanilla extract
- 1 teaspoon vanilla extract
- ¼ teaspoon salt
- ¼ teaspoon salt
- ¼ teaspoon baking powder
Instructions
- Warm your oven to 350°F (175°C) and prepare an 8×8-inch pan by lining it with parchment paper, then lightly coating with cooking spray.
- Combine 12 cup (113g) melted butter and 1 cup (200g) granulated sugar in a mixing bowl, whisking until the mixture looks smooth and glossy.
- Crack 2 large eggs into the butter mixture, then pour in 1 teaspoon vanilla extract. Blend thoroughly until everything is well incorporated.
- Sift 12 cup (60g) all-purpose flour, 13 cup (30g) cocoa powder, 14 teaspoon salt, and 14 teaspoon baking powder into the wet ingredients. Stir gently until just combined.
- Transfer the brownie batter into your prepared pan, spreading it evenly across the surface.
- Create a single layer of 16 Oreo cookies across the batter, pressing them slightly into the mixture.
- Slide the pan into the preheated oven and bake for 20-25 minutes, checking that a toothpick inserted comes out with moist crumbs.
- Remove the brownies and let them cool completely at room temperature.
- Heat-treat your 1 cup (125g) flour by microwaving in 30-second intervals until it reaches 165°F (75°C), stirring between each interval.
- In a separate bowl, cream 12 cup (113g) softened butter with 12 cup (100g) brown sugar and 14 cup (50g) granulated sugar until light and fluffy.
- Add 1 teaspoon vanilla extract, 14 teaspoon salt, and 2 tablespoons milk to the butter mixture. Mix thoroughly.
- Fold the heat-treated flour into the mixture until smooth, then gently incorporate 12 cup (90g) mini chocolate chips.
- Spread the cookie dough evenly over the cooled brownie and Oreo layer, smoothing the top with a spatula.
- Chill the pan in the refrigerator for at least 30 minutes to help the layers set.
- Slice into squares and serve chilled.
Notes
- Always heat-treat flour to kill potential bacteria, ensuring safe raw cookie dough consumption.
- Use room temperature butter and eggs for smoother, more evenly mixed batter that creates better texture.
- For gluten-free version, swap regular flour with a cup-for-cup gluten-free flour blend in both brownie and cookie dough layers.
- When cutting brownies, clean your knife between slices with a hot, damp cloth for neat, precise edges.
- Prep Time: 20 minutes
- Cook Time: 30 minutes
- Category: Brownies
- Method: Baking
- Cuisine: American
Nutrition
- Serving Size: 9
- Calories: 347 kcal
- Sugar: 25 g
- Sodium: 110 mg
- Fat: 22 g
- Saturated Fat: 13 g
- Unsaturated Fat: 8 g
- Trans Fat: 0.3 g
- Carbohydrates: 36 g
- Fiber: 2 g
- Protein: 3 g
- Cholesterol: 45 mg
Madison Wyman
Recipe Developer & Food Storyteller
Expertise
Recipe Research and Adaptation, Food Writing and Cultural Storytelling, Sustainable and Ethical Sourcing, Dietary Adaptations (e.g., gluten-free, plant-based)
Education
Oregon Health & Science University
Portland Community College
Madison’s passion for flavor and culture ignited amidst the rich Southern cooking traditions of her upbringing, where cherished family recipes told delicious tales.
Armed with a Master’s in Food Systems and Society from Oregon Health & Science University and a Culinary Arts Certificate from Portland Community College, Madison truly excels at transforming rich, intricate flavors into dishes that are both approachable and heartfelt.
For her, cooking is a vibrant blend of science, art, and heritage – a powerful way to connect us to our roots and each other. Her recipes invite you to delve deeper, uncovering the fascinating stories woven into every ingredient.