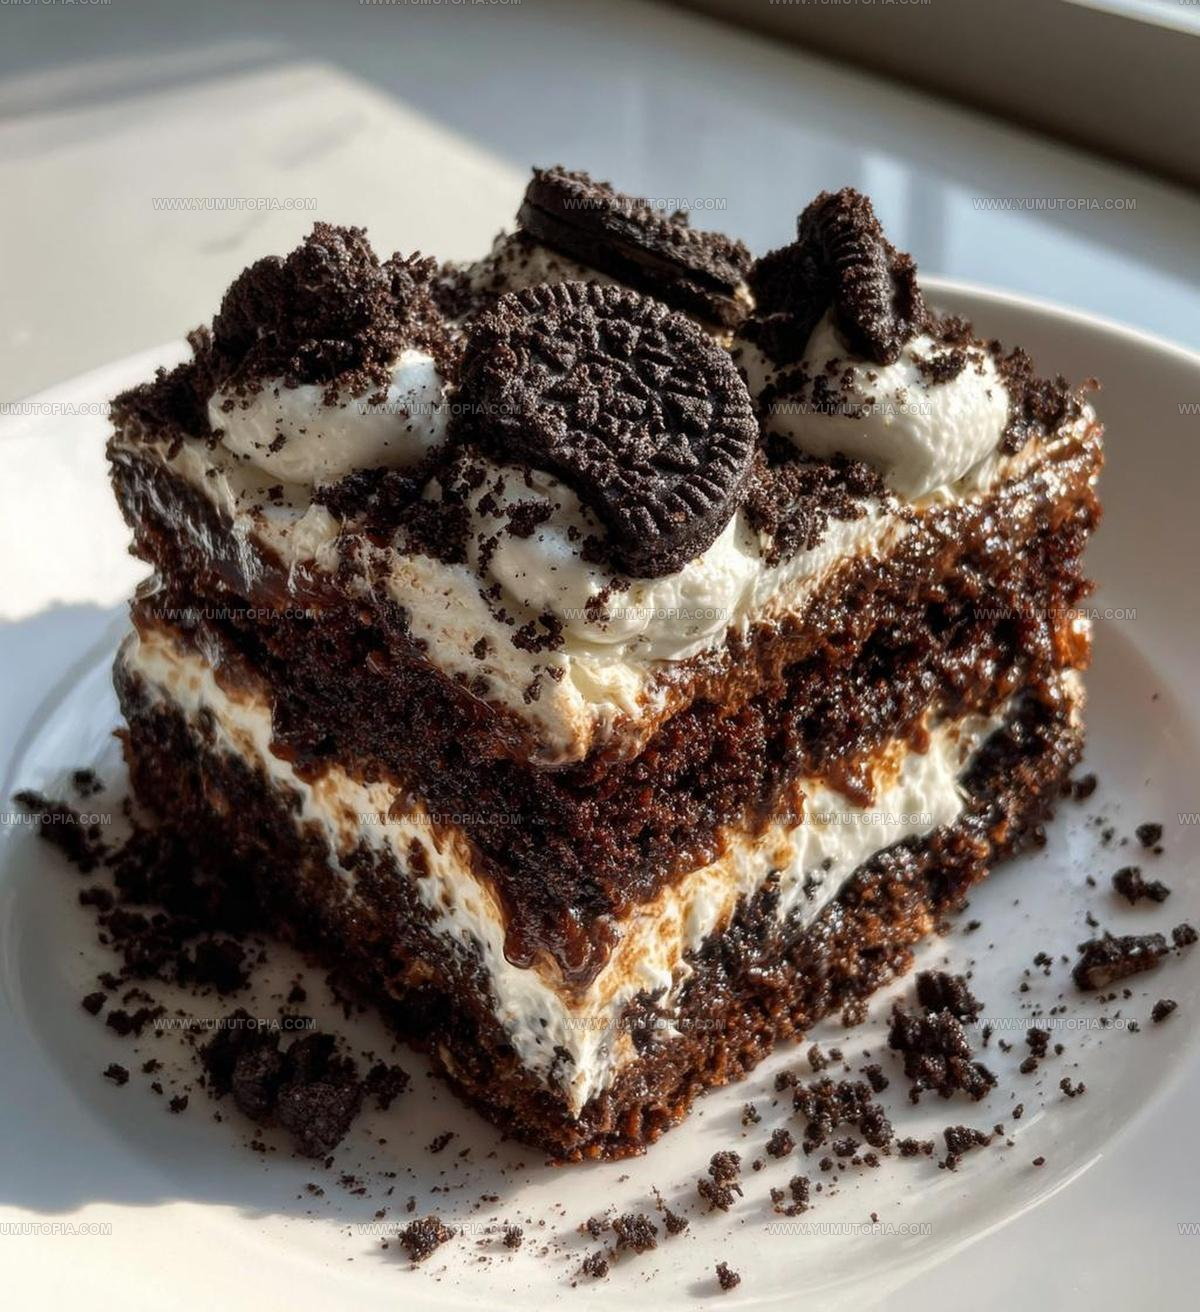
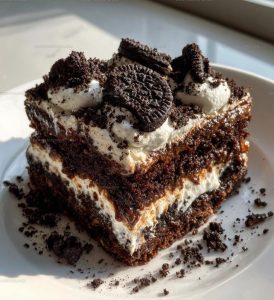
Foolproof Oreo Dump Cake Recipe Everyone Adores
Oreo dump cake recipe fans know that some of the best desserts come together with minimal fuss and maximum flavor.
This sweet treat unlocks all the satisfaction of a decadent chocolate dessert without hours of preparation or complicated techniques.
It’s become a go-to choice for potlucks, family gatherings, and weeknight cravings when something rich and comforting sounds absolutely perfect.
Chocolate lovers will appreciate how each bite combines cake-like texture with those beloved cookie flavors everyone recognizes instantly.
It works beautifully for celebrations or casual nights at home when you need something sweet to round out dinner.
The simplicity means less time measuring and mixing, leaving more moments to actually enjoy with the people around the table.
Pull out a baking dish and get that oven preheated because dessert just became wonderfully uncomplicated.
What Makes Oreo Dump Cake So Effortless
All Ingredients Needed for Oreo Dump Cake
Cake Base:Oreo Layer:Creamy Topping:Binding Ingredient:Core Kitchen Tools for Oreo Dump Cake
Simple Instructions For Oreo Dump Cake
Prepare the Oven
Crank up your oven to exactly 350°F. Grab a 9×13 inch baking dish and give it a generous spray of cooking oil or rub it down with butter so nothing sticks.
Create the Oreo Base
Crumble those 15 oz of Oreos into delightful chunks. Spread half of the crushed cookies across the bottom of your prepared baking dish, creating a tasty cookie foundation.
Mix the Cake Batter
Grab that chocolate cake mix and follow the package instructions carefully. You’ll need to combine the mix with the required ingredients – typically water, eggs, and oil. Whisk everything together until the batter is smooth and free of lumps.
Pour the Batter
Gently pour the chocolate cake batter over the crushed Oreo layer. Make sure the batter covers the cookies evenly across the entire dish.
Prepare Cream Cheese Topping
In a separate mixing bowl, blend the softened 8 oz cream cheese and 1 cup of powdered sugar.
Beat until the mixture becomes completely smooth and creamy.
Add Cream Cheese Dollops
Use a spoon to drop small dollops of the cream cheese mixture across the top of the cake batter. Try to distribute them evenly so each bite gets a bit of creamy goodness.
Final Oreo Sprinkle
Scatter the remaining crushed Oreo cookies over the entire surface of the cake.
Butter Drizzle
Melt 1/2 cup of unsalted butter and drizzle it carefully over the top of the cake.
Bake to Perfection
Slide the baking dish into the preheated oven and bake for exactly 30-35 minutes. Check doneness by inserting a toothpick – it should come out clean when the cake is ready.
Cool and Serve
Allow the cake to cool completely before cutting. This helps the layers set and makes serving much easier.
Easy Notes for Classic Oreo Dump Cake
Oreo Dump Cake With Layered Variations
Best Ways To Serve Oreo Dump Cake
Oreo Dump Cake Storage Tips
Oreo Dump Cake FAQs
Can I use a different type of cookie instead of Oreos?
Absolutely! Chocolate sandwich cookies work great, so feel free to swap in your favorite brand or flavor.
How do I know when the cake is completely done baking?
Check the center with a toothpick – when it comes out clean without wet batter, your cake is ready to remove from the oven.
What if my cream cheese is still cold?
Let the cream cheese sit at room temperature for about 30 minutes before mixing to ensure a smooth, lump-free texture.
Should the cake mix be prepared exactly as the box instructs?
Follow the package directions precisely for the best cake consistency and texture.
Can this dessert be made ahead of time?
Prepare the cake up to a day before and store covered in the refrigerator, then bake when you’re ready to serve.
Do I need any special equipment to make this recipe?
Just a basic mixing bowl, baking dish, and standard kitchen tools – nothing complicated required.
Oreo-Stuffed Dump Cake Recipe
- Total Time: 45-50 minutes
- Yield: 8 1x
Description
Oreo dump cake layers rich chocolate and crunchy cookies into a decadent dessert. Simple to make and big on flavor, it’s always a hit.
Ingredients
Main Ingredients:
- 1 box chocolate cake mix
- 1 package (15 oz) Oreos, crushed
- 1 cup milk
Supporting Dairy Ingredients:
- ½ cup unsalted butter, melted
- 1 package (8 oz) cream cheese, softened
- 1 cup powdered sugar
Instructions
- Heat your oven to precisely 350°F and coat a 9×13 inch baking dish with cooking spray.
- Scatter 1 cup of crushed Oreos evenly across the bottom of the dish.
- Prepare the chocolate cake mix with 1 cup of milk, following package directions carefully.
- Gently pour the entire cake batter over the first layer of crushed Oreos.
- Blend 8 ounces of softened cream cheese with 1 cup of powdered sugar until completely smooth.
- Dollop small spoonfuls of the cream cheese mixture randomly across the cake batter’s surface.
- Sprinkle the remaining 1 cup of crushed Oreos over the cream cheese drops.
- Drizzle ½ cup of melted unsalted butter across the entire top layer.
- Slide the dish into the preheated 350°F oven and bake for exactly 35 minutes.
- Check doneness by inserting a toothpick into the center – it should come out clean.
- Allow the cake to rest and cool completely before cutting into squares.
- Serve at room temperature for the best texture and flavor.
Notes
- Use room temperature cream cheese for smoother mixing and easier spreading on the cake batter.
- Crush Oreos into different sizes for varied texture – some fine crumbs and some larger chunks create an interesting mouthfeel.
- For a gluten-free version, swap regular cake mix and Oreos with their gluten-free alternatives.
- Make sure to cool the cake completely before cutting to help the cream cheese layer set and prevent crumbling.
- Prep Time: 15 minutes
- Cook Time: 30-35 minutes
- Category: Dump Cakes
- Method: Baking
- Cuisine: American
Nutrition
- Serving Size: 8
- Calories: 474 kcal
- Sugar: 44 g
- Sodium: 210 mg
- Fat: 25 g
- Saturated Fat: 14 g
- Unsaturated Fat: 9 g
- Trans Fat: 0.5 g
- Carbohydrates: 59 g
- Fiber: 2 g
- Protein: 4 g
- Cholesterol: 50 mg
Logan Lemaster
Founder & Culinary Innovator
Expertise
Recipe Development and Innovation, Menu Design and Optimization, Fine Dining Techniques, Ingredient Pairing and Flavor Science
Education
Metropolitan Culinary Arts Institute
Logan’s culinary journey kicked off in his vibrant Chicago family kitchen, where fresh, seasonal ingredients and bold flavors were always front and center.
After graduating from the Metropolitan Culinary Arts Institute in Arlington, Virginia, and honing his skills in renowned restaurants, Logan mastered the art of blending classic techniques with exciting, modern twists.
His kitchen is a dynamic lab for flavor exploration. Through Yum Utopia, Logan aims to empower you to cook with both confidence and creativity, turning simple ingredients into spectacular meals.