
Creamy Peanut Butter Cheesecake in a Cup Recipe
Peanut butter cheesecake in a cup serves up all the creamy decadence of a classic dessert without any fuss or special equipment.
Single-serving treats have become increasingly popular for good reason, they offer portion control, quick preparation, and minimal cleanup.
The combination works beautifully because it balances richness with just enough sweetness to satisfy cravings.
Whether you need a last-minute dessert for unexpected company or simply want something special after dinner, individual portions always feel more personal and thoughtful.
No oven is required, which means you can enjoy a homemade dessert even on the hottest summer days.
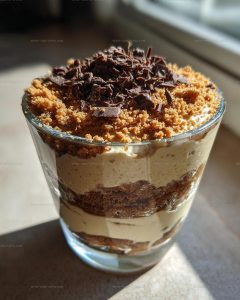
The presentation looks impressive in clear glasses or mason jars, making them perfect for casual gatherings or quiet nights at home.
When you want something that feels indulgent but doesn’t require hours in the kitchen, this recipe will become one of your most reliable options.
Why Peanut Butter Cheesecake in Cup Feels Effortless
Everything Used in Peanut Butter Cheesecake Cups
Base Ingredients:Flavor Enhancers:Topping and Texture:What Tools Make Peanut Butter Cheesecake Cups
No-Bake Instructions for Peanut Butter Cheesecake Cups
Cream Cheese Prep
Grab your 8 oz block of cream cheese and use an electric mixer to beat it until super smooth and creamy. Make sure the cream cheese is at room temperature so it blends perfectly without any lumps.
Flavor Fusion
In the same mixing bowl, add these delicious ingredients:
Blend everything together until the mixture looks completely combined and silky.
Whipped Cream Boost
Gently fold 1 cup of whipped cream into the peanut butter mixture. Use slow, careful strokes to keep the cream light and fluffy. The goal is to create a soft, airy texture that melts in your mouth.
Graham Cracker Base
Sprinkle 1/4 cup of crushed graham crackers into the bottom of your serving cups. Press them down lightly to create a crunchy foundation for the creamy layers.
Layer and Build
Carefully spoon the peanut butter cheesecake mixture over the graham cracker layer. Fill each cup about 3/4 full, creating a smooth surface.
Chocolate Finish
Scatter some chocolate shavings on top of each cup for a beautiful and tasty decoration.
Chill and Set
Place the cups in the refrigerator for exactly 30 minutes at 40°F. This helps the cheesecake set and develops the perfect texture and flavor.
Best Tips for Peanut Butter Cheesecake in a Cup
Peanut Butter Cheesecake Cup Variations to Try
How to Serve Peanut Butter Cheesecake Cups
Smart Storage Advice for Peanut Butter Cheesecake Cups
Peanut Butter Cheesecake in a Cup Questions
Can I use crunchy peanut butter instead of creamy?
Crunchy peanut butter works great and adds extra texture to the cheesecake. Just make sure to mix it thoroughly so the cream cheese stays smooth.
How do I get the layers to look perfect?
Gently spoon each layer and use the back of a spoon to create clean, even layers. Take your time and work slowly for the best presentation.
Is this dessert gluten-free?
Not as written. The graham crackers contain wheat. You can swap them with gluten-free graham-style crackers or crushed gluten-free cookies to make the recipe safe for those with gluten sensitivities.
Can I make this dessert ahead of time?
Absolutely! Prepare the cups up to two days before serving. Keep them covered in the refrigerator until you’re ready to enjoy.
What if my cream cheese is too cold?
Let the cream cheese sit at room temperature for about 30 minutes before mixing. This helps create a smoother, easier-to-blend consistency.
Peanut Butter Cheesecake In A Cup Recipe
- Total Time: 10 minutes
- Yield: 2 1x
Description
Creamy Peanut Butter Cheesecake in a Cup delivers pure dessert bliss in just minutes, packed with rich flavor and smooth texture. Whip up this quick treat when your sweet tooth craves something special without complicated baking.
Ingredients
Main Ingredients:
- 8 oz cream cheese
- ½ cup peanut butter
- 1 cup whipped cream
Supporting Ingredients:
- ½ cup powdered sugar
- ½ teaspoon vanilla extract
Garnish:
- ¼ cup crushed graham crackers
- Chocolate shavings
Instructions
- Pull your softened 8 oz cream cheese into a medium mixing bowl and whip until completely silky and free of lumps.
- Incorporate ½ cup peanut butter, ½ cup powdered sugar, and ½ tsp vanilla extract into the cream cheese. Blend thoroughly until the mixture becomes uniform and creamy.
- Gently fold 1 cup whipped cream into the peanut butter mixture, creating a light and airy texture. Stir carefully to maintain the cream’s volume.
- Sprinkle ¼ cup crushed graham crackers as the first layer at the bottom of your serving cups, creating a delightful crunchy foundation.
- Carefully spoon the peanut butter cream mixture over the graham cracker layer, filling each cup about ¾ full.
- Delicately garnish the top with chocolate shavings, distributing them evenly across the surface.
- Refrigerate the cups at 40°F for exactly 30 minutes to set the cheesecake and enhance the flavors.
- Remove from the refrigerator just before serving to ensure the perfect chilled consistency.
Notes
- Softening cream cheese at room temperature helps create a smoother, lump-free cheesecake filling.
- Fold whipped cream gently to maintain its airy texture and prevent deflating the mixture.
- For a gluten-free version, swap graham crackers with gluten-free cookies or crushed nuts.
- Customize your dessert by using dark, milk, or white chocolate shavings on top for different flavor profiles.
- Prep Time: 10 minutes
- Cook Time: 0 minutes
- Category: Cheesecakes
- Method: Chilling
- Cuisine: American
Nutrition
- Serving Size: 2
- Calories: 870 kcal
- Sugar: 38 g
- Sodium: 460 mg
- Fat: 74 g
- Saturated Fat: 25 g
- Unsaturated Fat: 40 g
- Trans Fat: 1 g
- Carbohydrates: 30 g
- Fiber: 3 g
- Protein: 17 g
- Cholesterol: 95 mg
Madison Wyman
Recipe Developer & Food Storyteller
Expertise
Recipe Research and Adaptation, Food Writing and Cultural Storytelling, Sustainable and Ethical Sourcing, Dietary Adaptations (e.g., gluten-free, plant-based)
Education
Oregon Health & Science University
Portland Community College
Madison’s passion for flavor and culture ignited amidst the rich Southern cooking traditions of her upbringing, where cherished family recipes told delicious tales.
Armed with a Master’s in Food Systems and Society from Oregon Health & Science University and a Culinary Arts Certificate from Portland Community College, Madison truly excels at transforming rich, intricate flavors into dishes that are both approachable and heartfelt.
For her, cooking is a vibrant blend of science, art, and heritage – a powerful way to connect us to our roots and each other. Her recipes invite you to delve deeper, uncovering the fascinating stories woven into every ingredient.