Creamy Peanut Butter Pie Recipe That Melts Smooth
Peanut butter pie captures that perfect balance of rich, creamy satisfaction and crowd-pleasing sweetness that makes any occasion feel special.
Whether it’s a summer potluck, holiday gathering, or just because, everyone around the table lights up when dessert arrives.
The combination works beautifully for both casual weeknight treats and impressive dinner party finales.
What makes it so appealing is how effortlessly it wins over kids and adults, creating one of those rare desserts that genuinely pleases everyone.
No complicated techniques stand between you and a showstopping result that looks as fantastic as it tastes.
The cool, smooth texture paired with nutty flavor creates pure comfort in every bite.
Make it once and watch it become the most requested dessert in rotation.
Why Peanut Butter Pie Is a Crowd Favorite
What Ingredients Build Peanut Butter Pie
Main Ingredients:Crust:Topping:Refrigeration:Pie Prep Tools for Peanut Butter Pie
Peanut Butter Pie Step-by-Step Preparation Instructions
Prepare Mixing Base
Grab a large mixing bowl and toss in 1 cup of peanut butter and 1 cup of cream cheese. Use an electric mixer to blend these together until they’re super smooth and creamy. You’ll want to mix for about 2-3 minutes so there are no lumps.
Add Sweet Powder
Sprinkle 1 cup of powdered sugar into the peanut butter and cream cheese mixture. Mix again until everything combines perfectly. The texture should look silky and consistent.
Fold in Whipped Cream
Carefully fold 1 cup of whipped cream into the mixture. Use a spatula and gentle folding motions to keep the mixture light and airy. Your goal is to create a fluffy, soft texture without deflating the whipped cream.
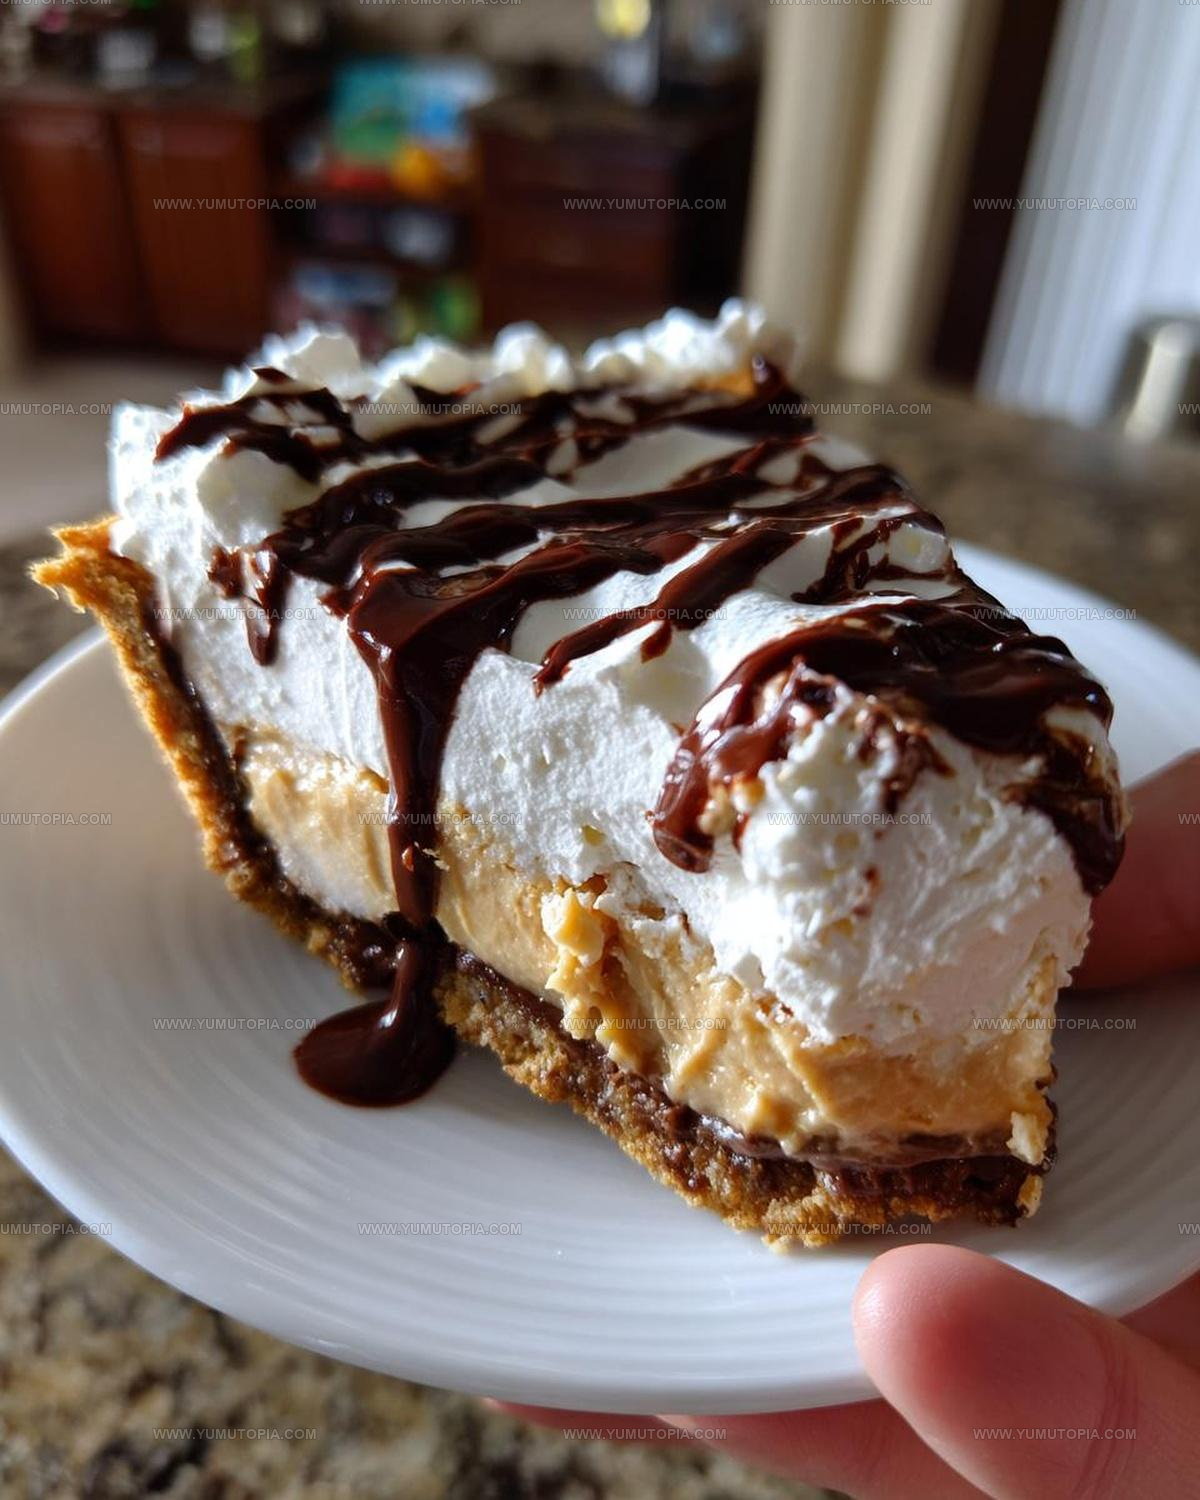
Fill Graham Cracker Crust
Take your prepared graham cracker crust and slowly pour the creamy mixture into it. Spread the filling evenly across the crust, making sure to reach all the edges. Smooth the top with a spatula so it looks neat and tidy.
Drizzle Chocolate Decoration
Grab your chocolate syrup and drizzle 1/4 cup in a zigzag pattern across the top of the pie. This adds a nice visual touch and extra flavor dimension.
Chill and Set
Place the pie in the refrigerator for exactly 4 hours. The cool temperature will help the pie set and develop a perfect, firm texture. When the time is up, your pie is ready to slice and serve.
Proven Tips for Peanut Butter Pie
Which Peanut Butter Pie Variations to Try
Serving Suggestions for Peanut Butter Pie
Best Storage for Peanut Butter Pie
Peanut Butter Pie Frequently Asked Questions
Can I use low-fat cream cheese?
Definitely! Low-fat cream cheese works perfectly and helps reduce calories without changing the delicious flavor.
What if my peanut butter is too thick?
Warm it slightly in the microwave for 15-20 seconds to soften, making it easier to blend smoothly with cream cheese.
Do I need a stand mixer for this recipe?
No, a hand mixer or even a whisk will work great for mixing the ingredients until they’re creamy and well combined.
Can this dessert be made ahead of time?
Absolutely! The pie actually tastes better when chilled overnight, so it’s an excellent make-ahead dessert for parties.
Is this pie good for people who can’t eat gluten?
Swap the graham cracker crust for a gluten-free version, and the entire recipe becomes celiac-friendly.
How long does the pie stay fresh?
When covered and refrigerated, your peanut butter pie will taste amazing for 3-4 days after preparing.

Peanut Butter Pie Recipe
- Total Time: 10 minutes
- Yield: 8 to 10 1x
Description
No-bake peanut butter pie layers a crunchy chocolate crust with creamy, dreamy filling like a peanut butter cup in slice form. Fifteen minutes of prep, then chill and enjoy.
Ingredients
Pie Base:
- 1 graham cracker crust
Primary Ingredients:
- 1 cup peanut butter
- 1 cup cream cheese
- 1 cup whipped cream
Supporting Ingredients:
- 1 cup powdered sugar
- ¼ cup chocolate syrup
Instructions
- Grab a large mixing bowl and combine 1 cup of peanut butter with 1 cup of cream cheese, using an electric mixer to create a silky, lump-free blend.
- Gradually incorporate 1 cup of powdered sugar into the mixture, beating until the texture becomes uniformly creamy and light.
- Tenderly fold 1 cup of whipped cream into the peanut butter base, ensuring a soft, airy consistency without deflating the whipped cream.
- Transfer the entire mixture into your prepared graham cracker crust, spreading it evenly with a spatula to create a smooth surface.
- Artfully drizzle ¼ cup of chocolate syrup across the top of the pie, creating delicate swirls or patterns that catch the eye.
- Place the pie in the refrigerator and chill for a minimum of 4 hours, allowing the filling to set completely and develop a rich, firm texture.
- Before serving, let the pie rest at room temperature for 10 minutes to soften slightly and make slicing easier.
Notes
- Ensure cream cheese is at room temperature to prevent lumps and create a silky-smooth filling.
- Opt for creamy peanut butter for the most consistent texture, avoiding natural varieties that separate.
- When folding whipped cream, use gentle circular motions to maintain the airy volume and prevent deflating the mixture.
- For a gluten-free version, swap the graham cracker crust with an almond flour or crushed nut-based alternative.
- Prep Time: 10 minutes
- Cook Time: 0 minutes
- Category: Pies
- Method: Chilling
- Cuisine: American
Nutrition
- Serving Size: 8 to 10
- Calories: 395 kcal
- Sugar: 23 g
- Sodium: 180 mg
- Fat: 32 g
- Saturated Fat: 10 g
- Unsaturated Fat: 20 g
- Trans Fat: 0.5 g
- Carbohydrates: 21 g
- Fiber: 2 g
- Protein: 9 g
- Cholesterol: 40 mg
Logan Lemaster
Founder & Culinary Innovator
Expertise
Recipe Development and Innovation, Menu Design and Optimization, Fine Dining Techniques, Ingredient Pairing and Flavor Science
Education
Metropolitan Culinary Arts Institute
Logan’s culinary journey kicked off in his vibrant Chicago family kitchen, where fresh, seasonal ingredients and bold flavors were always front and center.
After graduating from the Metropolitan Culinary Arts Institute in Arlington, Virginia, and honing his skills in renowned restaurants, Logan mastered the art of blending classic techniques with exciting, modern twists.
His kitchen is a dynamic lab for flavor exploration. Through Yum Utopia, Logan aims to empower you to cook with both confidence and creativity, turning simple ingredients into spectacular meals.