
Flaky Puff Pastry Cream Horns Recipe for Elegant Gatherings
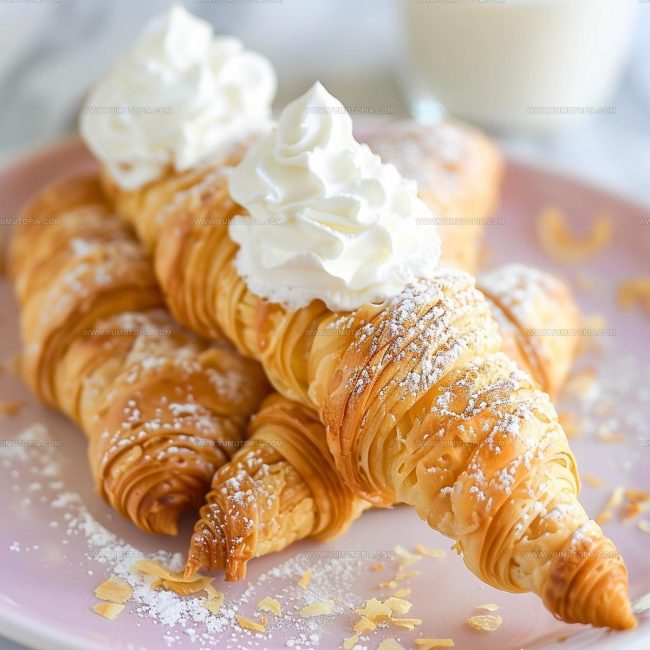
Puff pastry cream horns bring old-world bakery charm right to any table with their delicate, flaky shells and smooth filling.
These cone-shaped treats have been delighting dessert lovers across Europe for generations, and it’s easy to see why they remain so popular today.
The crisp, golden exterior gives way to a lusciously creamy center that feels both fancy and comforting at the same time.
Perfect for afternoon tea, special celebrations, or simply when you want something a bit more elegant than everyday sweets, they strike that ideal balance between impressive presentation and approachable flavor.
Making them at home means you can enjoy bakery-style results without the premium price tag.
The process is surprisingly straightforward, and the reward is a platter of stunning pastries that look like you spent hours in a professional kitchen.
Roll up those sleeves and prepare to fill the kitchen with the irresistible aroma of buttery, golden pastry.
Standout Features Of Puff Pastry Cream Horns

Core Ingredients for Puff Pastry Cream Horns
Pastry Base:Filling Ingredients:Basic Tools for Cream Horns
Steps for Making Puff Pastry Cream Horns
Prepare Oven and Baking Sheet
Set your oven to 400°F. Grab a baking sheet and line it with parchment paper so nothing sticks.
Prepare Pastry Dough
Dust your countertop with a light sprinkle of flour. Unroll the 2 boxes of puff pastry dough and slice each sheet into 4 even strips. Your strips should look neat and uniform.
Shape Pastry Strips
Take your cream horn molds or make cone shapes from foil. Wrap each pastry strip around the mold, making sure the edges overlap slightly to create a secure horn shape.
Bake Pastry Shells
Place the wrapped molds on your prepared baking sheet. Slide them into the 400°F oven and bake for exactly 12 minutes until they turn a light golden brown. After baking, let the shells cool right on the molds for 20 minutes.
Remove Pastry Shells
Carefully slide the pastry shells off the molds. They should now be crisp and ready for filling.
Create Cream Filling
Grab your mixing bowl and beat together 1/2 cup softened unsalted butter and 1/2 cup vegetable shortening until smooth. Then add the filling ingredients:
Whip everything until the mixture becomes light and fluffy.
Fill Pastry Shells
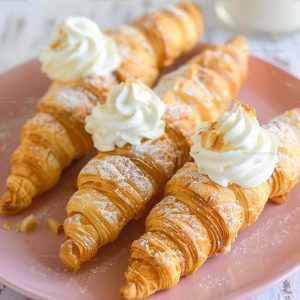
Using a piping bag or spoon, fill the cooled pastry shells from both ends. Make sure each horn gets a generous amount of cream filling.
Store and Serve
These cream horns can sit happily at room temperature for up to 3 days. Just keep them in a covered container to maintain their freshness.
Good To Know Before Cooking Puff Pastry Cream Horns
Easy Variations for Puff Pastry Cream Horns
Serving Notes For Puff Pastry Cream Horns
Proper Storage For Puff Pastry Cream Horns
Puff Pastry Cream Horns Helpful FAQs
Can I make cream horns without special molds?
Absolutely! Aluminum foil works perfectly. Wrap cone-shaped foil tightly and spray with cooking spray before wrapping pastry strips.
How thin should pastry strips be when rolling?
Aim for about 1/8 inch thickness. Too thick prevents crisp, delicate texture. Too thin risks tearing during wrapping.
What if my pastry cracks while wrapping?
Work quickly and gently. Cold pastry tears easier, so keep it slightly warm. Patch small cracks with extra pastry strips before baking.
Does the filling need refrigeration?
Not immediately. Your cream filling stays fresh at room temperature for 2-3 days. Refrigerate if kitchen is very warm.
Can cream horns be frozen?
Absolutely. Wrap unfilled shells carefully in plastic. Freeze up to one month. Thaw at room temperature before filling.
How do pastry shells stay crisp after filling?
Pipe filling just before serving. Waiting too long makes shells soft. Quick filling keeps that perfect crunch.
Puff Pastry Cream Horns Recipe
- Total Time: 47 minutes
- Yield: 8 1x
Description
Cream horns from France dance with delicate layers of buttery puff pastry wrapped around silky vanilla custard that melts in your mouth. Crisp pastry and smooth cream come together in a classic French dessert perfect for sharing with friends during afternoon tea.
Ingredients
Main Ingredients:
- 2 boxes puff pastry dough
- 3 cups marshmallow fluff
- ½ cup unsalted butter
- ½ cup vegetable shortening
Supporting Ingredients:
- 3 cups powdered sugar
- 1 teaspoon vanilla extract
Liquid Ingredients:
- 1 tablespoon water
- 2 tablespoons heavy cream
Instructions
- Heat oven to 400°F. Cover a baking sheet with parchment paper for easy cleanup.
- Dust your work surface with flour. Roll out both thawed puff pastry sheets and slice each into 4 equal strips.
- Gently wrap each pastry strip around a cream horn mold or foil cone, ensuring a slight overlap to secure the shape.
- Slide the pastry-covered molds into the 400°F oven. Bake for precisely 12 minutes until the horns turn a delicate golden brown.
- Remove horns from oven and let them cool directly on the molds for 20 minutes. This helps maintain their curved shape.
- Carefully slide horns off the molds once completely cooled. Set them aside while preparing the filling.
- In a mixing bowl, combine ½ cup softened butter and ½ cup vegetable shortening. Blend until smooth and creamy.
- Add 3 cups powdered sugar, 3 cups marshmallow fluff, 1 teaspoon vanilla extract, and 2 tablespoons heavy cream to the butter mixture.
- Beat the filling ingredients for 3-4 minutes until light and fluffy, creating a silky smooth texture.
- Transfer the filling to a piping bag. Fill each pastry horn from both ends, ensuring an even distribution.
- Arrange filled cream horns on a serving plate. They can be enjoyed at room temperature for up to 3 days.
Notes
- Ensure puff pastry is cold and firm for the cleanest, most precise cuts when shaping the horns.
- Dust your work surface lightly with flour to prevent the delicate pastry from sticking and tearing.
- If cream horn molds aren’t available, create your own using aluminum foil wrapped tightly into cone shapes.
- For a gluten-free version, swap traditional puff pastry with a gluten-free alternative made from rice or almond flour.
- Prep Time: 15 minutes
- Cook Time: 12 minutes
- Category: Pastries
- Method: Baking
- Cuisine: French
Nutrition
- Serving Size: 8
- Calories: 609
- Sugar: 61 g
- Sodium: 42 mg
- Fat: 43 g
- Saturated Fat: 18 g
- Unsaturated Fat: 22 g
- Trans Fat: 0.5 g
- Carbohydrates: 59 g
- Fiber: 0 g
- Protein: 1 g
- Cholesterol: 41 mg
Madison Wyman
Recipe Developer & Food Storyteller
Expertise
Recipe Research and Adaptation, Food Writing and Cultural Storytelling, Sustainable and Ethical Sourcing, Dietary Adaptations (e.g., gluten-free, plant-based)
Education
Oregon Health & Science University
Portland Community College
Madison’s passion for flavor and culture ignited amidst the rich Southern cooking traditions of her upbringing, where cherished family recipes told delicious tales.
Armed with a Master’s in Food Systems and Society from Oregon Health & Science University and a Culinary Arts Certificate from Portland Community College, Madison truly excels at transforming rich, intricate flavors into dishes that are both approachable and heartfelt.
For her, cooking is a vibrant blend of science, art, and heritage – a powerful way to connect us to our roots and each other. Her recipes invite you to delve deeper, uncovering the fascinating stories woven into every ingredient.