
Red Velvet Thumbprint Cookies Recipe with Smooth Cream Cheese
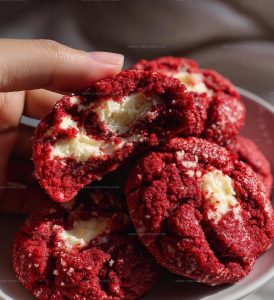
Red velvet thumbprint cookies with cream cheese combine two beloved desserts into one delightful treat that works for any occasion.
The soft, tender texture paired with a smooth filling creates an unforgettable contrast that keeps everyone coming back for more.
Whether hosting a gathering or simply enjoying a quiet afternoon at home, having something special to serve makes all the difference.
The beautiful color and elegant presentation make them look impressive without requiring advanced baking skills.
They’re perfect for celebrations, holiday parties, or when something sweet sounds just right.
What makes them so appealing is how they balance richness with lightness in every bite.
Best Reasons Red Velvet Thumbprint Cookies With Cream Cheese Pop
Red Velvet Thumbprint Cookies with Cream Cheese Ingredients
Cookie Base Ingredients:Filling Ingredients:Which Tools Are Essential for Red Velvet Thumbprint Cookies?
Preparation Guide for Red Velvet Thumbprint Cookies with Cream Cheese

Warm Up the Oven
Set your oven to exactly 350°F. Grab a baking sheet and line it with parchment paper for easy cleanup.
Combine Dry Ingredients
Whisk together the dry ingredients in a medium bowl:
Cream the Butter and Sugar
In a separate large bowl, beat the butter and sugar until they’re light and fluffy. You’ll want to use:
Add Wet Ingredients
Blend in these ingredients until smooth:
Mix the Dough
Slowly add the dry ingredient mixture to the wet ingredients. Stir until everything comes together into a soft, red dough.
Shape the Cookies
Roll the dough into small balls, about 1 inch in diameter. Place them on the prepared baking sheet, leaving some space between each cookie.
Create Cookie Centers
Use your thumb or the back of a small spoon to make a gentle indentation in the center of each cookie ball.
Bake the Cookies
Pop the baking sheet into the preheated oven. Bake for exactly 10-12 minutes until the edges look set.
Cool the Cookies
Remove the cookies from the oven and let them cool completely on a wire rack.
Prepare the Filling
In a small bowl, mix the cream cheese filling:
Blend until smooth and creamy.
Fill the Cookies
Spoon the cream cheese mixture into the center of each cooled cookie. Make sure to fill them generously but neatly.
Best Tips for Red Velvet Thumbprint Cookies
Red Velvet Thumbprint Cookies With Cream Cheese Alternative Versions
Red Velvet Thumbprint Cookies With Cream Cheese Serving Ideas
Red Velvet Thumbprint Cookies Storage Tips
Red Velvet Thumbprint Cookies With Cream Cheese FAQs
Can I make these cookies ahead of time?
Absolutely! Prepare the dough, shape your cookies, and refrigerate for up to 3 days before baking. This helps the flavors develop and makes your baking day easier.
What if I do not have red food coloring?
No worries! You can use natural alternatives like beet juice or skip the coloring altogether. The cookies will still taste delicious and have a rich cocoa flavor.
How do I prevent my thumbprint from losing shape during baking?
After making the indentation, chill your cookie dough for 15 minutes before baking. This helps the cookies hold their shape perfectly and prevents spreading.
Can these cookies be frozen?
Definitely! Freeze baked and filled cookies in a single layer, then transfer to a freezer container. They will stay fresh for about 2 weeks.
Do I need a special tool to make the thumbprint?
Not at all! Your clean thumb works great, but the back of a small measuring spoon can create an equally perfect indentation.
What if my cream cheese filling seems too runny?
Simply add a bit more powdered sugar to thicken the mixture. Mix gradually until you reach your desired consistency.
Red Velvet Thumbprint Cookies With Cream Cheese Recipe
- Total Time: 25-27 minutes
- Yield: 12 1x
Description
Red velvet thumbprint cookies with cream cheese are perfect for holiday baking when you want something special and sweet. These charming treats combine rich cocoa flavor with creamy filling, making your cookie platter absolutely delightful.
Ingredients
Main Ingredients:
- 1 cup all-purpose flour
- ½ cup cocoa powder
- ½ cup unsalted butter
- 1 cup sugar
- 1 large egg
Flavor Enhancers:
- 1 teaspoon vanilla extract
- 1 tablespoon red food coloring
- ½ teaspoon salt
Filling:
- ½ cup cream cheese
- ¼ cup powdered sugar
Instructions
- Heat the oven to 350F and line a baking sheet with parchment paper for easy cleanup.
- Whisk 1 cup flour, ½ cup cocoa powder, and ½ teaspoon salt in a medium bowl until completely combined.
- Cream ½ cup softened butter with 1 cup sugar using an electric mixer until the mixture looks fluffy and light.
- Blend 1 large egg, 1 teaspoon vanilla extract, and 1 tablespoon red food coloring into the butter mixture until smooth.
- Gradually fold the dry ingredients into the wet ingredients, mixing until a consistent dough forms.
- Shape the dough into 1-inch balls, placing them 2 inches apart on the prepared baking sheet.
- Press your thumb gently into the center of each dough ball, creating a small well for filling.
- Bake the cookies for exactly 11 minutes at 350F, watching to ensure edges are set but centers remain soft.
- Remove from the oven and let the cookies cool completely on a wire rack for 20 minutes.
- Whip ½ cup cream cheese with ¼ cup powdered sugar until smooth and creamy.
- Carefully spoon the cream cheese mixture into the center indentations of each cooled cookie.
Notes
- Chill the dough for 30 minutes before rolling to prevent sticky hands and help cookies maintain their shape.
- Use a rounded measuring spoon or the back of a small spoon to create perfect indentations in the cookie centers.
- For a gluten-free version, swap regular flour with a 1:1 gluten-free baking blend and check that your cocoa powder is certified gluten-free.
- Store these cookies in an airtight container in the refrigerator for up to 5 days to keep the cream cheese filling fresh and creamy.
- Prep Time: 15 minutes
- Cook Time: 10-12 minutes
- Category: Cookies
- Method: Baking
- Cuisine: American
Nutrition
- Serving Size: 12
- Calories: 193 kcal
- Sugar: 14 g
- Sodium: 92 mg
- Fat: 11 g
- Saturated Fat: 6 g
- Unsaturated Fat: 4 g
- Trans Fat: 0.3 g
- Carbohydrates: 22 g
- Fiber: 1 g
- Protein: 2 g
- Cholesterol: 31 mg
Logan Lemaster
Founder & Culinary Innovator
Expertise
Recipe Development and Innovation, Menu Design and Optimization, Fine Dining Techniques, Ingredient Pairing and Flavor Science
Education
Metropolitan Culinary Arts Institute
Logan’s culinary journey kicked off in his vibrant Chicago family kitchen, where fresh, seasonal ingredients and bold flavors were always front and center.
After graduating from the Metropolitan Culinary Arts Institute in Arlington, Virginia, and honing his skills in renowned restaurants, Logan mastered the art of blending classic techniques with exciting, modern twists.
His kitchen is a dynamic lab for flavor exploration. Through Yum Utopia, Logan aims to empower you to cook with both confidence and creativity, turning simple ingredients into spectacular meals.